
DVJ-X1 - DJ CD player PIONEER - Free user manual and instructions
Find the device manual for free DVJ-X1 PIONEER in PDF.

User questions about DVJ-X1 PIONEER
0 question about this device. Answer the ones you know or ask your own.
Ask a new question about this device
Download the instructions for your DJ CD player in PDF format for free! Find your manual DVJ-X1 - PIONEER and take your electronic device back in hand. On this page are published all the documents necessary for the use of your device. DVJ-X1 by PIONEER.
USER MANUAL DVJ-X1 PIONEER
Operating Instructions
Mode d'emploi
Bedienungsanleitung
The lightning flash with arrowhead symbol, within an equilateral triangle, is intended to alert the user to the presence of uninsulated "dangerous voltage" within the product's enclosure that may be of sufficient magnitude to constitute a risk of electric shock to persons.
CAUTION
RISK OF ELECTRIC SHOCK
DO NOT OPEN

The exclamation point within an equilateral triangle is intended to alert the user to the presence of important operating and maintenance (servicing) instructions in the literature accompanying the appliance.
D3-4-2-1-1 En-A
IMPORTANT

Replacement and mounting of an AC plug on the power supply cord of this unit should be performed only by qualified service personnel.
IMPORTANT
FOR USE IN THE UNITED
KINGDOM
The wires in this mains lead are coloured in
accordance with the following code: Blue Neutral
If the plug provided is unsuitable for your socket outlets, the plug must be cut off and a suitable plug fitted.
The cut-off plug should be disposed of and must not be inserted into any 13 amp socket as this can result in electric shock. The plug or adaptor or the distribution panel should be provided with 5 A fuse. As the colours of the wires in the mains lead of this appliance may not correspond with coloured markings identifying the terminals in your plug, proceed as follows:
The wire which is coloured blue must be connected to the terminal which is marked with the letter N or coloured black.
The wire which is coloured brown must be connected to the terminal which is marked with the letter L or coloured red.
Do not connect either wire to the earth terminal of a three pin plug.
After replacing or changing a fuse, the fuse cover in the plug must be replaced with a fuse cover which corresponds to the colour of the insert in the base of the plug or the word that is embossed on the base of the plug, and the appliance must not be used without a fuse cover. If lost replacement fuse covers can be obtained from your dealer. Only 5 A fuses approved by B.S.I or A.S.T.A to B.S.1362 should be used.
D3-4-2-1-2-2_En
WARNING
This equipment is not waterproof. To prevent a fire or shock hazard, do not place any container filed with liquid near this equipment (such as a vase or flower pot) or expose it to dripping, splashing, rain or moisture. D3-4-2-1-3.A.En
AVERTISSEMENT
Before plugging in for the first time, read the following section carefully.
The voltage of the available power supply differs according to country or region. Be sure that the power supply voltage of the area where this unit will be used meets the required voltage (e.g., 230V or 120V) written on the rear panel. D3-4-2-1-4.A Er
AVERTISSEMENT
This product is a class 1 laser product, but this product contains a laser diode higher than Class 1. To ensure continued safety, do not remove any covers or attempt to gain access to the inside of the product. Refer all servicing to qualified personnel. The following caution label appears on your unit.

D3-4-2-1-8 A En
ATTENTION
To prevent a fire hazard, do not place any naked flame sources (such as a lighted candle) on the equipment. D3-4-2-1-7a_A_En
This product complies with the Low Voltage Directive (73/23/EEC, amended by 93/68/EEC), EMC Directives (89/336/EEC, amended by 92/31/EEC and 93/68/EEC). D3-4-2-1-9a_En
AVERTISSEMENT
When installing this unit, make sure to leave space around the unit for ventilation to improve heat radiation (at least 5 cm at rear, and 5 cm at each side).
WARNING
Slots and openings in the cabinet are provided for ventilation to ensure reliable operation of the product, and to protect it from overheating. To prevent fire hazard, the openings should never be blocked or covered with items (such as newspapers, table-cloths, curtains) or by operating the equipment on thick carpet or a bed. D3-4-2-1-7b_A_En
PRECAUTION DE VENTILATION
Operating Environment
Operating temperature and humidity: +5^ + + 35^ (+41^ + + 95^) less than 85% RH (cooling vents not blocked)
Do not install this unit in a poorly ventilated area, or in locations exposed to high humidity or direct sunlight (or strong artificial light) D3-4-2-1-7c_A_En
When using this product follow the instructions written on the underside of the unit, which concern rated voltage, etc. D3-4-2-2-4_En
If the AC plug of this unit does not match the AC outlet you want to use, the plug must be removed and appropriate one fitted. Replacement and mounting of an AC plug on the power supply cord of this unit should be performed only by qualified service personnel. If connected to an AC outlet, the cut-off plug can cause severe electrical shock. Make sure it is properly disposed of after removal.
The equipment should be disconnected by removing the mains plug from the wall socket when left unused for a long period of time (for example, when on vacation). D3-4-2-2-1a_A.En
The POWER switch on this unit will not completely shut off all power from the AC outlet. Since the power cord serves as the main disconnect device for the unit, you will need to unplug it from the AC outlet to shut down all power. Therefore, make sure the unit has been installed so that the power cord can be easily unplugged from the AC outlet in case of an accident. To avoid fire hazard, the power cord should also be unplugged from the AC outlet when left unused for a long period of time (for example, when on vacation). D3-4-2-2a_A_En
ATTENTION
Thank you for buying this Pioneer product.
Please read through these operating instructions so you will know how to operate your model properly. After you have finished reading the instructions, put them away in a safe place for future reference.
In some countries or regions, the shape of the power plug and power outlet may sometimes differ from that shown in the explanatory drawings. However the method of connecting and operating the unit is the same. K015 En
Confirming Accessories
SD memory card 1
Operating Instructions 1
Video cable 1
Audio cable 1
Control cord 1
Power cord 1
Forcible eject pin (mounted on unit's bottom panel) 1
Contents
Before Operating
Confirming Accessories 1
Features 2
Handling Precautions 4
Discs Usable with This Unit 5
Names and Functions of Parts 7
Rear panel 7
Operation panel 8
Display 10
Jog dial display 11
Playing images from the DVJ-X1 on a television set 11
Connections 12
- Connections to DJ mixer (DJM-600, DJM-500, DJM-300, DJM-909, DJM-707 or DJM-3000) (audio output and control connector) 12
- Control cord connection for relay play 12
- Connection to stereo amplifier (without DJ mixer) 13
- Connection to component equipped with digital input connector 13
- Connection to television monitor (composite video/S-Video) 14
- Connection to television monitor (component video) ... 14
- Connection to video mixer 15
- Connecting the power cord 15
Preparations
Setup 16
Setting the TV system 16
How to perform setup 16
Using the Setup Navigator 16
Setup Menu items 18
To return all settings to their factory defaults 19
Using the Setup Menu 19
Advanced settings 20
Adjusting Dolby Digital audio 20
Digital output setting 20
[Audio2] settings 21
[Video1] settings 22
Video quality adjust 23
[Video2] settings 25
[Language] Settings 25
Setting Parental Lock 28
Basic Operations
Loading and Removing Discs 30
Basic Operations 31
Beginning playback 31
Auto cue function 31
To stop playback 31
To change language/subtitle settings during playback (DVD only) 32
Changing the viewing angle (DVD only) 32
To temporarily interrupt playback (pause mode) 32
Fast forward/fast reverse 33
Track search (skip) 33
Title search (DVD only) 33
Setting cue points 34
Changing playback speed 34
Setting master tempo 35
Jog dial functions 35
Mixing different tracks (splicing) 35
Advanced Operations
Advanced Operations 36
Scratch play 36
Spin play 36
Hot cue 36
Loop playback 37
Reverse play 37
About fader start play 37
Relay play with two players 38
WAVE display. 38
CD TEXT display 38
To view guide displays 39
Operations Using Memory Cards 40
Recording to memory cards 40
To recall data recorded on memory cards 41
To delete information recorded on memory cards 43
Other
Troubleshooting 44
Error message display 46
Dot Matrix Guide Display Messages 47
Specifications 48
Features
This player has been designed to provide CD/DVD playback features and functions demanded by professional disco club DJs and VJs. It is a professional DVD player equipped with operational ease, sound quality, and functions superior to those found on the professional analog players conventionally used by DJs.
JOG DIAL
Large-diameter (206 mm) dial for operating sensitivity exceeding that possible with conventional analog turntables
PITCH BEND
Changes playback pitch in proportion to the direction and speed of jog dial rotation.
- SCRONTH PLAY
In VINYL mode, when the top surface of the jog dial is touched, playback stops and starts in response to the direction and speed of jog dial rotation. The user can also adjust the sensitivity of start-up when the jog dial is touched and released, making possible new DJ techniques.
- FRAME SEARCH
When the jog dial is rotated during pause, the pause position is changed in units of individual frames (1/75th second).
SUPER FAST SEARCH
When the jog dial is rotated while depressing the manual search button, track search button or title search button, the search will be performed more quickly than the conventional search or track search (or title/chapter search) functions.
- HYPER JOG MODE
In VINYL mode, when the jog dial is rotated, the amount of sound or image change corresponding to the dial rotation doubles. Performance possibilities are enhanced by employing this function together with the ordinary mode.
ON JOG DISPLAY
The center of the jog dial is furnished with a display providing variety of information, including disc status, cue point position, audio/video memory status, jog touch detect display, and VINYL mode.
WAVE DISPLAY
With an analog record, the user could look for the breaks in the grooves to use as mix points and end points. In the same way, the WAVE display reveals track breaks in advance, allowing the DJ to use them as break points.
CUE/LOOP MEMORY
Cue points and loop points can be recorded for each disc on the external SD memory cards, and called up later as desired.
HOT CUE
Up to 3 hot cue points (A, B, C) can be recorded in advance and called up later for instant playback from those points. Hot cues can be used not only to record normal cue points, but also for loop point playback.
REVERSE PLAY
By pulling the DIRECTION select switch toward the front (REV position), tracks can be played in reverse.
TEMPO CONTROL
High-performance 100mm slider for precise adjustment of track speed
Using a digital display with 0.02% increments (within control range ± 6% ), the user can accu rately match the tempos of playback tracks.
TEMPO CONTROL RANGE
Four tempo control ranges are provided: ± 6% , ± 10% , ± 16% , and WIDE.
TEMPO CONTROL RESET
This control allows tempo to be reset to the default 0 % status instantly, regardless of the slider position.
- MASTER TEMPO
Allows pitch to be maintained while changing track speed.
CUE
- BACK CUE
By previously recording a cue point, it can be returned to instantly by pressing the CUE button during subsequent playback, thus starting playback again from that point.
- AUTO CUE
This function cues a track by skipping the non-recorded portion before the beginning of music, setting the player to standby mode immediately before music begins. In this way, playback can begin instantly when the PLAY/PAUSE (▶/II) button is pressed.
CUE POINT SAMPLER
This function allows one-touch playback from the cue points stored in memory, a convenient function for confirming cue points and sampling the points stored.
REAL TIME SEAMLESS LOOP
Allows simple setting and canceling of playback loops. Loops can be set quickly during track playback; also allows quick setting of a loop immediately before the end of a track, thus preventing the track from ending. Finally, an ADJUST mode has been added to allow one-touch changing of loop-out points.
RELOOP
Once set, a loop can be returned to any number of times
After canceling loop play, pressing the RELOOP/EXIT button causes playback to return and begin again from the previously set loop. Turning the function ON/OFF in time with the track's rhythm allows a variety of new performance possibilities.
EMERGENCY LOOP
Pressing the EMERGENCY LOOP button causes the current position (the point where the button was pressed) to act as a loop-in point, with a loop-out point being set automatically for loop play.
PLAYING ADDRESS
With an analog record, the position of the stylus gives the operator an immediate grasp of the progress of playback. In the same way, the play address display shows a bar graph that provides an immediate visual grasp of the track's playback progress. The current position in the track is indicated by the length of the bar; in addition, the bar flashes to warn that playback is approaching the end of the track.
FADER START
When the player is connected to a DJ mixer (DJM-600, DJM-300, DJM-909, DJM-707, DJM-500 or DJM-3000 (all sold separately)), the mixer's fader operation can be used to perform quick start and back cue.
MULTI READ
Discs readable on this player include CD-R/CD-RW (recorded in audio CD format), and DVD-R/DVD-RW (recorded in video format). However, since this player uses high-speed data read for the purposes of its DJ operations, some discs may not play back properly depending on the characteristics of the disc and the recorder, as well as a result of dirt or scratches on the disc, etc.
PREVIEW MONITOR OUTPUT
This is an auxiliary video output that produces an overlay display of operating information on the main video output screen, and provides the DJ with a visual aids when operating the unit. During use of DVD play, cue points, loop points, and hot cue points are displayed on a small screen overlain on the main output, making possible interactive DJ operations.
PROGRESSIVE OUTPUT
This player is equipped with a progressive scan output connector which supports video signals with 525p frequency (component output connector). When connected to a television monitor equipped with a component video input connector for progressive scan (525p), high definition images will be output, with twice the data produced by conventional interlaced scan televisions.
LEGATO PRO
The player is equipped with a digital filter that uses up-sampling technology (DVD: 48 kHz → 192 kHz; CD: 44.1 kHz → 176.4 kHz) for reproducing audio information lost in some disc (DVD, CD) formats.
HI-BIT
This function extends the bit length of audio data. By transforming 16-bit or 20-bit data to 24-bits, even minute signals can be reproduced with smooth, finely defined sound.
About DVD playback in DJ mode
Since various special operations are supported in DJ mode, certain limitations are placed on normal playback functions such as SCAN. For this reason, operations which are possible in the NORMAL mode may be limited or disabled when attempted in DJ mode. In short, if you wish to use all ordinary DVD play functions, use the NORMAL mode.
Limited or disabled functions (when in DJ mode)
- Cannot play sub-pictures (can't display subtitles or onscreen buttons)
- Cannot use password input command (when using interactive commands, the same operations may not produce the same results as when in NORMAL mode).
- May only play midway through titles.
- May skip certain parts of titles.
- Playback may be temporarily interrupted when switching audio functions.
- Playback may be temporarily interrupted when changing viewing angle.
- Cannot use pan-and-scan function.
- The title itself may disallow use of DJ operations. In this case, DJ operations are prohibited, and the same operations are performed as when in NORMAL mode.
Handling Precautions
Installation location
- Placing and using the player for long periods on heat-generating sources such as amplifiers or near spotlights, etc. will affect product performance. Avoid placing the player on heat-generating sources.
- Install this player as far as possible away from tuners and TV sets. The player installed in close proximity to such equipment may cause noise or degradation of the picture.
Noise may be noticeable when an indoor antenna is used. In such cases, make use of an outdoor antenna or turn off power to the player.
- When the unit is used in a loud-sound environment, e.g., near a speaker, sound skip may occur. Install the unit away from the speaker or reduce the listening volume.
- Place this unit on a level surface and a stable platform.
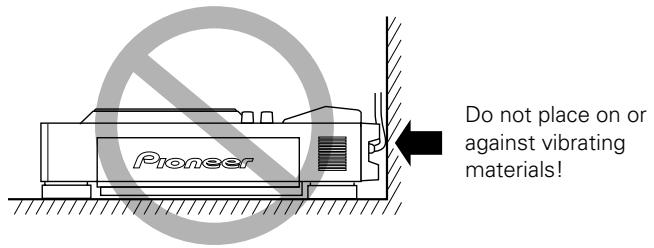
Take adequate note of the following precautions when preparing a place for installation:
Be sure the player, including its video, audio and power supply cords, does not touch vibrating materials. Any vibration other than that transmitted through the insulators may cause the disc to skip. Take special care when using the player while it is installed in a carrying case.
Leave space to allow for heat dissipation.

Moving the unit
■ Never move the unit during playback!
During playback, a disc rotates at very high speed; moving the player during playback may result in scratches or other damage to the disc.
■ When moving the unit is necessary
Before moving the unit, remove any disc and disconnect the power. Malfunctions or damage may result if the unit is moved with a disc loaded.
About the carrying case
The upper surface of the jog dial is equipped with a touch-sensitive switch. When placing the player in its carrying case, avoid placing any pressure on the jog dial.
Condensation
When this unit is brought into a warm room from previously cold surroundings or when the room temperature rises sharply, condensation may form inside the unit and impair its performance. In such cases, allow the unit to stand for about an hour or raise the room temperature gradually.
Cleaning the player
To clean the player wipe with a polishing or a soft, dry cloth. For stubborn dirt, moisten a soft cloth with a weak solution of neutral detergent (diluted in five to six parts water), wring the cloth well, and wipe away the dirt. Use a dry cloth to wipe the surface dry. Do not use volatile liquids such as benzene or thinner which will damage the unit.
About the lens cleaner
The player's pickup lens should not become dirty in normal use. If for some reason, the lens becomes soiled and malfunctions, contact your nearest PIONEER authorized service center. Lens cleaners for DVD (CD) players are commercially available, but special care should be exercised in their use as some may cause damage to the lens.
POWER-CORD CAUTION
Handle the power cord by the plug. Do not pull out the plug by tugging the cord and never touch the power cord when your hands are wet as this could cause a short circuit or electric shock. Do not place the unit, a piece of furniture, etc., on the power cord, or pinch the cord. Never make a knot in the cord or tie it with other cords. The power cords should be routed such that they are not likely to be stepped on. A damaged power cord can cause a fire or give you an electrical shock. Check the power cord once in a while. When you find it damaged, ask your nearest PIONEER authorized service center or your dealer for a replacement.
Regarding data recorded on memory cards
It is the users responsibility to make regular backups of important memory card data. Pioneer disclaims any responsibility for damage to or loss of memory card data, or other incidental damages arising from incompatibilities of the player and memory card, static electricity or other external causes.
Lawful use of DVJ-X1: Copyright etc
Neither Pioneer nor its dealers are responsible for the use made of the DVJ-X1. The user must ensure it has all relevant licences and consents in place (whether for copyright/public performance, performers rights, moral rights or otherwise) to allow the lawful use of the DVJ-X1.
This is likely to include licences from organisations administering performance rights in audio or video recordings or consents from any other relevant rights holders.
Discs Usable with This Unit
Types of discs playable on this unit
The following marks and logos are displayed on disc labels, packaging, or jackets.
| Types and Logos of playable discs | |||
| DVD video | DVD VIDEO | DVD VIDEO | |
| DVD-R (Note 1) | DVD-RW (Note 2) | ||
| R | R W | ||
| CD | CD-TEXT (Note 3) | CD-R (Note 4) | CD-RW (Note 4) |
| COMPACT DISC DIGITAL AUDIO | COMPACT DISC DIGITAL AUDIO TEXT | COMPACT DISC DIGITAL AUDIO Recordable | COMPACT DISC DIGITAL AUDIO ReWritable |
Note 1) About DVD-R disc playback:
This player can play back DVD-R discs recorded in "DVD video" format.
Note 2) About DVD-RW disc playback:
- This player can play back DVD-RW discs recorded in "DVD video" format.
- When playing a disc that has been edited on a DVD recorder, portions of the recording including links between tracks may appear as a momentary still image.
- When playing a disc that has been recorded or edited on a DVD recorder, the locations of edited portions may shift somewhat.
- For details, consult the Operating Instructions for your recorder.
Note 3) Regarding CD-TEXT display:
The number of characters that can be displayed is up to 72 for disc title, and 48 for track titles. When a display exceeds 8 characters in length, the display will scroll. Only alpha-numerics and a limited number of symbols can be displayed.
Note 4) CD-R/CD-RW discs:
This player can play CD-R/CD-RW discs recorded in audio CD format.
- For details, consult the Operating Instructions for your recorder.
When playing 8 cm CDs, always use an 8 cm CD adapter (P.30).
Note:
This player does not support playback of 8 cm DVDs. Do not attempt to use adapters meant for 8 cm CDs, since the adapter may come loose during rotation, causing damage to the disc or component.
The following discs cannot be played on this unit:
DVD video discs not marketed for region "2" or "ALL"
DVD-RW discs recorded in VR format
DVD audio discs
DVD-ROM
DVD-RAM
Video CDs
- CD-ROMs (MP3, etc.)
- Photo CD
- DTS-CD, etc.
Notes:
- Some DVD-R/DVD-RW and CD-R/CD-RW discs recorded on standalone recorders or computer drives may not be playable back on this player, due to a variety of reasons, including disc characteristics, scratches, dirt, player lens dirt or condensation, etc.
- Some discs recorded on computer drives may not be playable on this player, depending on the recording application used, its settings, and operating environment. Be sure to use the correct formatting for the discs used. For details, consult the application author.
- This unit cannot play DVD-R or DVD-RW discs recorded in video format unless they have been finalized.
- This unit cannot play DVD-RW discs recorded in VR format.
- This unit cannot play partially recorded CD-R or CD-RW discs that have not been finalized.
- For detailed information regarding the handling of DVD-R/DVD-RW and CD-R/CD-RW discs, consult the handling precautions supplied with each disc.
Marks displayed on DVD
The following symbols and marks may be displayed on DVD labels or packaging:
| Mark | Meaning |
| ② | Number of recorded audio tracks |
| 2 | Number of recorded subtitles |
| 3 | Number of recorded angles |
| 16:9 LB | Recorded aspect ratio |
| ALL | Region number. This player can play discs marked with region “2” or “ALL”. |
DVD operating limitations
Some DVDs are designed explicitly to prevent the use of certain operations or to prevent changing operation methods. As a result, the methods used to operate each disc may vary, and some techniques may not be usable with certain discs. In the event that a prohibited technique is attempted with a disc on this player, the display will show the disc operation prohibited mark . Also, certain other operations may not be supported on discs that support menus or dialogue-type operations during playback. In such cases, the player operation prohibited mark will be displayed.
Regarding copyright
- Unauthorized copying, broadcasting, public performance, or rental of copyrighted discs is prohibited by law.
- This product incorporates copyright protection technology that is protected by method claims of certain U.S. patents and other intellectual property rights owned by Macrovision Corporation and other rights owners. Use of this copyright protection technology must be authorized by Macrovision Corporation, and is intended for home and other limited viewing uses only unless otherwise authorized by Macrovision Corporation. Reverse engineering or disassembly is prohibited.
Disc composition
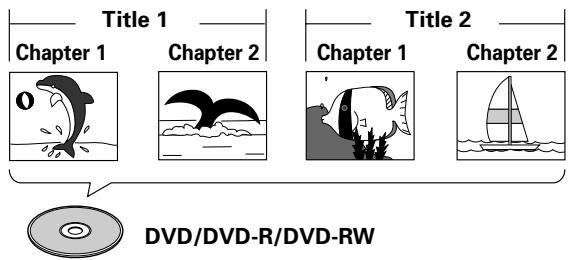
Digital Versatile Discs (DVD)
DVD video, DVD-R or DVD-RW discs are recorded in units called "titles," with each title being divided into one or more sub-divisions called "chapters." Further, some, discs are furnished with menus for navigating the disc, but menus may not be included with all titles. In the case of commercial films, a single movie normally corresponds to a single title. On so-called "karaoke" discs, each song track composes a single title, although there are some exceptions to this rule, so care is needed when using search functions.
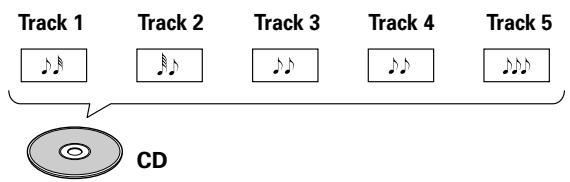
Compact Discs (CD)
In the case of compact discs, each disc is divided into units of individual tracks (normally, each song is contained on a single track). In addition, tracks may have sub-divisions called index numbers.
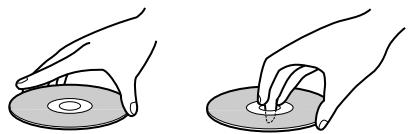
Handling discs
- When holding discs, do not touch their signal surfaces. Hold by the edges, or by one edge and the center hole.
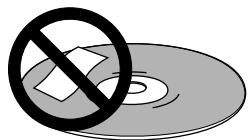
- Do not affix gummed labels or tape to the disc surface. Also, do not scratch or damage the label.
Discs rotate at high speeds inside the player. Do not use damaged, cracked or warped discs.
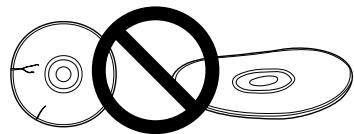
■ Do not play a disc with a special shape
- Do not play a disc having other shape than a circular disc, such as heart shaped disc. Otherwise malfunction may occur.

Storing discs
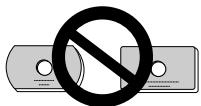
- Discs are made of the same kinds of plastic used for conventional analog audio records. Be careful not to allow discs to warp. Always store discs in their cases vertically, avoiding locations with high heat, humidity, or extremely low temperatures. Avoid leaving discs in cars; the interior of a car in direct sunlight can become extremely hot.
- Always read and abide by the precautionary notes listed on disc labels.
■ Cleaning discs
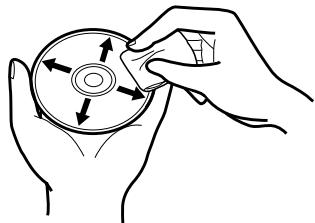
- Always keep your discs clean by wiping them gently with a soft cloth from the inner edge toward the outer edge.
- When cleaning discs, the use of a commercial CD/DVD cleaning kit is recommended.
- If a disc becomes very dirty, dampen a soft cloth with water, (be sure to wring it out well) and wipe the away dirt gently. Remove any water drops with another soft, dry cloth.
- Do not use record cleaning sprays or anti-static agents on discs. Never clean discs with benzene, thinner, or other volatile solvents or damage to the disc surface may result.
Regarding DVD-R/RW, CD-R/RW discs
- Due to the unique construction of DVD-R/RW and CD-R/RW discs, leaving them for extended periods of time in the pause (or cue standby) mode at a single point may result in the discs' becoming difficult to play at that place. The same symptom may also occur if the loop function is used to play back a single point on the disc excessively.
As a result, users are advised to construct backup archive discs when playing discs containing important data.
Names and Functions of Parts
Rear panel
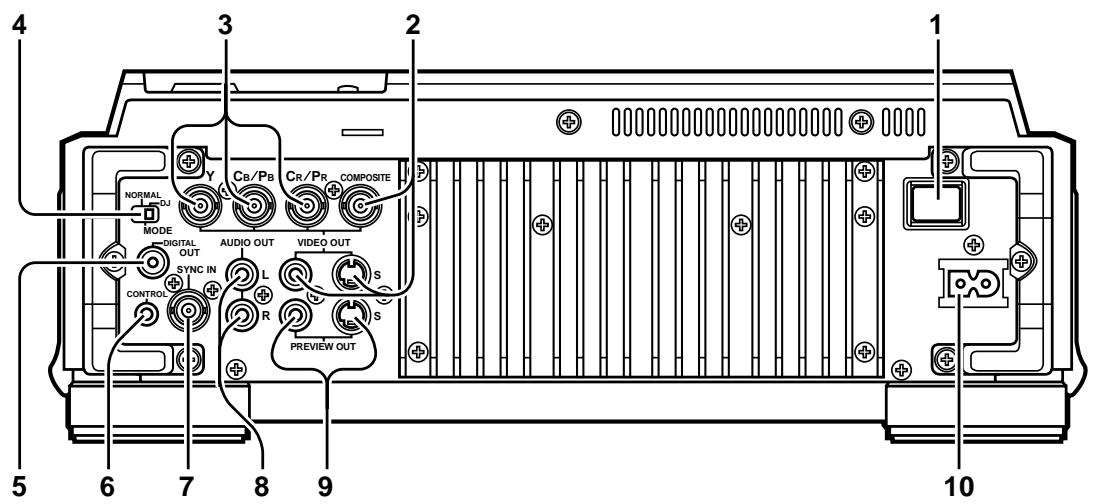
1. POWER OFF (I)/ON (→) switch
2. Main video output connectors (VIDEO OUT)
Includes RCA and BNC type connectors for outputting DVD playback video only (composite signals), as well as S-Video output connector.
3. Component video output connectors (Y, C_B / P_B , C_R / P_R )
BNC type connectors for component signal output of DVD playback video only. Produces higher image quality than composite output.
4. Mode select switch (MODE NORMAL/DJ) (P.13)
If this switch position is changed during playback, playback will stop, and then resume playback from the disc's beginning.
DJ: Allows use of jog dial operations, tempo variations and other DJ functions. During DVD playback, no signal is output from digital output connectors. Also, subtitles and certain other functions and operations are not supported, and some points cannot be played. During CD playback, only audio data are output from digital connectors.
NORMAL: DJ functions are not supported. Pause mode is silent, not audible. During DVD playback, selected audio signals are output from the digital output connectors. During CD playback, digital data containing subcodes are output (does not support CD graphics).
5. DIGITAL OUT connector
RCA type coaxial digital output, for connecting AV amplifier, Dolby Digital/DTS decoder, CD recorder, etc.
When mode select switch (4) is set to "DJ", no signal is output from this connector during DVD playback. During CD playback, only audio data without subcodes are output.
When mode select switch (4) is set to "NORMAL", this connector outputs digital data including subcodes.
6. CONTROL connector
Using the supplied accessory control cord, this connector can be connected to a Pioneer DJ mixer (DJM-600, DJM-500, DJM-300, DJM-909, DJM-707 or DJM-3000) to allow control of this unit from the DJ mixer. This facilitates the use of functions such as fader start play and back cue.
Alternatively, linking this connector to another DJ player allows automatic relay play (P.38).
7. SYNC IN connector
BNC type input connector for inputting external sync signal. Use to connect an optional sync signal generator.
8. AUDIO OUT L,R connectors
RCA type analog audio output connectors.
9. Preview video output connectors (PREVIEW OUT)
RCA type connector (composite signals) and S-Video output connector. These connectors output monitor images used to aid the DJ during operation. Outputs various guide messages and displays (P.11).
10. AC inlet
Use auxiliary power cord to connect to standard electrical outlet.
Operation panel
Buttons and controls with the Dl mark are disabled when the mode select switch is set to NORMAL. Buttons and controls with the Wl mark are disabled when the mode select switch is set to DJ.
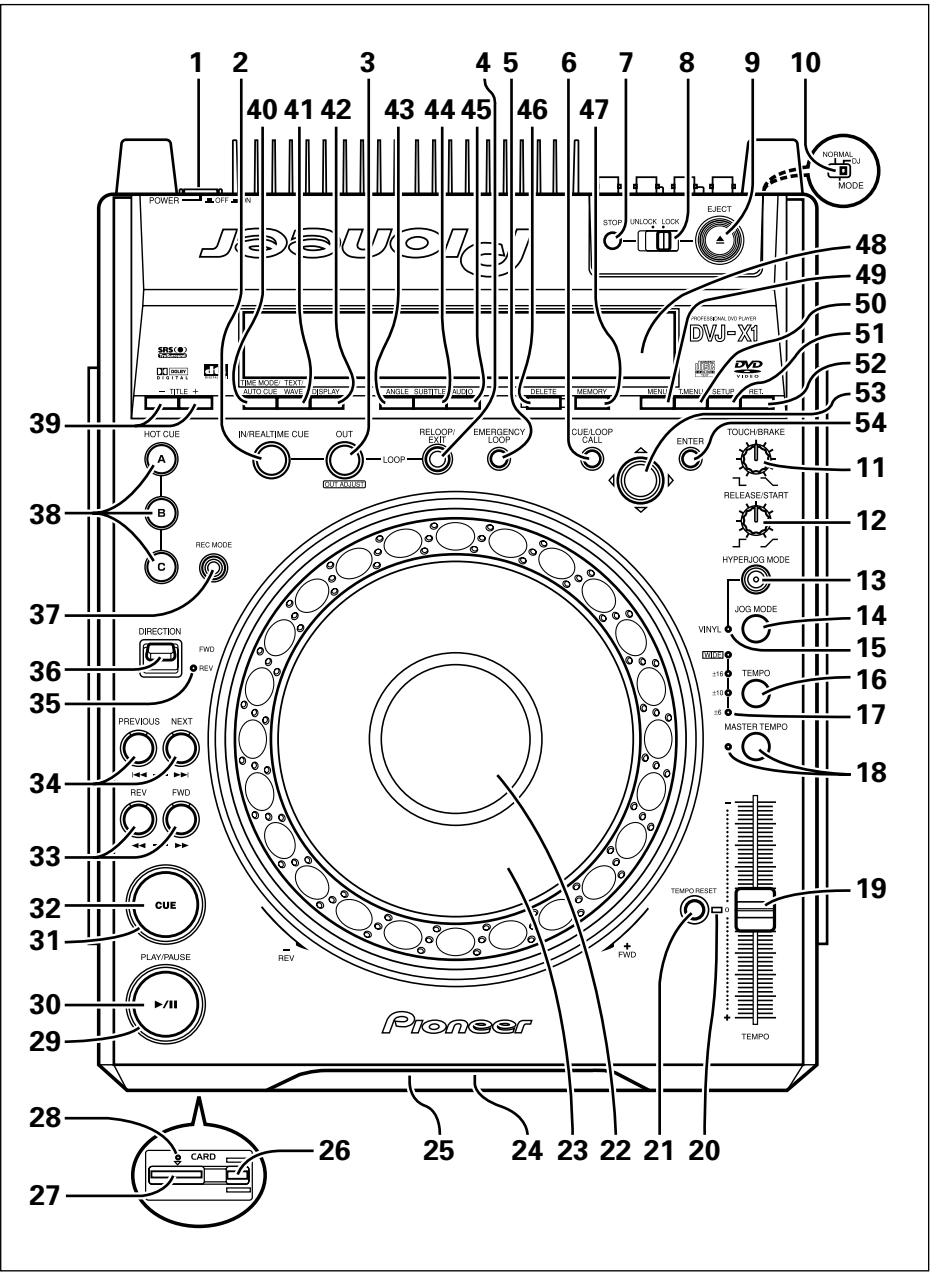
7. STOP button
Stops disc playback. When the eject/stop mode select switch is set to LOCK, playback will not stop unless the PAUSE mode is set first.
8. Eject/stop mode select switch (UNLOCK/LOCK)
UNLOCK: If the EJECT (▲) button is pressed during playback, the disc stops and is ejected. If the STOP button is pressed during playback, the disc playback stops.
LOCK: If the EJECT (▲) button is pressed during playback, the disc will not be ejected. To eject the disc, set the unit to pause, then press the EJECT (▲) button. Likewise, playback will not stop if the STOP button is pressed during playback; to stop disc playback, set the unit to pause, then press the STOP button.
9. EJECT (▲) button
When this button is pressed, disc rotation stops and the disc is ejected from the loading slot. If the eject/stop mode select switch is set to the LOCK position, the disc will not be ejected unless the unit is set to pause before pressing the EJECT (▲) button (P.30).
10. Mode select switch
(MODE NORMAL/DJ) P.7
Located on the rear panel.
11. TOUCH/BRAKE response dial
Adjusts the disc deceleration speed (time to playback stop) when the jog dial's top surface is touched with jog mode set to VINYL ON. Rotate the dial counterclockwise to stop playback quickly, and rotate dial clockwise to cause slower deceleration.
12. RELEASE/START response dial
Adjusts the disc acceleration speed (playback startup time) when the jog dial's top surface is released with jog mode set to VINYL ON. Rotate the dial counterclockwise to restart playback quickly, and rotate dial clockwise to cause slower acceleration.
13. HYPERJOG MODE button/indicator
When hyper jog mode is set to ON with jog mode set to VINYL ON, turning the jog dial causes the rate of change of image and sound to increase to 2x the rate of changed normally produced (when the hyper jog mode is OFF).
1. POWER OFF (I)/ON (→) switch
Located on the rear panel.
2. LOOP IN/REALTIME CUE button/indicator
Real time cue P.34
Loop-in point input P:37
3. LOOP OUT/OUT ADJUST button/indicator
Loop-out point input P.37
Loop-out point adjust P.37
4. RELOOP/EXIT button D P37
5. EMERGENCY LOOP button P37
When this button is pressed, the current point is set as a loop-in point; a loop-out point is set automatically and loop play begins between the two points.
6. CUE/LOOP CALL button P41
Press to turn cue point navigation mode ON/OFF.
14. JOG MODE select button
Each time pressed, sets VINYL mode alternately ON/OFF.
VINYL mode ON: If surface of jog dial is touched during playback, playback stops, and if the dial is then rotated, image and sound are output in response to the amount of rotation. (if the angled surface of the jog dial is rotated without touching the top, pitch bend operation is enabled.)
- The current jog mode is memorized even when power is turned off.
VINYL mode OFF: The above operations are disabled even when the jog dial's surface is touched.
15. VINYL mode indicator
Lights when the jog mode is set to VINYL mode.
16. TEMPO control range select button
Each time this button is pressed, the TEMPO control slider's variable range changes (± 6%, ± 10%, ± 16%, WIDE) .
When WIDE is selected, the variable range is +70 to -100 % for DVD playback, and ±100 % for CD playback.
17. TEMPO control range indicator (± 6, ± 10, ± 16, WIDE)
- When control range is set to ± 6% , the ± 6 indicator lights.
- When control range is set to ± 10% , the ± 6 and ± 10 indicators light.
- When control range is set to ± 16% , the ± 6, ± 10 and ± 16 indicators light.
- When control range is set to WIDE, the ± 6 , ± 10 , ± 16 and WIDE indicators light.
18. MASTER TEMPO button/indicator P35
Each time this button is pressed, the master tempo function turns alternately ON/OFF.
19. TEMPO control slider
When pulled forward (+) , playback tempo is accelerated, and when pushed away (-) , tempo is slowed.
20. TEMPO RESET indicator
When lighted, indicates that the playback tempo is set to normal tempo "0", regardless of the position of the TEMPO control slider.
21. TEMPO RESET button
Pressing this button instantly resets the playback tempo to "0" (normal tempo), regardless of the current position of the TEMPO control slider. Press the button once again to cancel the reset.
22. Jog dial display P.11 (30-34)
23.Jog dial (FWD + /REV - ) P.35
24. Disc loading slot P:30
25. Forced eject hole
26. Memory card eject button P.40
Press to remove memory card.
- Do not press when the memory CARD indicator is lighted.
27. Memory card slot P.40
- Memory CARD indicator P.40
Lights when unit is accessing the memory card.
- Do not remove memory card or turn off power when this indicator is lighted.
29. PLAY/PAUSE indicator
Lights during playback, and flashes during pause mode.
- PLAY/PAUSE ( /II) button P.31
31.CUE indicator P.34
Lights to indicate a cue point has been set. Flashes during pause mode.
32.CUE button
Cue point setting P.34
Back cue P.34
Cue point sampler P.34
33. Manual search buttons (REV< , FWD>) P.33
34. Track search buttons
(PrevIOUs ★, Next ★) P.33
Use to return or advance play (unit of movement is by tracks when playing CDs, and by chapters when playing DVDs).
During DVD playback, use to return to menu page or change page.
35. REV indicator
Lights when direction select switch is set to reverse.
36. DIRECTION FWD/REV select switch
Set to REV position for reverse playback.
37.HOT CUE REC MODE button P.36
Press to select the HOT CUE button's function (record/call).
- Defaults to call mode when power is switched on.
38.HOT CUE (A,B,C) buttons/indicators P.36
A, B, or C indicator lights red to indicate hot cue point record mode.
A, B, or C indicator lights green for hot cue point, and orange for hot loop point; when an indicator is lighted, call mode is enabled for that point; pressing the button initiates playback from the hot cue point.
When indicator is not lighted, no hot cue point is recorded.
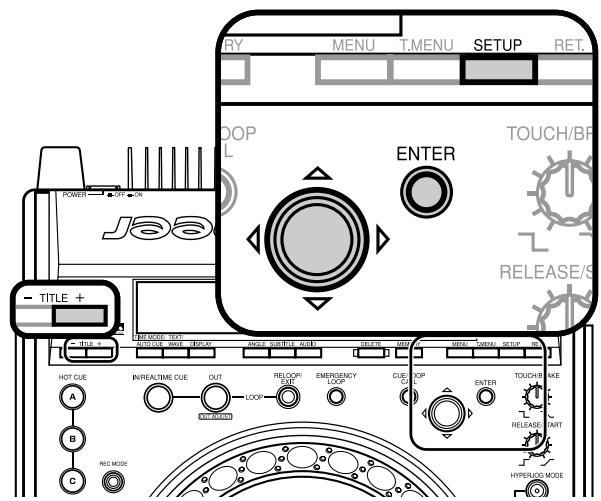
39. Title search buttons (TITLE + / - ) P.33
During DVD playback, titles are forwarded or reversed in the direction corresponding to the button pressed.
40. TIME MODE/AUTO CUE button
TIME MODE:
Each time the button is pressed, the time display switches alternately between playback elapsed time and remaining time (REMAIN).
- The time mode remains set in memory even when power is turned off.
AUTO CUE:
Hold depressed for one second or more to set/release the auto cue function.
Hold depressed for five seconds or more to switch the auto cue level (P.31).
- The auto cue ON/OFF setting and auto cue level remains set in memory even when power is turned off.
41. TEXT/WAVE select button
When pressed in DJ mode, the display alternates between WAVE display and CD-TEXT display (disc title / track title).
When pressed in NORMAL mode, alternates between CD-TEXT disc title / track title display.
42. DISPLAY button P.11, P.39
When pressed in DJ mode, turns the hot cue, cue point, and playback time guide display ON/OFF on the monitor connected to the preview video output connector.
When pressed in NORMAL mode, turns the disc information guide display ON/OFF.
- When power is switched ON, the display function defaults to ON when the unit is in the DJ mode, and OFF (no display) in the NORMAL mode.
43. ANGLE button
Press to change the viewing angle during DVD playback (on supported discs only).
- In DJ mode, when the angle is changed both video and audio playback temporarily stop (due to writing to buffer memory).
44. SUBTITLE button
During DVD playback, press to alternately turn subtitle display ON/OFF (on supported discs only).
- This function is disabled in DJ mode.
45. AUDIO button
During DVD playback, press this button to change language or audio channel (on supported discs only).
- In DJ mode, when the language/audio channel is changed, both video and audio playback temporarily stop (due to writing to buffer memory).
46. DELETE button P43
Press to delete cue points and loop points recorded in SD memory card.
47. MEMORY button P.40
Press to store cue points or loop points in SD memory card.
48. Display P.10 (1-29)
49. MENU button
Press to display DVD menu.
50. Top menu (T.MENU) button
Press to display a DVD's top menu level.
51. SETUP button P.16
Press to display the setup menu.
52. Return (RET.) button
When setup or other menus are displayed, press this button to return to the previous menu or item.
53. Cursor button ( / / / )
Press to select cue points navigation and DVD menu settings.
54. ENTER button
Press to confirm cue point navigation and various DVD input settings.
Display
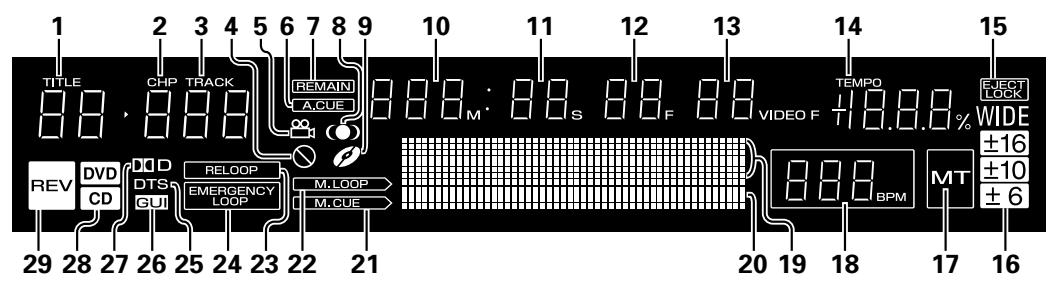
- Title number (TITLE 00-99)
Indicates the DVD title number.
Not displayed during CD playback.
- Chapter number (CHP 000-999)
Indicates the DVD chapter number.
"CHP" is not displayed during CD playback.
- Track number (TRACK 00-99)
Indicates CD track number.
"TRACK" is not displayed during DVD playback.
- Prohibited indicator ()
Some DVD discs or players do not support certain functions or operations; if an effort is made to perform such operations, this indicator appears for about 2 seconds.
- Angle indicator (B)
During DVD playback, this mark appears to indicate a scene with variable angle.
- Auto cue (A.CUE) indicator
Lights when auto cue is ON. Does not light during NORMAL mode.
- Remaining time (REMAIN) indicator
Indicates that the current numerical display is of a track's remaining time.
- SRS indicator ()
Lights when TruSurround function is selected. This function is disabled in DJ mode.
- Disc indicator ()
Lights during display of a CD TEXT disc title.
-
Minutes display (000-999 M)
-
Seconds display (00-59 S)
-
Frame display (00-74 F)
Display audio frame numbers. 75 frames are equivalent to one second of normal play. Not displayed in NORMAL mode.
- Video frame display (00-29VIDEO F)
Lights during DVD playback in DJ mode. 30 frames are equivalent to one second. Video frame display does not appear during CD playback and in NORMAL mode.
Since this unit controls video frames (1/30 second) based on the audio frame (1/75 second), combining the two will result in a maximum deviation of 1 frame.
- TEMPO indicator
Displays tempo variation produced when TEMPO control slider is operated.
15.EJECT LOCK indicator
Lights when eject/stop mode select switch is set to LOCK position. If the EJECT (▲) button or STOP button is pressed when this indicator is lighted, the indicator will flash for about 2 seconds.
- Tempo control range display (± 6, ± 10, ± 16, WIDE)
Lights to indicate the TEMPO control slider's variable range as selected with the tempo control range select button. Does not light in NORMAL mode.
- Master tempo indicator (MT)
Lights when master tempo function is ON.
Does not light in NORMAL mode.
- BPM counter display
Lights to indicate the beats per minute (BPM) of the currently playing track. Some tracks may not be measurable with the automatic BPM counter.
Does not light in NORMAL mode.
- Dot matrix display (50x7 dots)
Used to display CD TEXT, WAVE display, guide messages and other data. In the case of CD TEXT, the maximum number of alpha-numeric characters that can be displayed is 72 for disc titles and 48 for track titles (when a display exceeds 9 characters in length, the display will scroll). In the case of WAVE display, the varying volume levels of the currently playing track are displayed, with the track sized to fit into the entire 50-dot display width.
For guide messages, see P.47 "Dot Matrix Guide Display Messages".
- Play address display
Displays a bar graph to allow an immediate visual grasp of the elapsed and remaining playing time of the currently playing track. The full scale bar length indicates the full track length.
- The bar graph is off at the beginning of the track, and lights from left to right.
- The bar graph is lighted at the beginning of the track, and goes out from left to right.
-
When the remaining playing time falls below 30 seconds, the bar graph flashes slowly; when less than 15 seconds are left, the bar graph flashes quickly.
-
Cue memory indicator (M.CUE)
The selected chapter or track's cue memory position is indicated by the indicators beneath the play address display. Even if multiple memory points are located within the same block, only a single indicator lights. Does not light in NORMAL mode.
- Loop memory indicator (M.LOOP)
Displays the loop memory position for the selected track immediately above the playback address display. Even if multiple memory points are located within the same block, only a single indicator lights. Does not light in NORMAL mode.
- RELOOP indicator
Lights when loop-in points and loop-out points have been recorded and loop playback is possible, as well as during loop play operation itself.
Does not light in NORMAL mode.
- EMERGENCY LOOP indicator
Lights during loop operation in emergency loop mode.
Does not light in NORMAL mode.
- DTS indicator
Lights during playback when DTS audio has been selected.
Not supported in DJ mode.
- GUI indicator
Lights when setup menu, image adjust, disc information and other onscreen menus are displayed.
- Dolby Digital indicator (D)
Lights during playback when Dolby Digital audio has been selected.
- Disc type indicator (DVD/CD)
Lights to indicate the type of disc being played.
- Reverse indicator (REV)
Lights to indicate the DIRECTION select switch is set to reverse (REV) position.
Does not light in NORMAL mode.
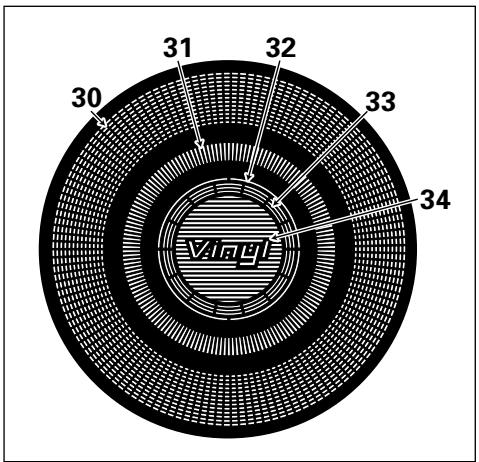
Jog dial display
30. Operation display
Displays play position, with one revolution equivalent to 135 frames. The display rotates during playback, and stops during pause.
31. Cue point position display
Displays the position of cue points.
32. Audio/video memory status display
Flashes during writing to the audio/video memory; lights steadily when writing is completed. While indicator is flashing, it may not be possible to record real time cue points or hot cue points.
33. Jog touch detector indicator
When VINYL mode is set to ON, this indicator lights when the top panel of the jog dial is touched.
34. VINYL mode indicator (Vinyl)
Lights when VINYL mode is set to ON.
Playing images from the DVJ-X1 on a television set
The example shown here is an illustration meant to depict the general display contents, and may differ somewhat from actual monitor appearance.
This unit is equipped with both main video output (VIDEO OUT) and preview video output (PREVIEW OUT) connectors.
In NORMAL mode, both Video OUT and Preview OUT produce the same video signals.
In DJ mode, the outputs of the two connectors are different, as indicated below. Even in DJ mode, however, if a non-supported DJ operation is attempted, the outputs will be the same as in NORMAL mode.
VIDEO OUT
This outputs only the DVD playback image; it should be connected to the main publicly viewed monitor.
PREVIEW OUT
This outputs the images used by the DJ when operating the unit, and includes various additional guide messages and menus.
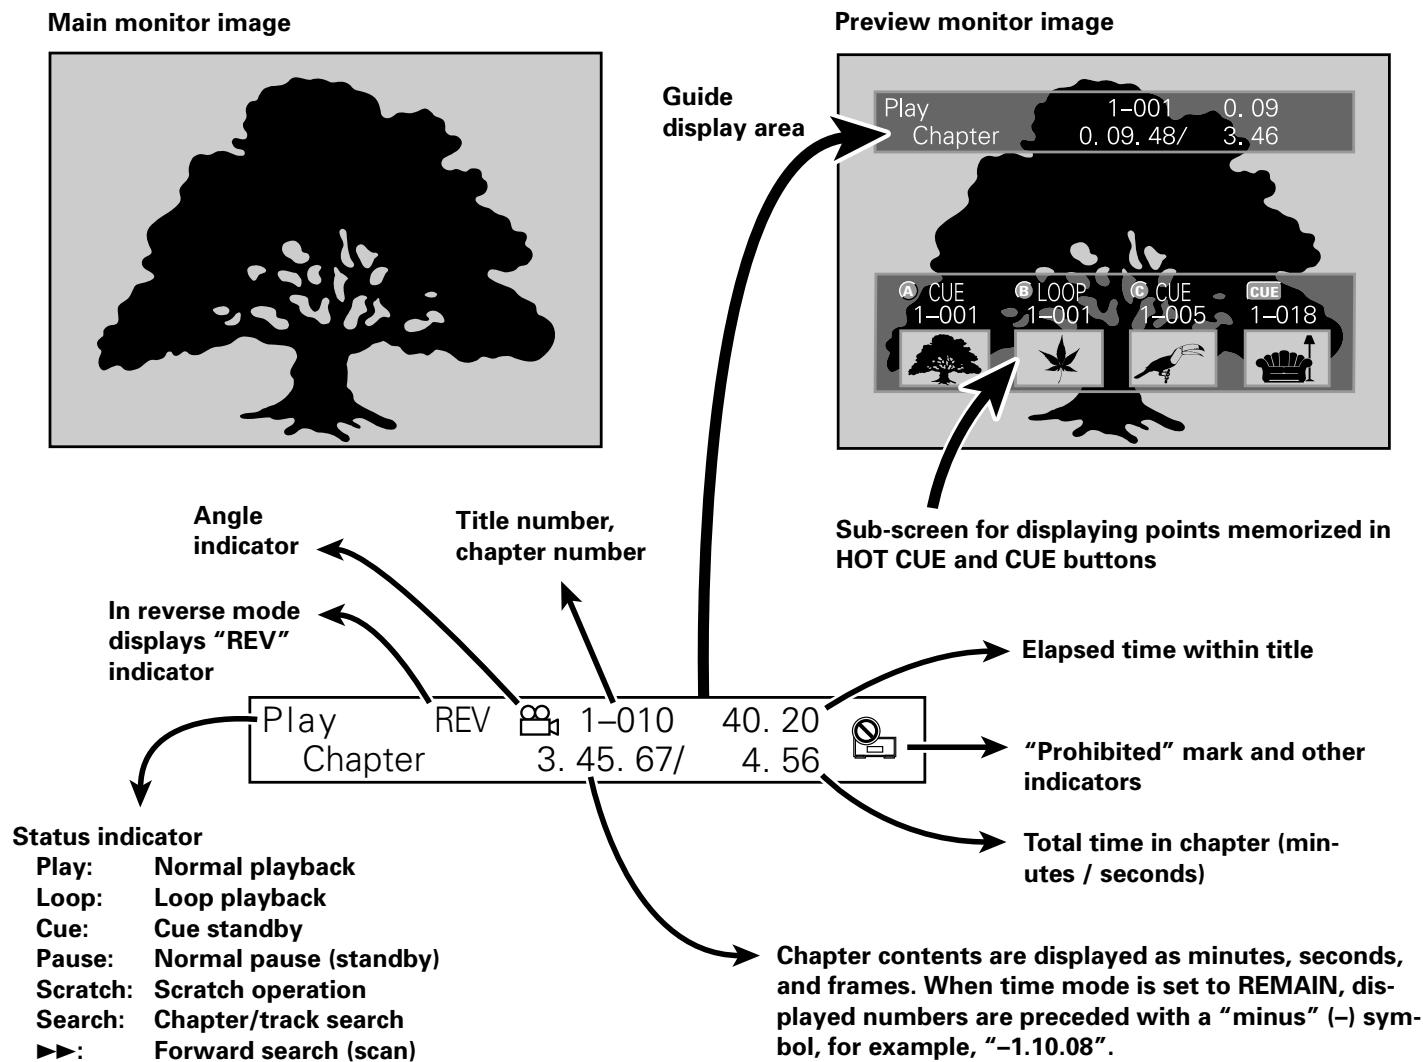
Reading: Recall hot cue, or cue point
Connections
Before making or changing the connections, switch off the power and disconnect the power cord from the AC outlet.
1. Connections to DJ mixer (DJM-600, DJM-500, DJM-300, DJM-909, DJM-707 or DJM-3000) (audio output and control connector)
Using the accessory audio cable, connect the white plug to the L (left) connector, and connect the red plug to the R (right) connector. By connecting the accessory control cord, the player can be controlled from the mixer, allowing fader start play and back cue operations.
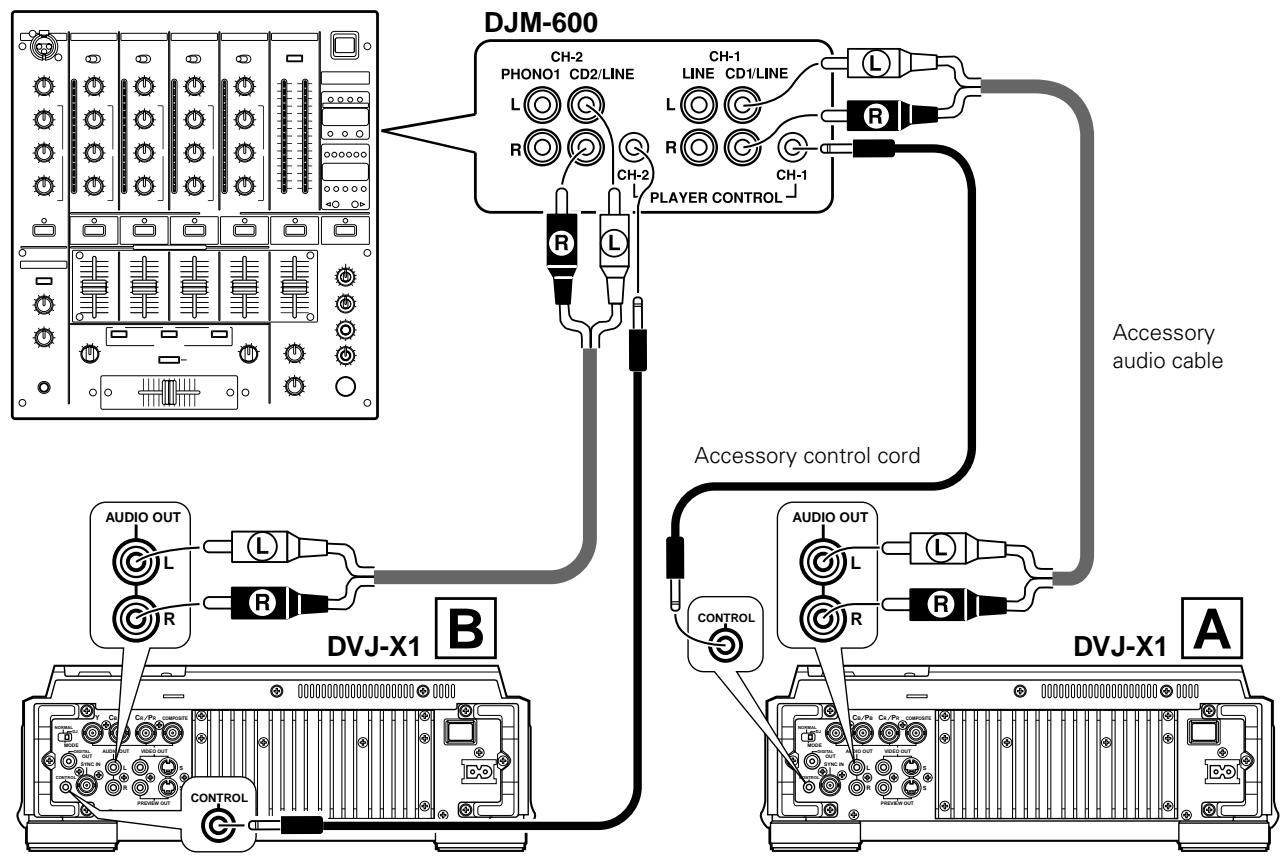
Connection example DJM-600:
- Connect similarly to the above when using DJM-300 or DJM-500.
- When connecting DJM-909 or DJM-707, use the accessory audio cable to connect CH-1 CD to PLAYER A, and the CH-2 CD to PLAYER B.
- In the case of the DJM-3000, connect A PLAYER to LINE 1 of CH-1, connect B PLAYER to LINE 3 of CH-2.
- When connecting this player to other audio mixers, the player's AUDIO OUT connector should be connected to the mixer's LINE IN connector or AUX connector (★ Do not connect the player to a mixer's PHONO connector, since sound will be distorted and proper playback will not result).
2. Control cord connection for relay play
By using the accessory control cord to connect two DJ players, automatic relay play can be performed between the two units. (P.38)

3. Connection to stereo amplifier (without DJ mixer)

4. Connection to component equipped with digital input connector
CD recorder or amplifier with digital input connector, etc.

Setting the mode select switch (MODE NORMAL/DJ) (rear panel)
When the unit is used normally as a DJ DVD player, the mode select switch should be set to the "DJ" position. If the switch position is changed during playback, playback will stop and after the stop, playback will begin from the beginning of the disc.
When set to DJ (DJ mode):
- During DVD playback, no signals will be output from the digital output connector. In addition, subtitles and certain other functions and operations are not supported.
- During CD playback, the digital connector outputs only audio data without sub-codes. However, the mode is fixed at 44.1kHz , with the result that some limitations may be experienced in recording or other functions when CD recorders and certain other components are connected. For details, consult the Operating Instructions for the component to be connected.
- Some functions may be limited or disabled during DVD playback ( P.3, "About DVD playback in DJ mode").
When set to NORMAL (NORMAL mode):
- The digital connector outputs digital data including sub-codes, but the player's DJ functions are disabled (P.7).
- When a non-supported operation is attempted, the display shows the message "NORMAL".
- When power is turned ON, if the mode select switch is set to "NORMAL", the display shows the message "NORMAL"
- If you wish to use all ordinary functions during DVD playback, set the unit to NORMAL mode (P.3, "About DVD playback in DJ mode").
Note:
Most DJ functions (cue, loop, reloop, tempo adjust, hot cue, jog dial, reverse play) are not supported when the mode select switch is set to "NORMAL". In addition, the pause mode is silent, not audible.
5. Connection to television monitor (composite video/S-Video)
This player is equipped with two video output connectors: a main video output connector (VIDEO OUT) which outputs only the DVD playback image, and a preview video output connector (PREVIEW OUT) which produces a variety of data displays used by the DJ during a performance.
Each of the television monitors is connected by using standard video cables (RCA plug) or S-Video cables.
The main video output is also equipped with a BNC type output connector (COMPOSITE), allowing the use of a BNC connector if desired.
* Only one video cable is provided as an accessory. S-Video cables and BNC connector cables are not provided.

Main monitor
Connect the player's video output directly to a television monitor, not to a video deck (if connected through a video deck, the copy guard function may prevent proper playback).
6. Connection to television monitor (component video)
This connection is recommended if the main monitor is equipped with component video input (Y / P_B / P_R) , since a higher fidelity video image will be produced.
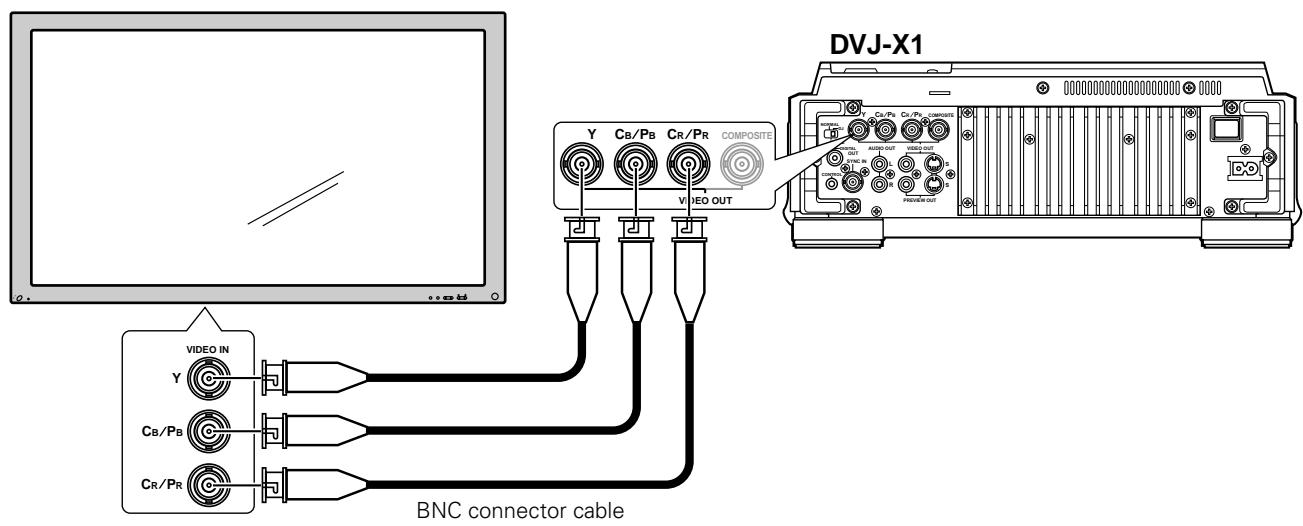
Main monitor
Cannot be connected to a Hi-Vision component video input connector.
7. Connection to video mixer
Use a standard video cable (RCA plug) or S-Video cable for these connections.

8. Connecting the power cord
After all other connections are completed, connect one end of the accessory power cord to the rear-panel AC inlet, and connect the other end (power plug) to a wall outlet or to the auxiliary outlet on an amplifier.
Setup
Initial setup is required before playing DVDs.
Setting the TV system
The default setting of this player is AUTO, and unless you notice that the picture is distorted when playing some discs, you should leave it set to AUTO.
If you experience picture distortion with some discs, set the TV system to match your country or region's system. Doing this, however, may restrict the kinds of disc you can watch. The table below shows what kinds of disc are compatible with each setting (AUTO, PAL and NTSC).
| Disc | Output format | |||
| Type | Format | Player setting | ||
| NTSC | PAL | AUTO | ||
| DVD | NTSC | NTSC | MOD. PAL | NTSC |
| PAL | — | PAL | PAL | |
| CD, No disc | NTSC | PAL | PAL or NTSC | |
To change the TV system setting, turn on the power while holding the TITLE+ button depressed, then continue holding the button depressed for 2 seconds.
The TV system changes as follows:
AUTO NTSC
NTSC PAL
PAL AUTO
The display indicates the new setting.
Note that you have to switch the player into power off before each change.
How to perform setup
Setup operations are performed by first pressing the SETUP button to display the Setup Menu on the screen; the cursor button is used to select items, and items are confirmed with the ENTER button.
The cursor button contains four sensors ( ) in a single button. Press the top () , bottom () , left () and right () sides of the button to move in the corresponding directions on the screen.
Settings are performed via a "Setup Navigator" which uses a dialog format to make basic settings of television and amplifier; a "Setup Menu Mode" is used for individual settings. First press the SETUP button to start the "Setup Navigator".
"Setup Menu Mode" includes "Basic" and "Expert"; the latter mode allows more detailed settings.
About MOD. (Modulation) PAL
SHRINK
Most models of the newly developed countdown PAL TV system detect 50Hz (PAL)/60 Hz (NTSC) and automatically switch vertical amplitude, resulting in a display without vertical shrinkage.
- If your PAL TV does not have a V-Hold control, you may not be able to view NTSC disc because the picture may roll. If the TV has a V-Hold control, adjust it until the picture stops rolling. On some TVs, the picture may shrink vertically, leaving black bands at the top and bottom of the screen. This is not a malfunction; it is caused by the NTSC PAL conversion.
Using the Setup Navigator
The "Setup Navigator" uses a dialog format to make basic television and amplifier settings. The various settings are made automatically as the user responds to displayed questions. The Setup Navigator function cannot be used during playback.
When Setup Navigator is started, setup questions appear in the following order:
Language (OSD Language) TV Connection (TV type) Amp Connection
1. Set POWER switch to ON.
If a disc is already loaded, remove it.
2. Press SETUP button.
The Setup Navigator screen will appear.
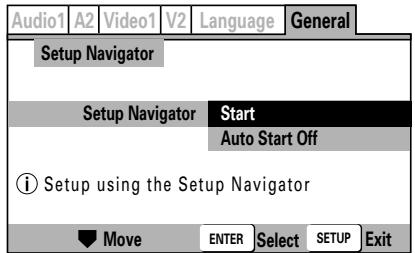
- When [Auto Start Off] is selected, the next time the SETUP button is pressed the manual Setup Menu will appear. For details, see pages 18-29.
Start:
Select to begin the Setup Navigator.
Auto Start Off:
Select if Setup Navigator settings are already completed.
3. Press ENTER button.
The Setup Navigator is initiated.
During setup, to return to the previous menu screen: Press the cursor button's left side (▲).
Select On-Screen-Display (OSD) Language
Languages selectable include English, French, German, Italian, or Spanish.
Press the cursor button's up/down sides ( /) to move the cursor to the language desired, then press ENTER button to confirm.
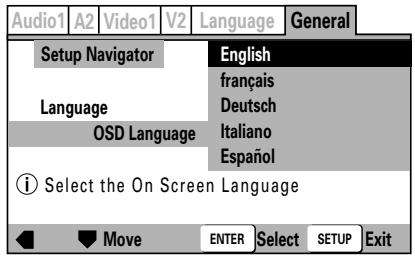
The language selected as the OSD Language is automatically selected as the language used in subtitles and audio. (P. 25)
English: OSD Language is English.
Français: OSD Language is French.
Deutsch: OSD Language is German.
Italiano: OSD Language is Italian.
Espanol: OSD Language is Spanish.
Select type of television connected
Sets the type of television connected to the player.
Press the cursor button's up/down sides ( /) to move the cursor to the item desired, then press ENTER button to confirm.
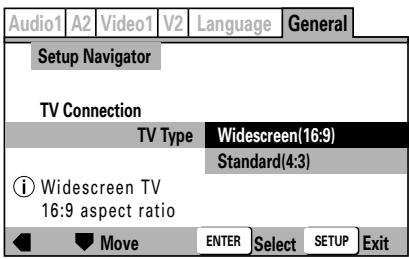
Widescreen(16:9):
Select this option when connecting a television with Widescreen (16:9) aspect ratio.
Standard(4:3):
Select this option when connecting a television with conventional (4:3) aspect ratio.
Select the type of digital signal supported by your amplifier
Digital output is disabled in DJ mode.
Set the type of digital signal supported by the amplifier connected to the player. (Consult the Operating Instructions for your amplifier when making this setting.)
Press the cursor button's up/down sides ( /) to move the cursor to the item desired, then press ENTER button to confirm.
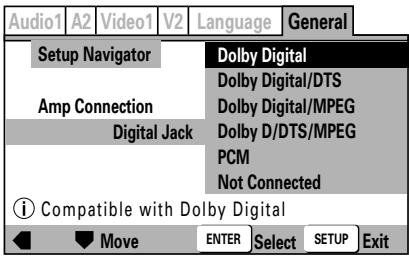
Dolby Digital:
Select this item if you have used a digital audio cable to connect a AV amplifier to the player, and the amplifier supports the Dolby Digital format.
Dolby Digital/DTS:
Select this item if you have used a digital audio cable to connect an AV amplifier to the player, and the amplifier supports Dolby Digital and DTS formats.
Dolby Digital/MPEG:
Select this item if you have used a digital audio cable to connect an AV amplifier to the player, and the amplifier supports Dolby Digital and MPEG formats.
Dolby D/PTS/MPEG:
Select this item if you have used a digital audio cable to connect an AV amplifier to the player, and the amplifier supports Dolby Digital, DTS, and MPEG formats.
PCM:
Select this item if you have used a digital audio cable to connect a stereo or Dolby Pro Logic amplifier.
Not Connected:
Select this item if you have used the accessory analog audio cable to connected an amplifier, or if you do not know whether the amplifier supports digital signals. When this item is selected, the next setting [96kHz PCM Audio] is not required; skip it and go directly to [Exit Setup Navigator].
- If your amplifier does not support DTS audio, do not select the [Dolby Digital/DTS] or [Dolby D/DTS/MPEG], since additional noise may occur.
Select whether connected amplifier supports 96 kHz audio NORMAL
Digital output is disabled in DJ mode.
Set this item to reflect whether the connected amplifier supports linear PCM 96 kHz audio.
Press the cursor button's up/down sides ( /) to move the cursor to the item desired, then press ENTER button to confirm.
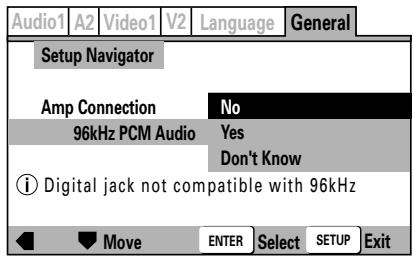
No:
Connected amplifier does not support linear PCM 96 kHz audio.
Yes:
Connected amplifier does support linear PCM 96 kHz audio.
Don't Know:
Select this item if you are unsure whether the connected amplifier supports linear PCM 96 kHz audio.
- If [No] or [Don't Know] is selected, DVD audio will be converted to 48kHz for output, regardless of whether it is originally linear PCM 96 kHz.
Exit Setup Navigator
Choices here include: to save the new settings and close Setup Navigator; to abandon (delete) the new settings and close Setup Navigator, or to start over without closing.
Press the cursor button's up/down sides ( /) to move the cursor to the item desired, then press ENTER button to confirm.
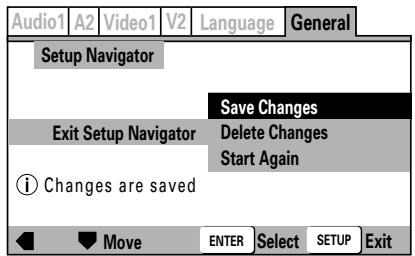
Save Changes:
The new settings will be saved and applied, and Setup Navigator will close.
Delete Changes:
New settings will be abandoned and Setup Navigator will close.
Start Again:
Setup Navigator will return to the [OSD Language] and start settings again.
- If [Save Changes] or [Delete Changes] is chosen, the initial setup menu will close.
- If [Start Again] is selected, the display will return to the [OSD Language] menu screen.
- The Setup Navigator is used to make basic settings only. For more detailed settings, use the Setup Menu to make manual settings.
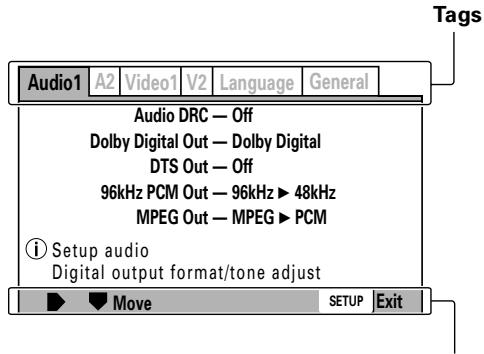
Setup Menu items
Manual setup using the Setup Menu allows a greater variety of setup options than the Setup Navigator. Consult the pages Noted for more information about the contents of items and options listed on the menu.
- I indicates factory default values
- settings are displayed in the Setup Menu's [Expert] mode.
| Audio1 | A2 | Video1 | V2 | Language | General |
| Audio DRC | ■Off On | ||||
| Dolby Digital Out | ■Dolby Digital Dolby Digital ▷ PCM | ||||
| DTS Out | ■Off DTS | ||||
| 96kHz PCM Out | ■96kHz ▷ 48kHz 96kHz | ||||
| MPEG Out | ■MPEG ▷ PCM | ||||
| Digital Out | ■On Off | ||||
| A1 | Audio2 | Video1 | V2 | Language | General |
| Virtual Surround | Off | TruSurround | |||
| Legato PRO | Off | Standard | |||
| Effect1 | |||||
| Effect2 | |||||
| Effect3 | |||||
| Hi-Bit | On | Off | |||
| Audio1 | A2 | Video1 | V2 | Language | General |
| TV Screen | 4:3(Letter Box) | ||||
| 4:3(Pan&Scan) | |||||
| 16:9(Wide) | |||||
| Component Video | Interlace | ||||
| Progressive | |||||
| S-Video Out | S1 | ||||
| S2 | |||||
| Screen Saver | On | ||||
| Off | |||||
| Audio1 | A2 | V1 | Video2 | Language | General |
| Background | ■ Pioneer Logo Black Start | P.25 | |||
| Video Adjust | P.23 | ||||
| Still Picture | Field Frame | P.25 | |||
| On Screen Display | ■ Auto | ||||
| Angle Indicator | ■ On Off | P.25 | |||
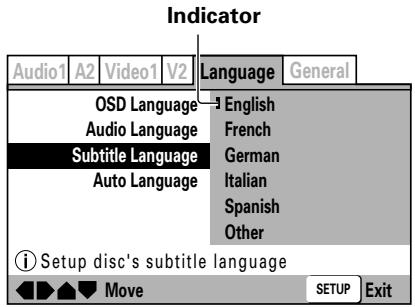
| Audio1 | A2 | Video1 | V2 | Language | General |
| OSD Language | ■English français Deutsch Italiano Espanol | P.25 | |||
| Audio Language | ■English French German Italian Spanish Other | P.25 | |||
| Subtitle Language | ■English French German Italian Spanish Other | P.26 | |||
| Auto Language | ■On Off | P.26 | |||
| DVD Language | ■w / Subtitle Language English French German Italian Spanish Other | P.26 | |||
| Subtitle Display | ■On Off Assist Subtitle | P.27 | |||
| Subtitle Off | ■Selected Subtitle | P.27 | |||
| Audio1 | A2 | Video1 | V2 | Language | General |
| Setup Menu Mode | Expert | ||||
| ■Basic | |||||
| Setup Navigator | Start | ||||
| Parental Lock | Password (Change) | ||||
| Level | |||||
| Country Code | |||||
To return all settings to their factory defaults
Use this command to return all changed settings to their factory default values.
1. Turn power OFF.
-
While holding the STOP button depressed, turn power ON, and continue holding the STOP button until the "POWER ON" indication goes off.
-
All setting contents will be returned to their factory default values.
The DJ mode functions listed below are set to the following factory defaults in addition to the items in the Setup Menu (P.18).
- Auto Cue: OFF
- Auto Cue level: -60 dB
Jog mode: VINYL ON
Time mode: REMAIN
This command additionally erases all memory contents, including "video memory" (P.23-24). Be sure you wish to delete all memory contents before using this command.
Using the Setup Menu
Setup menu functions are disabled during DVD playback in DJ mode, and during CD playback. Set the unit to stop, or remove the disc before attempting setup operations.
The Setup Menu is used when you wish to modify the default factory settings. The following instructions introduce the basic operations and controls used with the Setup Menu.
- If you have not yet performed the basic setup using the Setup Navigator, the Setup Navigator screen will appear first.
Confirm that power is turned ON, then
1. Press the SETUP button.
The Setup Menu will appear.
[Example]
Usable operation buttons
- Press the left and right sides of the cursor button (/) to move between the tags at the top of the menu ([Audio1], [Audio2], [Video1], [Video2], [Language], or [General]).
- Use the upper and lower sides of the cursor button ( / ) to select the desired setting item.
- Press the cursor button's right side (▶) to move to the options list.
- Use the upper and lower sides of the cursor button ( /) to move between options.
- Press the ENTER button to confirm the selection.
Repeat steps 2-6 to modify other settings.
7. Press the SETUP button.
The Setup Menu will close.
- If the Setup Menu is opened again after you have previously made settings there, the previously shown menu screen will appear.
Disc-dependent settings
Some setting changes are not supported, depending on the kind of disc (DVD/CD) used. Whether a desired setting is supported can be confirmed by viewing the indicator color at the left of the selected setting item. Consult the accompanying table for information regarding what settings are supported for each disc type. Changed settings become effective immediately.
| Indicator Color | Disc Type |
| Blue, Yellow | DVD only |
| Green | All |
■ Items not changeable during playback
Items that cannot be set during playback are displayed in grey. Perform this operation in the stop mode, or when no disc is loaded.

Advanced settings
The Setup Menu includes two mode levels, [Basic] and [Expert]; the [Expert] mode allows more advanced settings.
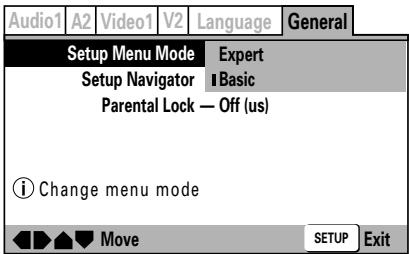
Expert:
Displays advanced settings.
Basic:
Displays basic settings; simple explanations ( ① ) are displayed for the items selected (factory default settings).
Adjusting Dolby Digital audio
Digital output during DVD playback is disabled in DJ mode.
This item allows adjustment of the dynamic range of digital sound. By adjusting the audio DRC (dynamic range compression), large-volume sounds can be attenuated and low-volume sounds can be enhanced for a variety of playback effects. This setting is effective, for example, when it is difficult to hear dialog on a television program, or when you do not wish to disturb neighbors while watching movies late at night.
See P.19 for menu instructions.

Off:
Cancels Audio DRC. Allows maximum audio presence when used with high-fidelity speakers (factory default setting).
On:
Suppresses loud sounds (explosions, etc.) making it easier to understand dialog.
- Audio DRC is supported only when using Dolby Digital audio.
- Some discs may produce less effect.
- Audio DRC is also applied to audio produced from the digital output (coaxial) connectors. In this case, set [Dolby Digital Out] to [Dolby Digital PCM], and set [Digital Out] to [On].
- The effect produced with Audio DRC differs depending on the speakers used and the volume setting of the AV amplifier. Turn the setting ON/OFF while adjusting your sound volume so as to produce most effective results.
Digital output setting
Digital output during DVD playback is disabled in DJ mode.
This item allows selection of the kind of digital signals supported by the connected amplifier.
- If this item is set incorrectly, unwanted noise may be produced.
- Consult the Operating Instructions for your amplifier when making this setting.
See P.19 for menu instructions.
Dolby Digital output NORMAL
Set to [Dolby Digital PCM] when the connected amplifier does not supports Dolby Digital audio.
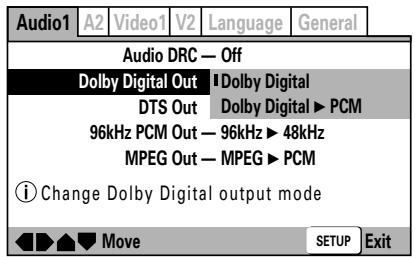
Dolby Digital:
Setting for amplifier or decoders supporting Dolby Digital audio (factory default setting).
Dolby Digital PCM:
Dolby Digital signals are converted to linear PCM for output. Select this setting when the connected amplifier does not support Dolby Digital audio.
DTS output NORMAL
Set this item to [DTS] when the connected amplifier supports DTS.
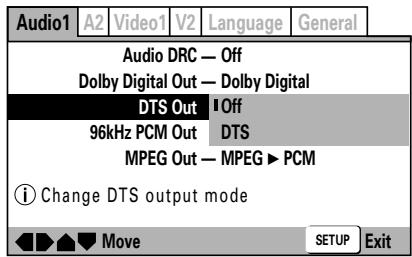
Off:
Select this item when the connected amplifier does not support DTS (factory default setting).
DTS:
Select this item when the connected amplifier or decoder supports DTS.
96 kHz PCM output
Set this option to [96kHz] when the connected amplifier supports 96 kHz output.
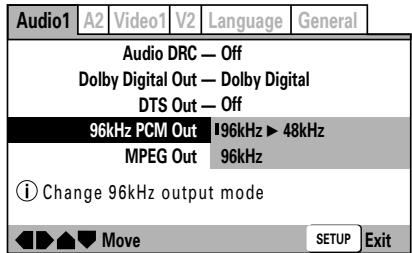
96kHz 48kHz:
96 kHz signals are converted to 48 kHz for output. Select this option when the connected amplifier does not support 96 kHz signals (factory default setting).
96kHz:
Select this option if the connected amplifier or decoder supports 96 kHz output.
MPEG output
Set this option to [MPEG] if the connected amplifier supports MPEG audio.
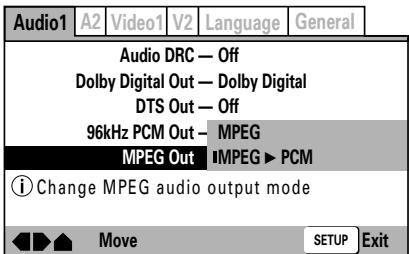
MPEG:
Select this option if the connected amplifier or decoder supports MPEG audio.
MPEG PCM:
MPEG signals are converted to linear PCM for output. Select this option if the connected amplifier does not support MPEG (factory default setting).
Digital output ON/OFF (Expert Mode)
This setting allows disabling of outputs from the digital audio output connectors.
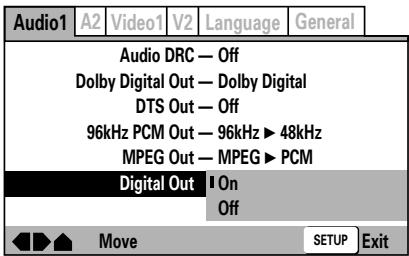
On:
Signals are output from the rear panel digital output connectors (factory default setting).
Off:
Signals are not output from the rear panel digital output connectors.
Supports Dolby\* Digital / DTS\*2 for genuine theater-like sound impact


By connecting an amplifier supporting Dolby Digital/DTS, you can enjoy the immediacy and power of 5.1 channel movies and music DVDs.
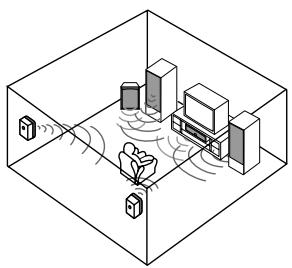
Equipped with SRS TruSurround (Virtual Surround)

Recreates the ambience of 5.1 channel sound using only 2 speakers. SRS TruSurround*3 technology performs direct processing of 5.1 channel digital sound data.
1 Manufactured under license from Dolby Laboratories. "Dolby" and the double-D symbol are trademarks of Dolby Laboratories.
2 "DTS" and "DTS Digital Out" are registered trademarks of Digital Theater Systems, Inc.
3 TruSurround, SRS and ()^ symbol are trademarks of SRS Labs, Inc.
TruSurround technology is incorporated under license from SRS Labs, Inc.
[Audio2] settings
See P.19 for menu instructions.
Surround setting
This option is not supported in DJ mode.
This function is supported only when connected to the audio output connectors. Not supported during use of DTS audio, linear PCM 96 kHz audio.
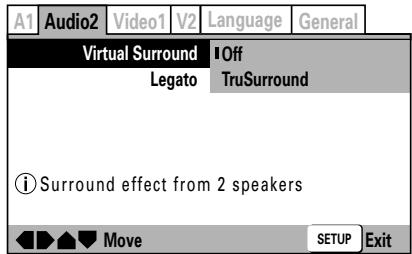
Off:
Disabled (factory default setting)
TruSurround:
Select for virtual surround sound.
- If [TruSurround] is selected during playback of DVD Dolby Digital 2ch discs, the audio level produced from the digital output connectors will be reduced.
Also note that if the [Audio1] menu item [Dolby Digital Out] is set to [Dolby Digital PCM] when playing discs other than those recorded in Dolby Digital 2ch format, selecting [TruSurround] will cause audio output to be disabled from the digital output connectors.
- Some discs may produce less surround effect than others.
Legato PRO function
Select from among the four ambience modes based on your own preferences and the style of music being played. The characteristics of the four modes are as follows:
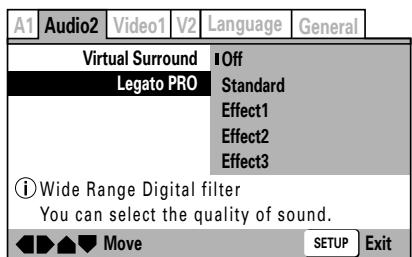
Off:
Legato function disabled (factory default setting).
Standard:
Produces full-bodied sound presence.
Effect1:
Produces bright, vivid sound.
Effect2:
Produces sound with depth and reserve.
Effect3:
Produces sound with solid bass and balance.
- The Legato PRO function operates to change the audio digital filter response of those bands primarily outside the audio range.
- The amount of tonal change may vary, depending on the listening room environment.
Hi-Bit function (Expert Mode)
By converting 16-20 bit audio data to 24 bit, smooth, detailed sound quality is produced even at low listening levels.
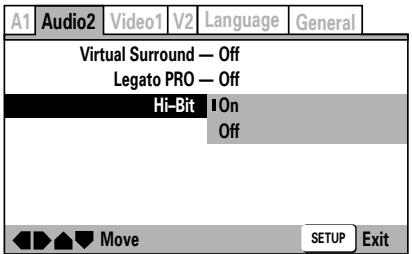
On:
Hi-Bit function is enabled (factory default setting)
Off:
Hi-Bit function is disabled.
[Video1] settings
See P.19 for menu instructions.
Set the screen aspect ratio for the television
Select the value matching the type of television connected. Select [16:9(Wide)] when a wide-screen television is connected. Most DVD movies are recorded to support wide television screens with an aspect of 16 horizontal to 9 vertical. As a result, when DVDs are viewed on conventional televisions, the image is projected at the television's aspect ratio of 4:3, causing it to appear horizontally compressed. In order to eliminate this kind of distortion, set the aspect ratio either for [4:3 (Letter Box)] or [4:3 (Pan&Scan)] when using a conventional television.
- This setting cannot be changed during playback.
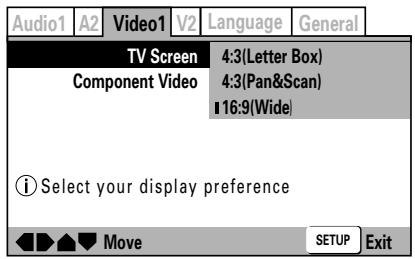
4:3(Letter Box):
Select this setting when using a conventional television and you wish to view movies in letterbox format.
4:3(Pan&Scan)
Select this setting when using a conventional television and you wish to view movies in "pan and scan" format.
16:9(Wide):
Select this setting when using a widescreen (16:9) television (factory default setting)
The 4:3(Pan&Scan) format is not supported in DJ mode. If [4:3(Pan&Scan)] is selected when the unit is in DJ mode, output will be in letterbox setting.
- Some DVDs do not support changing of aspect ratio. Consult the information printed on your disc's jacket for more details.
■ Aspect ratio formats
[With conventional television set]
| DVD recording format | Player Setting | Viewing appearance |
| 16:9 disc | 4:3(Letter Box) | Black bands appear at top and bottom of screen; image is projected in correct aspect ratio. |
| 4:3(Pan&Scan) | Right/left sides of image are cut off, but image is projected in correct aspect ratio. | |
| 16:9(Wide) | Image is horizontally compressed (appears vertically stretched). If the image appears as shown here, set the player's aspect ratio to [4:3 (LetterBox)] or [4:3 (Pan&Scan)]. | |
| 4:3 disc | All settings | Appears with correct aspect ratio. |
[With widescreen television set]
| DVD recording format | Player Setting | Viewing appearance |
| 16:9 disc | 16:9(Wide) | Black bands may appear at top/bottom with some discs. |
| 4:3 disc | 16:9(Wide) | Black bands appear at right/left, but image is projected in correct aspect ratio. Image is vertically compressed (appears horizontally stretched) If the image appears as shown here, set the television set's aspect ratio "normal". For details consult the Operating Instructions for your television set. |
Select video output format
When the television monitor used is connected for component video and supports progressive inputs, set this option to select the kind of player output, either interlace scan or progressive scan.
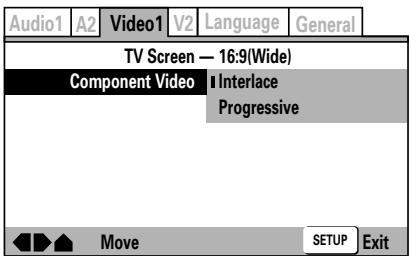
Interlace:
Select this option when the television or projector does not support progressive inputs (factory default setting).
Progressive:
This mode produces finely detailed, high-definition images and should be selected when using a television or projector that supports progressive inputs.
- If this player is set to output progressive-scan video, it's possible that the picture will appear stretched when playing discs recorded in 4:3 format. This happens when the TV's aspect ratio is set 'Full'. To see the picture in its correct aspect ratio, change the TV setting to 'Normal'.
If your TV doesn't have settings to change the aspect ratio of the picture, set this player to 16:9 (Compressed).
Note:
If you connect a TV that is not compatible with a progressive scan signal and choose one of the progressive scan settings, you will not be able to see any picture at all. With your TV connected using either the composite or S-Video terminals, choose the Interlace setting in the Component Video menu.
Compatibility of this unit with progressive-scan TVs.
CONSUMERS SHOULD NOTE THAT NOT ALL HIGH DEFINITION TELEVISION SETS ARE FULLY COMPATIBLE WITH THIS PRODUCT AND MAY CAUSE ARTIFACTS TO BE DISPLAYED IN THE PICTURE. IN CASE OF 525 PROGRESSIVE SCAN PICTURE PROBLEMS, IT IS RECOMMENDED THAT THE USER SWITCH THE CONNECTION TO THE "STANDARD DEFINITION" OUTPUT. IF THERE ARE QUESTIONS REGRADING OUR TV SET COMPATIBILITY WITH THIS MODEL 525p DVD PLAYER, PLEASE CONTACT OUR CUSTOMER SERVICE CENTER.
S1 Video Output:
S1 is S-Video with added signal for discrimination of aspect ratio (4:3, 16:9).
S2 Video Output:
S2 is the S1 signal with the addition of another signal for discrimination of the picture viewing format (letter box, pan and scan). When played on a wide television supporting S2, the appropriate picture mode will be selected automatically.
Select S-Video output (Expert Mode)
Set this option to select the video signal output from the S-Video connector.
- When the S-Video connector is used to connect the player to a television set, the image may appear vertically compressed (or stretched horizontally). In this case, select [S1].
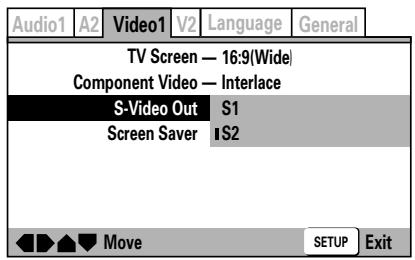
S2:
The S2 video signal is output (factory default setting).
S1:
The S1 video signal is output.
Screen Saver setting (Expert mode)
The screen saver function is provided in order to prevent image burn (residual image) on a television screen when a single image is paused or otherwise remains on the screen for an extended period of time.
- When enabled, the screen saver function operates after an image has been displayed for about five minutes.
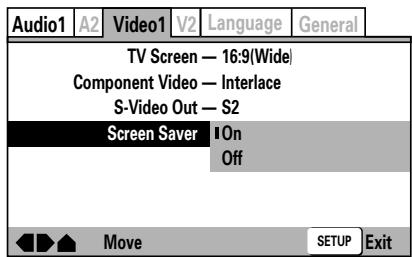
On:
Screen saver function is enabled (factory default setting).
Off:
Screen saver function is disabled.
In DJ mode, the screen saver function does not operate when the unit is in pause mode.
Video quality adjust
The video quality can be set to provide optimum reproduction of specific types of image (movies, animation, etc.). Further, each of the video image quality options can be set individually, and each setting can be recorded in memory. If playback is performed while displaying the initial setup menu, the picture quality can be adjusted while viewing the actual television image.
To select a preset picture quality
- Using the four sides of the cursor button ( / / / ) , select [Video2] [Video Adjust] [Start].
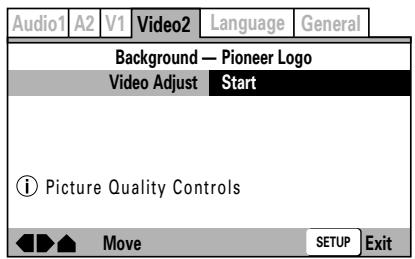
2. Press the ENTER button.
The Picture Quality Controls menu will appear.

3. Select [Video Memory Select] and press the ENTER button.
![PIONEER DVJ-X1 - Select [Video Memory Select] and press the ENTER button. - 1](/content/2025/01/76095/images/2108811608c8e2a41d88220f0749d53866c4327ab1c69ac344e7d892acdd6512.jpg)
4. Use the four sides of the cursor button ( / / ) to select the desired preset picture quality.
Standard:
Reproduces the picture quality recorded on the disc as is. Cinema:
Optimum for watching in a darkened room, to recreate the atmosphere of a movie theater.
Animation:
Produces bright, crisp colors, optimum for watching video animation.
Memory1/Memory2/Memory3:
Favorite picture quality settings can be recorded in memory, as described in the following section, "Adjusting picture quality".
5. Press the ENTER button.
The Picture Quality Controls menu will close. If the Picture Quality Controls menu closes automatically, any set contents will be canceled.
Adjusting picture quality
1. Use the four sides of the cursor button ( / / / ) to select [Video2] [Video Adjust] [Start], then press the ENTER button.
The Picture Quality Controls menu will appear.
![PIONEER DVJ-X1 - Use the four sides of the cursor button ( / / / ) to select [Video2] [Video Adjust] [Start], then press the ENTER button. - 1](/content/2025/01/76095/images/09cb313c658abbb0ef365b08c696d571fb9680d3d06ef67ce31f046f5743a324.jpg)
2. Use the cursor button's up/down sides (/) to select [Video Setup] and press the ENTER button.
![PIONEER DVJ-X1 - Use the cursor button's up/down sides (/) to select [Video Setup] and press the ENTER button. - 1](/content/2025/01/76095/images/648ec5c3e2f426566834f9db6412806a57d8cfd09056dc0a9b7190022b9c939b.jpg)
3. Use the cursor button's up/down sides ( / ) to select the item you wish to adjust.
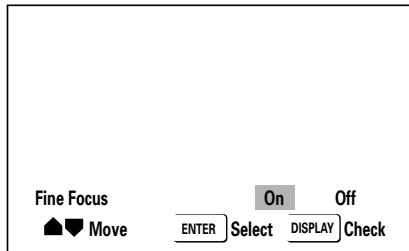
When the DISPLAY button is pressed, a submenu list of the selected adjustment items will be displayed. Press the DISPLAY button once again to return to the previous menu.

Fine Focus:
Set to [On] to reproduce high-resolution images.
Contrast:
Use to adjust the ratio between the brightest and darkest parts of the image.
Sharpness:
Use to adjust the image brightness with respect to the middle frequency range. This function is disabled when [Fine Focus] is set to [On].
Chroma Level:
Use to adjust the depth of color. This function is particularly effective when watching heavily colored animations.
Hue:
Use to adjust the red-green balance (this function is disabled with component video signals).
4. Use the cursor button's left/right sides (▲/▲) to adjust the selected item's level.
When setting [Fine Focus], select between [On] or [Off].
5. Repeat steps 3-4 for all desired setting items.
If you wish to record the selected settings in memory, use the cursor button's up/down sides (/) to select [Memory], then use the cursor button's left/right (/) sides to select [1], [2], or [3] to record the combination of settings in the corresponding memory space.
- If a combination of settings has previously been memorized in the selected memory space, the previous settings will be overwritten (erased) by the new settings.
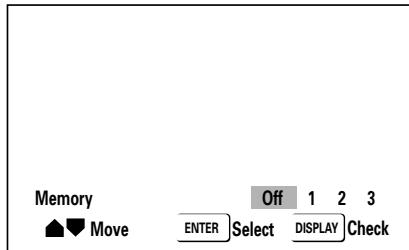
6. Press the ENTER button.
The Picture Quality Controls menu will close.
-
If the ENTER button is not pressed, the newly modified picture quality control settings will not be recorded in [Memory].
-
The effect of picture quality control changes may not appear as distinct with some DVDs and on some television sets.
-
Picture adjustments are reflected on interlaced output. When the [Progressive] is selected with [Component Video], picture adjustments are not applied to the component output.
[Video2] settings
See P.19 for menu instructions.
Select Background
Select the kind of background that appears when disc is stopped.
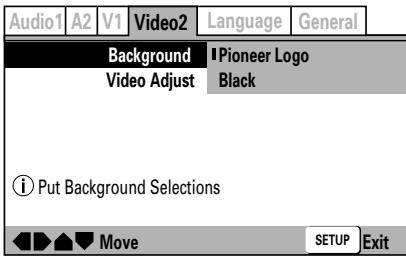
Pioneer Logo:
The Pioneer Logo mark appears as background when disc is stopped (factory default setting).
Black:
Background appears black when disc is stopped.
Still Picture selection (Expert Mode)
Use to eliminate image shaking when viewing still images (DVD pause mode), and produce a clearer picture.
- Some discs may not appear clearer even when [Field] is selected.
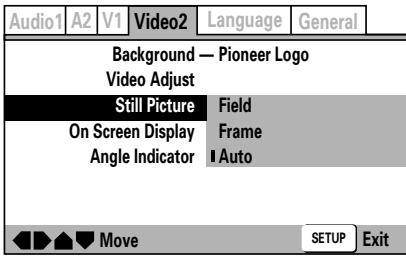
Field:
Eliminates shaking during still images.
Frame:
Normal mode.
Auto:
Switches automatically between [Field] and [Frame] (factory default setting).
- Automatically defaults to [Auto] in DJ mode.
Turn on-screen display ON/OFF (Expert Mode)
Sets player's onscreen display ON/OFF.

On:
On-screen display is enabled (factory default setting).
Off:
On-screen display is disabled.
Angle mark display (Expert Mode)
Use this option to turn the on-screen angle indicator mark ON/OFF. In DJ mode, the preview image output angle indicator mark is turned ON/OFF using the DISPLAY button, regardless of the setting of this option.
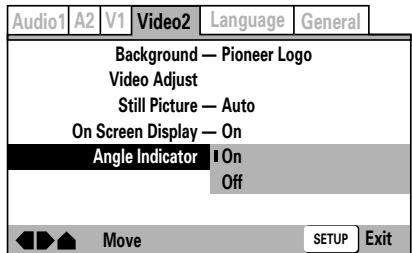
On:
The angle indicator mark 品 _ 1 ^ 品 appears on screen (factory default setting).
Off:
The angle indicator mark 品 does not appear on screen.
[Language] settings
Some DVDs include multiple subtitle and audio languages, allowing the user to select different languages as desired. This setting item allows the selection of such language and subtitle alternatives.
See P.19 for menu instructions.
Set the OSD Language
Select the language used for Setup Menu and other on-screen displays (OSD).
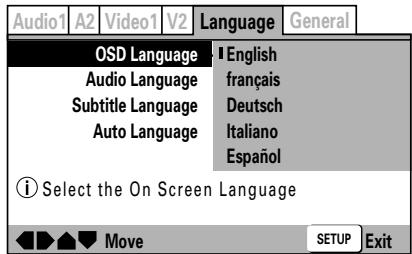
English: OSD Language is English.
François: OSD Language is French.
Deutsch: OSD Language is German.
Italiano: OSD Language is Italian.
Espanol: OSD Language is Spanish.
- In the DJ mode, the guide display language for preview images, etc., is always English, regardless of the setting of this item.
Select the Audio Language
Select the language heard in audio channels. This setting cannot be changed during playback.
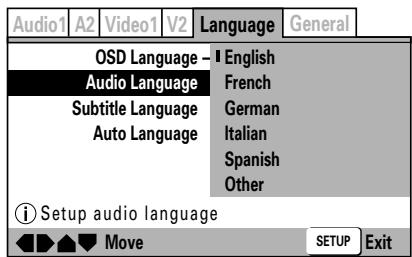
English: Audio Language is English.
French: Audio Language is French.
German: Audio Language is German.
Italian: Audio Language is Italian.
Spanish: Audio Language is Spanish.
Other: Select from among 136 languages.
For information on this item, see the section "■ When Selecting [Other] for Subtitle Language, Audio Language, or DVD Language".
Select the Subtitle Language
Select the language you wish subtitles to appear in. This setting cannot be changed during playback.
No subtitles are displayed in DJ mode.
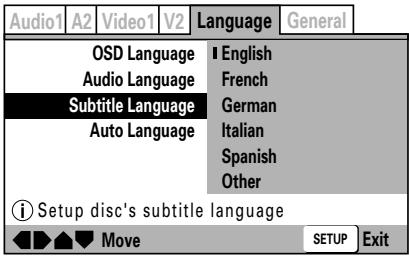
English: Subtitle Language is English.
French: Subtitle Language is French.
German: Subtitle Language is German.
Italian: Subtitle Language is Italian.
Spanish: Subtitle Language is Spanish.
Other: Select from among 136 languages.
For information on this item, see the section "■ When Selecting [Other] for Subtitle Language, Audio Language, or DVD Language".
- If an attempt is made to select an Audio Language or Subtitle Language not actually recorded on the disc, the disc's original language of recording will be selected automatically.
Automatic language and subtitle setting
This function selects either automatic audio and subtitle language selection, or manual selection via the Setup Menu are used. This setting cannot be changed during playback.
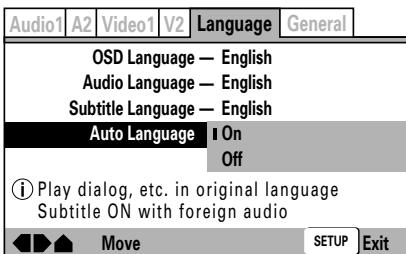
On:
Enabled when [Audio Language] and [Subtitle Language] are the same, and when subtitle display is set to ON (factory default setting).
Off:
Automatic audio language setting is canceled; instead, the languages set manually with [Audio Language] and [Subtitle Language] are enabled.
Set DVD menu language (Expert Mode)
Many DVDs contain menus; this command allows selection of the menu display language, when available.
- This setting cannot be changed during playback.
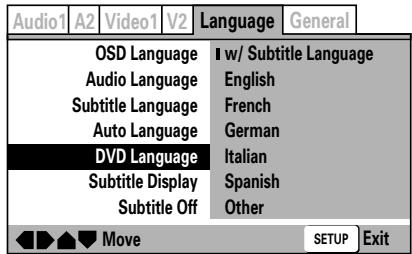
w/Subtitle Language:
The language selected in [Subtitle Language] becomes the menu display language (factory default setting).
English: Menu display language is English.
French: Menu display language is French.
German: Menu display language is German.
Italian: Menu display language is Italian.
Spanish: Menu display language is Spanish.
Other: Select from among 136 languages.
For information on this item, see the section "■ When Selecting [Other] for Subtitle Language, Audio Language, or DVD Language".
■ When selecting [Other] for Subtitle Language, Audio Language, or DVD Language
Make this selection while looking at the "Language Code List" on P.27. If a language is selected that is not actually recorded on the DVD, one of the recorded languages will be used for the menu display.
1. Select [Other] and press the ENTER button.
The Language selection menu will appear.
(Example): To set the Audio Language
![PIONEER DVJ-X1 - Select [Other] and press the ENTER button. - 1](/content/2025/01/76095/images/24db792a972ea2846e1125e146c8e6a12095526dd5590d4641f384cfce54a66d.jpg)
2. Select [List of Language] or [Code].
Some languages are not displayed on the Code page. For details, see the "Language Code List" (P.27).
- The numbers listed in parentheses () beside [Code] indicate the range of numbers possible.
■ Select language using [Code]
Use one of the following methods:
(Example): To select French
Use the cursor button's up/down sides ( / ) to select the desired number for each digit; use the cursor button's left/right sides ( / ) to move between digits.
■ Select language using [List of Language]
(Example): To select French
Use the cursor button's down side () to move down one place.
- Press the ENTER button.
Set Subtitle Display ON/OFF (Expert Mode)
Select whether to turn subtitles ON, OFF, or to display assist subtitles.
- This setting cannot be changed during playback.
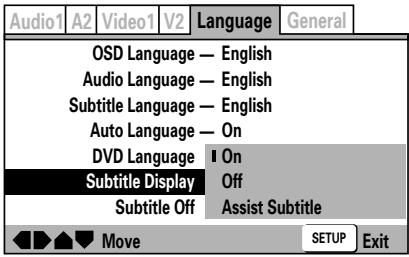
On:
Subtitles are displayed normally (factory default setting).
Off:
Subtitles are not displayed. However, some DVDs have subtitles that are displayed by default, regardless of this setting (see paragraph at right).
Assist Subtitle:
[Assist Subtitle] are subtitles that provide additional information about the current scene, for example descriptions of ambient sounds for the hearing impaired. Select this option to display such assist subtitles. Note that assist subtitles are displayed only when they originally recorded on the DVD being played.
Set language for forced subtitles (Expert Mode)
On some DVDs, even when the [Subtitle Display] is set to [Off], some subtitles may be displayed automatically. Use this command to select the language used for such subtitles.
- This setting cannot be changed during playback.
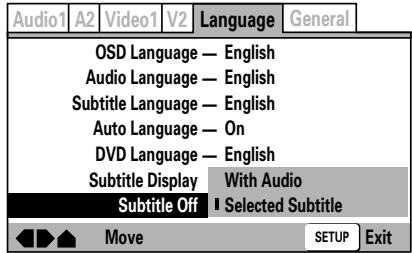
With Audio:
Display subtitles in the same language as the audio being played.
Selected Subtitle:
Display subtitles in the language selected with the [Subtitle Language] in the Setup Menu (factory default setting).
Language Code List
| Language | Input-code |
| Japanese (ja) | 1001 |
| English (en) | 0514 |
| French (fr) | 0618 |
| German (de) | 0405 |
| Italian (it) | 0920 |
| Spanish (es) | 0519 |
| Chinese (zh) | 2608 |
| Dutch (nl) | 1412 |
| Portuguese (pt) | 1620 |
| Swedish (sv) | 1922 |
| Russian (ru) | 1821 |
| Korean (ko) | 1115 |
| Greek (el) | 0512 |
| Afar (aa) | 0101 |
| Abkhazian (ab) | 0102 |
| Afrikaans (af) | 0106 |
| Amharic (am) | 0113 |
| Arabic (ar) | 0118 |
| Assamese (as) | 0119 |
| Aymara (ay) | 0125 |
| Azerbaijani (az) | 0126 |
| Bashkir (ba) | 0201 |
| Byelorussian (be) | 0205 |
| Bulgarian (bg) | 0207 |
| Bihari (bh) | 0208 |
| Bislama (bi) | 0209 |
| Bengali (bn) | 0214 |
| Tibetan (bo) | 0215 |
| Breton (br) | 0218 |
| Catalan (ca) | 0301 |
| Corsican (co) | 0315 |
| Czech (cs) | 0319 |
| Welsh (cy) | 0325 |
| Danish (da) | 0401 |
| Bhutani (dz) | 0426 |
| Esperanto (eo) | 0515 |
| Estonian (et) | 0520 |
| Basque (eu) | 0521 |
| Persian (fa) | 0601 |
| Finnish (fi) | 0609 |
| Fiji (fj) | 0610 |
| Faroeese (fo) | 0615 |
| Frisian (fy) | 0625 |
| Irish (ga) | 0701 |
| Scotts-Gaelic (gd) | 0704 |
| Galician (gl) | 0712 |
| Guarani (gn) | 0714 |
| Language | Input-code |
| Gujarati (gu) | 0721 |
| Hausa (ha) | 0801 |
| Hindi (hi) | 0809 |
| Croatian (hr) | 0818 |
| Hungarian (hu) | 0821 |
| Armenian (hy) | 0825 |
| Interlingua (ia) | 0901 |
| Interlingue (ie) | 0905 |
| Inupiak (ik) | 0911 |
| Indonesian (in) | 0914 |
| Icelandic (is) | 0919 |
| Hebrew (iw) | 0923 |
| Yiddish (ji) | 1009 |
| Javanese (jw) | 1023 |
| Georgian (ka) | 1101 |
| Kazakh (kk) | 1111 |
| Greenlandic (kl) | 1112 |
| Cambodian (km) | 1113 |
| Kannada (kn) | 1114 |
| Kashmiri (ks) | 1119 |
| Kurdish (ku) | 1121 |
| Kirghiz (ky) | 1125 |
| Latin (la) | 1201 |
| Lingala (ln) | 1214 |
| Laothian (lo) | 1215 |
| Lithuanian (lt) | 1220 |
| Latvian (lv) | 1222 |
| Malagasy (mg) | 1307 |
| Maori (mi) | 1309 |
| Macedonian (mk) | 1311 |
| Malayalam (ml) | 1312 |
| Mongolian (mn) | 1314 |
| Moldavian (mo) | 1315 |
| Marathi (mr) | 1318 |
| Malay (ms) | 1319 |
| Maltese (mt) | 1320 |
| Burmese (my) | 1325 |
| Nauru (na) | 1401 |
| Nepali (ne) | 1405 |
| Norwegian (no) | 1415 |
| Occitan (oc) | 1503 |
| Oromo (om) | 1513 |
| Oriya (or) | 1518 |
| Panjabi (pa) | 1601 |
| Polish (pl) | 1612 |
| Pashto, Pushto (ps) | 1619 |
| Quechua (qu) | 1721 |
| Language | Input-code |
| Rhaeto-Romance (rm) | 1813 |
| Kirundi (rn) | 1814 |
| Romanian (ro) | 1815 |
| Kinyarwanda (rw) | 1823 |
| Sanskrit (sa) | 1901 |
| Sindhi (sd) | 1904 |
| Sangho (sg) | 1907 |
| Serbo-Croatian (sh) | 1908 |
| Sinhalese (si) | 1909 |
| Slovak (sk) | 1911 |
| Slovenian (sl) | 1912 |
| Samoan (sm) | 1913 |
| Shona (sn) | 1914 |
| Somali (so) | 1915 |
| Albanian (sq) | 1917 |
| Serbian (sr) | 1918 |
| Siswati (ss) | 1919 |
| Sesotho (st) | 1920 |
| Sundanese (su) | 1921 |
| Swahili (sw) | 1923 |
| Tamil (ta) | 2001 |
| Telugu (te) | 2005 |
| Tajik (tg) | 2007 |
| Thai (th) | 2008 |
| Tigrinya (ti) | 2009 |
| Turkmen (tk) | 2011 |
| Tagalog (tl) | 2012 |
| Setswana (tn) | 2014 |
| Tonga (to) | 2015 |
| Turkish (tr) | 2018 |
| Tsonga (ts) | 2019 |
| Tatar (tt) | 2020 |
| Twi (tw) | 2023 |
| Ukrainian (uk) | 2111 |
| Urdu (ur) | 2118 |
| Uzbek (uz) | 2126 |
| Vietnamese (vi) | 2209 |
| Volapük (vo) | 2215 |
| Wolof (wo) | 2315 |
| Xhosa (xh) | 2408 |
| Yoruba (yo) | 2515 |
| Zulu (zu) | 2621 |
Setting Parental Lock
Some DVDs containing violent or other mature material are provided with a parental lock function allowing parents to limit the disc's viewing (see the disc's jacket or label for information). By setting the player's lock level lower than that of the disc, you can limit what discs can be viewed on the player. For example, by setting the player's level to 6, discs with level designation 7 or 8 cannot be viewed unless a previously recorded password is input.
See P. 19 for menu instructions.
Recording a password
1. Use the four sides of the cursor button ( / / / ) to navigate to the [General] [Parental Lock] [Password]
A password must be recorded before the [Level] and [Country Code] can be selected.
![PIONEER DVJ-X1 - Use the four sides of the cursor button ( / / / ) to navigate to the [General] [Parental Lock] [Password] - 1](/content/2025/01/76095/images/d36004b92b42f3284ea5ba775c07214191ab2bb845b840d32b763313fcb2b402.jpg)
2. Press the ENTER button.
The [Register Code Number] screen will appear.
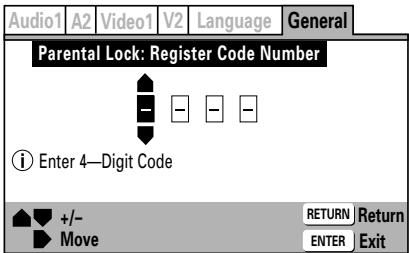
3. Enter a 4-digit numerical code as your new password.
Press the cursor button's up/down sides ( / ) to increment/ decrement numbers, and use the left/right ( / ) sides to move between digits.
4. Press the ENTER button.
The following Setup Menu will be displayed.
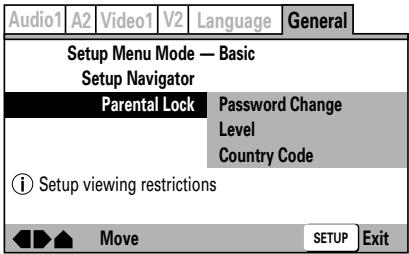
Password Change:
Select this item to change your password (code number).
Level:
Select this item to set the parental lock level.
Country Code:
Select this item to select the country code of discs.
- It is recommended that you make a memo of your password number and store in a safe place.
- If you forget your password, return the unit to its factory default settings (P. 19), and set the password again.
- Some discs allow parental lock to be applied at the scene level, in which case restricted scenes will be skipped during playback. For details, consult the Operation Instructions accompanying your disc.
Change the Parental Lock level
1. Select [Level] and press the ENTER button.
The [Confirm Code Number] screen will appear.
![PIONEER DVJ-X1 - Select [Level] and press the ENTER button. - 1](/content/2025/01/76095/images/2dc4ffcaff6cdc4120abac4dd79cd8ccd295483480753d5ec11639a3ca6430cb.jpg)
2. Input the previously recorded 4-digit password (code number).
Input the four digits by pressing the cursor button's up/down sides ( / ) to increment/decrement numbers, and the left/right ( / ) sides to move between digits.
3. Press the ENTER button.
The parental lock level setting screen will appear. The factory default setting is [Off].

4. Press the cursor button's left/right sides (▲/▲) to select the desired level, and press the ENTER button.
The selected parental lock level will be set.
To play back DVDs with parental lock restrictions
When an attempt is made to play back a disc restricted with the parental lock function, a screen may appear asking you to input the password (code number). The disc cannot be played back if the code number is not input correctly.
Input the code number as follows:
① Input the 4-digits by pressing the cursor button's up/down (▲/▼) sides to increment/decrement numbers, and the left/right sides (▲/▼) to move between digits.
② Press the ENTER button.
To change your password
1. Select the [Password Change] and press the ENTER button.
The [Confirm Code Number] screen will appear.
![PIONEER DVJ-X1 - Select the [Password Change] and press the ENTER button. - 1](/content/2025/01/76095/images/a4468fd6936d11bda4d6ad7d6bf77095730eccb13730e62bc99d8d501e2196e2.jpg)
2. Input the previously set code number.
Input the 4-digits by pressing the cursor button's up/down (/) sides to increment/decrement numbers, and the left/right sides (/) to move between digits.
3. Press the ENTER button.
The [Change Code Number] screen will appear.
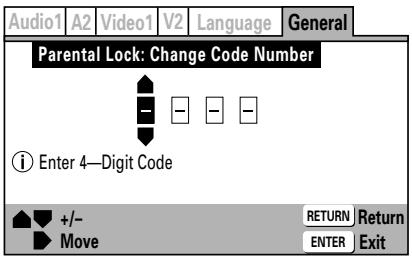
4. Enter a new 4-digit password (code number).
Input the 4-digits by pressing the cursor button's up/down sides ( / ) to increment/decrement numbers, and the left/right sides ( / ) to move between digits.
5. Press the ENTER button.
The password (code number) will be changed.
To change the country code
Consult the accompanying Country Code List when making this setting.
1. Select [Country Code] and press the ENTER button.
The [Confirm Code Number] screen will appear.
![PIONEER DVJ-X1 - Select [Country Code] and press the ENTER button. - 1](/content/2025/01/76095/images/a09e26910d2db5044765552a031f5c767d5a8fb9f119dd38543de72a34bdf165.jpg)
2. Input the previously recorded 4-digit password (code number).
Input the 4-digits by pressing the cursor button's up/down sides ( / ) to increment/decrement numbers, and the left/right sides ( / ) to move between digits.
3. Press the ENTER button.
The Setup Country Code menu will appear.
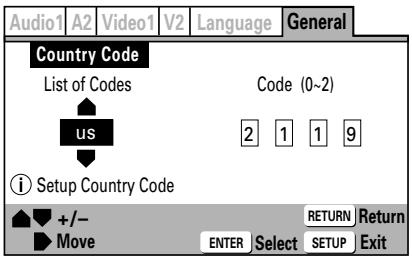
4. Select either [List of Codes] or [Code]
The numbers listed in parentheses ( ) beside [Code] indicate the range of numbers possible.
■ When using [Code] to select the country code: (Example) Selecting the code for U.S.A.
Input the 4-digit code number (2, 1, 1, 9) by pressing the cursor button's up/down sides (/) to increment/decrement numbers, and the left/right sides (/) to move between digits.
When using [List of Codes] to select the country code:
(Example) Selecting the code for U.S.A.
Use the cursor button's down side () to highlight [us].
5. Press the ENTER button.
Country Code List
| Country | Input-code | Country-code |
| ARGENTINA | 0118 | ar |
| AUSTRALIA | 0121 | au |
| AUSTRIA | 0120 | at |
| BELGIUM | 0205 | be |
| BRAZIL | 0218 | br |
| CANADA | 0301 | ca |
| CHILE | 0312 | cl |
| CHINA | 0314 | cn |
| DENMARK | 0411 | dk |
| FINLAND | 0609 | fi |
| FRANCE | 0618 | fr |
| GERMANY | 0405 | de |
| HONG KONG | 0811 | hk |
| INDIA | 0914 | in |
| INDONESIA | 0904 | id |
| ITALY | 0920 | it |
| JAPAN | 1016 | jp |
| KOREA, REPUBLIC OF | 1118 | kr |
| MALAYSIA | 1325 | my |
| MEXICO | 1324 | mx |
| NETHERLANDS | 1412 | nl |
| NEW ZEALAND | 1426 | nz |
| NORWAY | 1415 | no |
| PAKISTAN | 1611 | pk |
| PHILIPPINES | 1608 | ph |
| PORTUGAL | 1620 | pt |
| RUSSIAN FEDERATION | 1821 | ru |
| SINGAPORE | 1907 | sg |
| SPAIN | 0519 | es |
| SWEDEN | 1905 | se |
| SWITZERLAND | 0308 | ch |
| TAIWAN | 2023 | tw |
| THAILAND | 2008 | th |
| UNITED KINGDOM | 0702 | gb |
| UNITED STATES OF AMERICA | 2119 | us |
Loading and Removing Discs
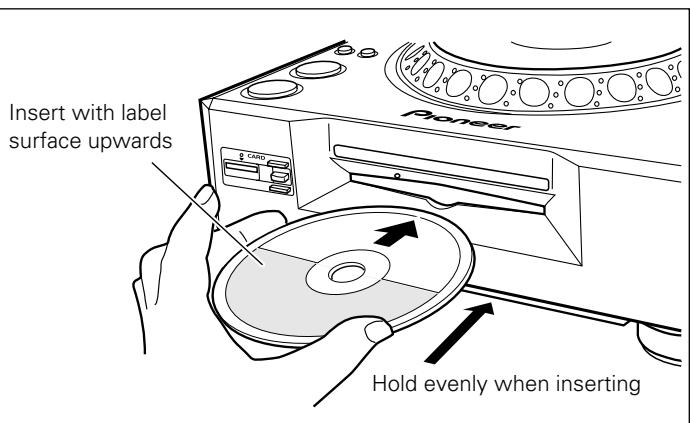
1. Set the rear panel POWER switch to ON.
Do not attempt to force a disc into the slot when the POWER switch is turned OFF, since the disc or loading mechanism may be damaged.
2. Insert the disc into the loading slot.
- Hold the disc with label surface upwards and insert evenly into the front-panel disc loading slot.
- When using 8 cm compact discs, place the disc into an adapter first.
- Only one disc can be loaded at a time. Do not attempt to load two or more discs simultaneously, or to load a second disc when another disc is already loaded.
- When loading a disc, do not apply bending force on the disc, or attempt to force the disc into the mechanism. Also, when the loading mechanism begins to pull the disc into the player or to eject a disc, do not attempt to forcibly override the mechanism's movement, since the disc or loading mechanism may be damaged.
3. When the eject/stop mode select switch is set to UNLOCK, press the EJECT (▲) button to eject a loaded disc. If the eject/stop mode select switch is set to LOCK, during playback press the PLAY/PAUSE (▶/II) button to first stop the disc, then press the EJECT (▲) button. If a cue point has been set, during playback press the CUE button to initiate back cue, then press the EJECT (▲) button to eject the disc.
- When the button is pressed, disc rotation will stop and the disc will be ejected partway from the loading slot.
Note:
Do not attempt to press the disc back into the slot while the "EJECT" indicator is lighted. If the disc is pressed back in while the "EJECT" indicator is lighted, the loading mechanism may stop. In this case, press the EJECT (▲) button again, and do not attempt to reload the disc until the "EJECT" indicator has turned OFF.
Precautions when playing 8 cm CD singles
① When playing 8 cm CD singles, be sure to use an adapter designed for 8 cm CDs. Before loading the disc into the player, confirm that the disc is fastened correctly by the adapter's tabs. If an 8 cm disc is loaded by mistake without an adapter, immediately press the EJECT (▲) button and remove the disc. If the disc is not ejected the first time the EJECT (▲) button is pressed, press the button again.
② Use only 8 cm disc adapters that feature the logo mark (recommended compatible adapters). When mounting the disc to an adapter, confirm that the disc is able to rotate freely, and is not bent or warped.
Forced eject function
If a disc fails to be ejected when the EJECT (▲) button is pressed or otherwise when you cannot remove a disc, insert the provided pin into the forced eject hole at the front of the player (see illustration) and press to eject the disc. When using the forced eject function, be sure to following the accompanying precautions.
① Turn off the player's power and wait for at least one minute.

Attempting the forced eject function immediately after turning off the power may cause the following dangers:
- The disc may be ejected while still rotating, resulting in personal injury.
- The disc may be damaged due to the disc clamp's rotating in an unstable condition.
(2) Use only the provided accessory pin for this procedure (do not use other pointed objects). The forced eject pin is located on the bottom surface of the player.
When the accessory pin is inserted fully into the forced eject hole, the disc will be ejected from the loading slot by about 5 - 10mm . It can then be grasped with the fingers and removed.
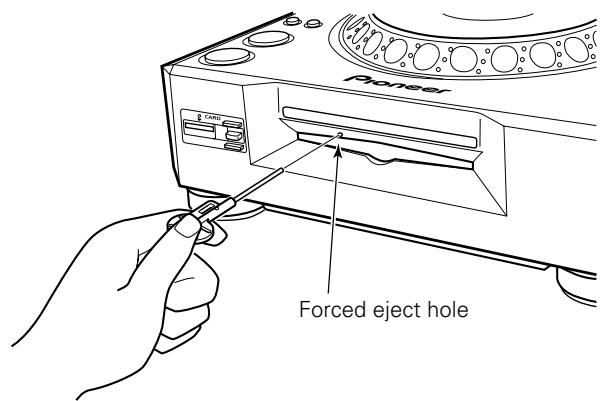
Note:
This player does not support playback of 8 cm DVDs. Do not attempt to use adapters meant for 8 cm CDs, since the adapter may come loose during rotation, causing damage to the disc or component.
Basic Operations
Buttons and controls with the D) mark are disabled when the mode select switch is set to NORMAL.
Buttons and controls with the mark are disabled when the mode select switch is set to DJ.
Beginning playback
The playback operation differs depending on the type of disc, the setting of the rear panel mode select switch, and the setting of auto cue and other functions.
When a CD is loaded
When the rear panel mode select switch (MODE NORMAL/DJ) is set to "NORMAL", playback will begin automatically from the first track, and when the final track ends, playback will stop. Special DJ functions are not supported in this mode.
When the rear panel mode select switch (MODE NORMAL/DJ) is set to "DJ", playback will begin automatically from the first track if the auto cue function (see next item) is set to OFF; when the final track ends, playback will stop. If the auto cue function is set to ON, the player will cue to the cue point and the outer rim of the CUE button will light, and the PLAY/PAUSE (/) button's outer rim indicator will flash, indicating the player is in the standby mode. When the PLAY/PAUSE (/) button is pressed, the player will skip over the non-recorded portion of the indicated track and immediately begin playback. When a single track ends, the player will cue to the next playback point, the outer rim of the CUE button will light, and the PLAY/PAUSE (/) button's outer rim indicator will flash, indicating the player is in the standby mode. When the PLAY/ PAUSE (/) button is pressed, playback will begin from the next track.
When a DVD is loaded
When a commercial DVD title is loaded, the initial default cautionary warnings will be displayed first (these warning messages cannot be skipped). When the DVD is recorded with a menu and automatic playback start has not been set, the menu will appear. The menu can also be displayed by pressing the MENU button or the top menu (T.MENU) button. The menu allows the setting of audio and subtitle languages, and the selection of special features on the disc.
EXAMPLE:
Main Menu
- Highlight clips
- Chapter list
- Previews
- Subtitle settings
- Audio settings
- Play
Depending on the disc, the style, contents, and operation method used in the menu may be different. Basic operations are performed by using the cursor button's four sides ( / / / ) to select options, and by pressing the ENTER button to confirm the selection. For detailed instructions on using a disc's menu, consult the operating guide provided with the disc.
DJ operations cannot be performed on the menu display.
When the rear panel mode select switch (MODE NORMAL/DJ) is set to "NORMAL" and the disc has been set for automatic playback start (or the menu's "Play" item has been selected), playback will begin. Special DJ functions are not supported in this mode.
When the rear panel mode select switch (MODE NORMAL/DJ) is set to "DJ" and auto cue function (see next item) is OFF, if the disc is set for automatic playback start (or or the menu's "Play" item has been selected), playback will begin. If the auto cue function is ON, the player will automatically cue to the cue point, the outer rim of the CUE button will light, and the PLAY/PAUSE (/) button's outer rim indicator will flash, indicating the player is in the standby mode. When the PLAY/PAUSE (/) button is pressed, the player will skip over the non-recorded portion of the indicated chapter and immediately begin playback. When a single chapter ends, the player will cue to the next playback point, the outer rim of the CUE button will light, and the PLAY/PAUSE (/) button's outer rim indicator will flash, indicating the player is in the standby mode. When the PLAY/PAUSE (/) button is pressed, the player will begin playback of the next chapter.
- Some of the above operations may not be supported, depending on the disc or the portion being played.
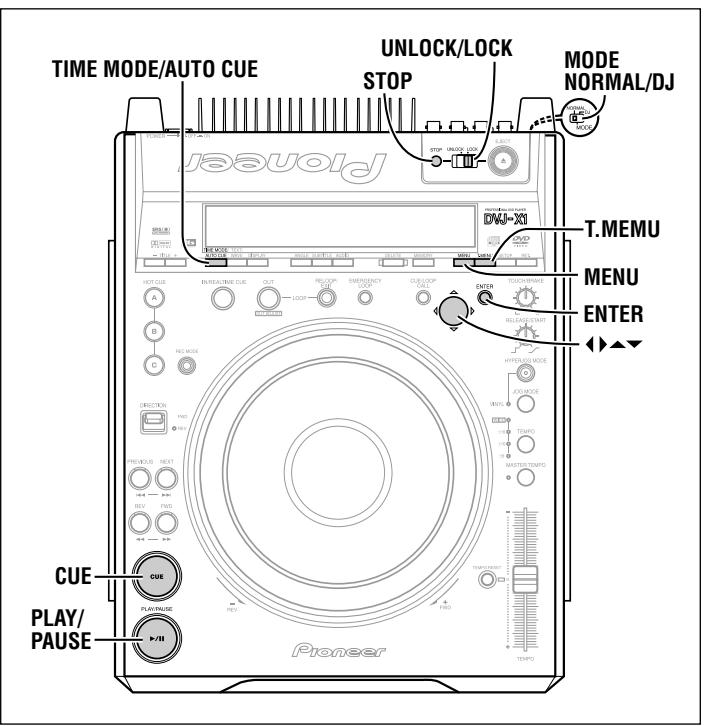
Auto cue function D
This function is not supported when the rear panel mode select switch (MODE NORMAL/DJ) is set to the NORMAL position.
This function is used to skip non-recorded (silent) portions at the beginning of tracks and automatically set the cue point ( P.34) immediately before actual sound begins when loading a disc, performing track search (chapter search), and when the playback track (chapter) changes.
Setting auto cue ON/OFF
Hold the TIME MODE/AUTO CUE button depressed for 1 second or more to alternate the auto cue function ON/OFF. The display's auto cue indicator (A.CUE) lights when the auto cue function is active.
- The auto cue function ON/OFF status is memorized even when the player's power is turned off.
The auto cue sensitivity level can be changed if desired.
Changing the auto cue sensitivity level
-
Hold the TIME MODE/AUTO CUE button depressed for 5 seconds or more.
-
The display will show the "A.CUE -60dB" indicator (factory default setting).
-
Press the cursor button's left/right sides (▲/▶) to change the sensitivity level.
-
Supported sensitivity levels include: -36 dB, -42 dB, -48 dB, -54 dB, -60 dB, -66 dB, -72 dB, -78 dB.
- Either press the TIME MODE/AUTO CUE button or wait 15 seconds and the setting mode will be canceled and the newly selected level will be set.
- The newly set sensitivity level is memorized even when the player's power is turned off.
To stop playback
■ When the eject/stop mode select switch (UNLOCK/LOCK) is set to UNLOCK: Press the STOP button.
- When the eject/stop mode select switch (UNLOCK/LOCK) is set to LOCK: During playback, press the PLAY/PAUSE (▶/II) button, or if a cue point has been set, during playback press the CUE button to initiate back cue, then press the STOP button.
- When STOP button is pressed in the NORMAL mode during DVD playback, the "RESUME" message will be displayed, and the place where the disc is stopped will be stored in memory (resume function).
- To resume playback from the place earlier stopped, press the PLAY/ PAUSE (▶/II) button.
- The resume function is canceled if the disc is removed or if the STOP button is pressed again while already in the stop mode.
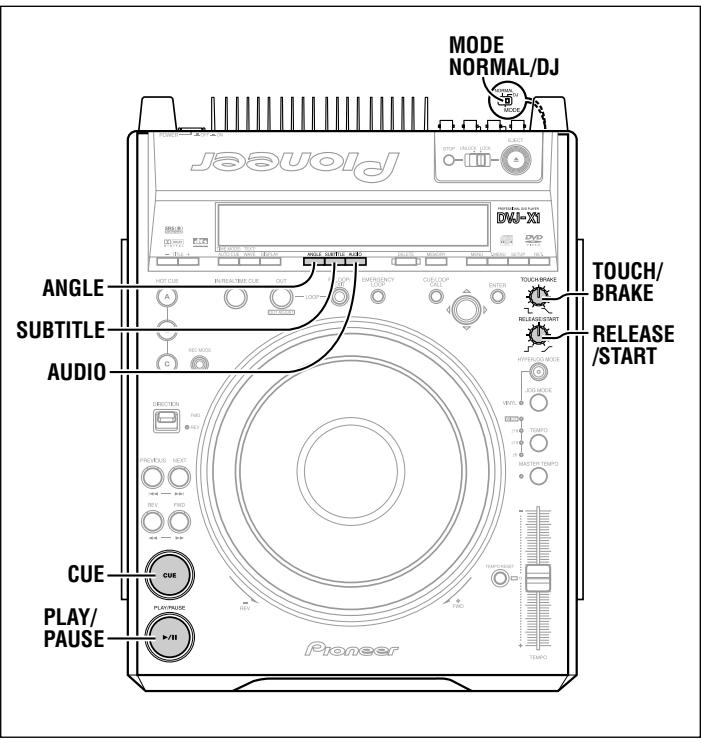
To change language/subtitle settings during playback (DVD only)
To change language during playback:
The language setting can be changed during playback when the DVD has been recorded with multiple language options.
Press the AUDIO button.
The currently selected audio (language) option will be displayed on the screen. Each time the button is pressed the language will alternate between the available language options.
- If the language is changed when the player is in DJ mode, both video and audio playback will be temporarily interrupted (due to writing to buffer memory).
- Some discs do not allow the audio language option to be changed with the AUDIO button (pressing the button will cause the prohibited mark to light, and the corresponding prohibited mark will appear on the screen). In this case, go to the disc's main menu to switch the language option.
- When a disc is removed from the player, the language setting will revert to that selected on the Setup Menu (P.25).
- With some discs, changing the language will cause the image to pause momentarily.
Changing the subtitle option during playback
This option is not supported when the rear panel mode select switch (MODE NORMAL/DJ) is set to DJ (subtitles are not displayed in DJ mode).
The subtitle language can be changed when the DVD has been recorded with multiple subtitle language options.
Press the SUBTITLE button.
The currently selected subtitle option will be displayed on the screen. Each time the button is pressed, the subtitle language will alternate between the available options; if OFF is selected, subtitles will not appear.
- Some discs do not allow the subtitle option to be changed with the SUBTITLE button (pressing the button will cause the prohibited mark to light, and the corresponding prohibited mark will appear on the screen). In this case, go to the disc's main menu to switch the subtitle language.
- When a disc is removed from the player, the subtitle setting will revert to that selected on the Setup Menu (P.26).
Changing the viewing angle (DVD only)
Alternate viewing angles can be selected during playback of DVDs recorded with multiple angles.
- DVDs recorded with multiple angles display the mark on their jacket.
During playback, when the 品 mark is displayed, press the ANGLE button.
Each time the button is pressed the angle view alternates between those available.
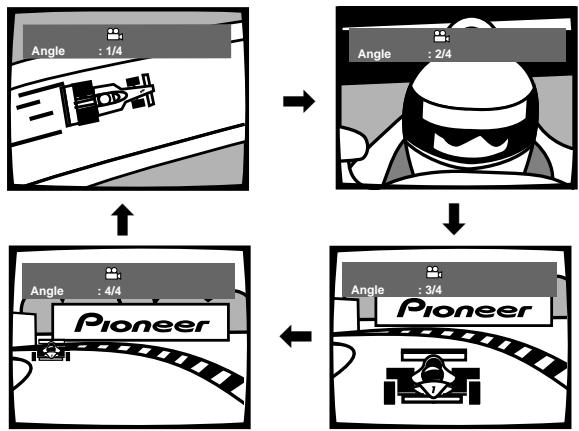
- If the angle is changed when the player is in DJ mode, both video and audio playback will be temporarily interrupted (due to writing to buffer memory).
- Some discs may not allow changing of the viewing angle, even though they display the mark.
- While in NORMAL mode or the main unit's display shows "DISABLE DJ MODE" message, the pause mode will be released if the angle is changed during playback pause.
- Some DVDs allow changing of the angle by means of the disc's main menu as well.
To turn off the angle indicator
While in NORMAL mode, go to the Setup Menu and set Angle Indicator to [Off] (P.25).
Regardless of the setting of the Setup Menu's Angle Indicator, when in DJ mode, the 品 mark will not appear in individual scenes during playback.
When display mode is ON, the mark will be displayed within the guide area of the preview monitor, during the playback of points that allow the selection of alternate angles.
To temporarily interrupt playback (pause mode)
During playback, press the PLAY/PAUSE (▶/II) button.
- The outer rim indicators of the PLAY/PAUSE (/) button and CUE button will flash, and playback will be interrupted.
- Some DVDs prohibit the use of playback pause; in this case pressing the PLAY/PAUSE (▶/II) button will cause the prohibited mark to light, and the corresponding prohibited mark will appear on the preview monitor.
- If the PLAY/PAUSE (▶/II) button is pressed when the unit is in the pause mode, the button rim indicators will go out and playback will resume.
- If the pause mode is allowed to continue for 80 minutes or more, the disc playback will automatically stop. In this case, press the PLAY/ PAUSE (▶II) button to resume playback.
[In DJ mode, with jog mode set to VINYL mode OFF]
- Placing the player in pause mode enables audible pause (the video image appears as a still image, but audio sound can be heard intermittently). If sound is not desired in this case, lower the audio mixer's output level.
[In DJ mode, with jog mode set to VINYL mode ON]
- Placing the player in pause mode enables silent pause (still image with no sound).
- The TOUCH/BRAKE response dial can be used to modify the disc's deceleration speed (time until playback stops).
- The RELEASE/START response dial can be used to modify the disc's playback acceleration time (time until disc reaches full playback speed).
[In NORMAL mode]
- Placing the player in pause mode enables silent pause (still image with no sound).
![PIONEER DVJ-X1 - [In NORMAL mode] - 1](/content/2025/01/76095/images/6831ed58f193530fd60afc5b15fc1c0d14ea253e99a4ad872d322d6c1d4dc066.jpg)
Fast forward/fast reverse
Press the manual search buttons (REV←, FWD▶) during playback or when in the pause mode.
[During CD playback]
Hold the FWD▶ button depressed to perform fast forward.
Hold the REV button depressed to perform fast reverse.
[During DVD playback in DJ mode]
Hold the FWD▶ button depressed to perform fast forward.
Hold the REV button depressed to perform fast reverse.
Fast forward and reverse are performed only within a single disc title.
[During DVD playback in NORMAL mode]
Press the FWD▶ button to perform fast forward.
Press the REV button to perform fast reverse.
Each time the button is pressed and released, the speed of fast forward/ reverse changes (in three stages). Press the PLAY/PAUSE (/) button to return the player from search mode to normal playback mode.
No sound is output during manual search.
- Some DVDs prohibit the use of manual search. In this case, the prohibited mark will light, and the same prohibited mark will appear on the preview monitor screen.
- When playing a DVD in DJ mode, the above functions may not be supported depending on the disc or on the part being played.
Super-fast search D
Rotate the jog dial while holding either one of the manual search buttons (REV<, FWD>) depressed.
This function is not supported when the rear panel mode select switch (MODE NORMAL/DJ) is set to the NORMAL position.
- While holding either button depressed, rotate the jog dial in the direction you wish the search operation to occur, and the player will enter the super-fast search mode.
- The search direction corresponds to the direction of jog dial rotation (rotate clockwise for fast forward, counterclockwise for fast reverse). The direction indicated by the manual search button is ignored.
- When the jog dial is released, the disc will enter the playback mode.
- If the manual search button is released, the super-fast search mode will be canceled.
Track search (skip)
Press one of the track search button
( PREVIOUS | ▲, NEXT▶).
Each time the button is pressed, playback skips to the next chapter (DVD) or track (CD) in the direction indicated by the button pressed. To return to the start of the currently playing track, press the PREVIOUS button once.
To return to the beginning of the track preceding the currently playing track, press the PREVIOUS button twice.
- Hold the button depressed to perform continuous track search. If the button is held depressed for 2 seconds, the search speed will increase.
- If auto cue is enabled and the player is in cue standby mode at the beginning of a track, pressing the PREVIOUS button will cause the player to search for the track previous to the current one, and enter cue standby at the beginning of that track.
[During CD playback]
- During playback of the disc's first track (01), pressing the PREVIOUS button twice in succession will cause the player to search for the beginning of the last track.
- During playback of the last track, pressing the NEXT button once will cause the player to search for the disc's first track (01).
[During DVD playback in DJ mode]
- During playback of the disc's first chapter (001), pressing the PRE-VIOUS button twice in succession will cause the player to search for the beginning of the last chapter.
- During playback of the last chapter, pressing the NEXT button will cause the player to search for the disc's first chapter (001).
[During DVD playback in NORMAL mode]
-
During playback of the last chapter, pressing the NEXT button will cause the player to search for the disc's next title.
-
Some DVDs prohibit the use of chapter search. In this case, the prohibited mark will light, and the same prohibited mark will appear on the preview monitor screen.
- When playing a DVD in DJ mode, the above functions may not be supported depending on the disc or on the part being played.
Super-fast track search D
Rotate the jog dial while holding either one of the track search buttons (PREVIOUS 一 , NEXT ) depressed.
This function is not supported when the rear panel mode select switch (MODE NORMAL/DJ) is set to the NORMAL position.
- While holding either button depressed, rotate the jog dial in the direction you wish the search operation to occur, and the player will search for tracks in response to the amount of jog dial rotation.
- The search direction corresponds to the direction of jog dial rotation (rotate clockwise for fast forward, counterclockwise for fast reverse). The direction indicated by the track search button is ignored.
- The super-fast track search mode is canceled when the track search button is released.
Title search (DVD only)
Press the title search button (TITLE+/-).
Each time the button is pressed, the player will search for the next (or previous) title (or PGC on multi-PGC discs) in the direction indicated.
- If the button is held depressed, the player will enter continuous search mode. If the button is held depressed for 2 seconds, the search speed will accelerate.
- Some DVDs prohibit the use of title search. In this case, the prohibited mark will light, and the same prohibited mark will appear on the preview monitor screen.
- When playing a DVD in DJ mode, the above functions may not be supported depending on the disc or on the part being played.
Super-fast title search D
Rotate the jog dial while holding either one of the title search buttons (TITLE +/−) depressed.
This function is not supported when the rear panel mode select switch (MODE NORMAL/DJ) is set to the NORMAL position.
- While holding either of the buttons depressed, rotate the jog dial in the direction you wish the search operation to occur, and the player will search for titles in response to the amount of jog dial rotation.
- The search direction corresponds to the direction of jog dial rotation (rotate clockwise for fast forward, counterclockwise for fast reverse). The direction indicated by the title search button is ignored.
- The super-fast track search mode is canceled when the title search button is released.
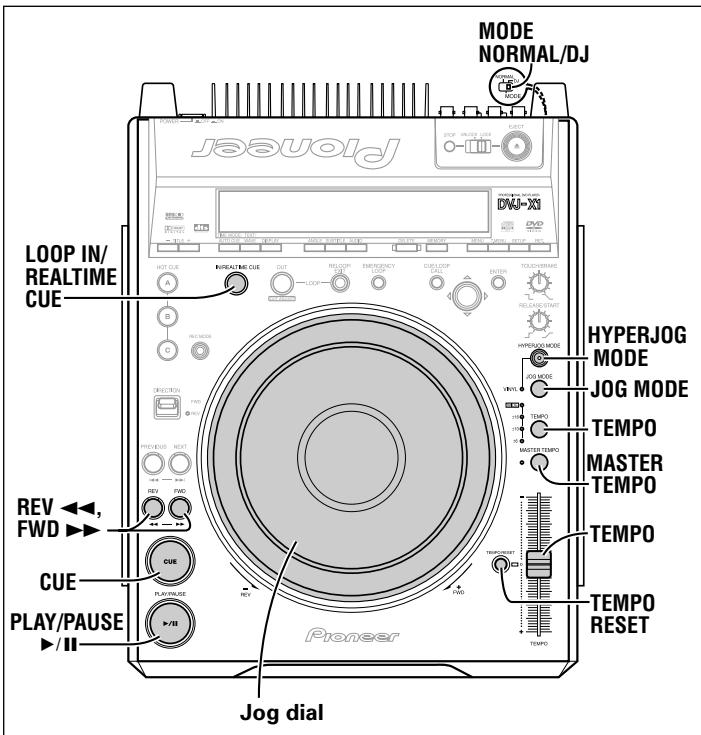
Setting cue points D
This function is not supported when the rear panel mode select switch (MODE NORMAL/DJ) is set to the NORMAL position.
When a cue point has been previously set, pressing the CUE button during playback will cause the player to move instantly to the cue point and enter the cue standby mode.
- Storing to memory may not be possible while the jog dial's audio/video memory status display is flashing.
Setting a cue point with VINYL mode OFF
- During playback, press the PLAY/PAUSE (▶/II) button near the point you wish to set as a cue point. The player will enter the pause mode.
2. Search for the precise cue point.
- Using frame numbers:
The cue point position can be set in units of single frames (75 frames per second).
Using the jog dial or the search buttons (REV<▲, FWD▶), advance or reverse the frames to the desired point. One revolution of the jog dial is equivalent to 135 frames; each time the search button is pressed, the disc moves one frame in the direction corresponding to the button.
Search for cue point using audible pause:
Rotate the jog dial slowly and reverse the disc to the instant just prior to the point from which you wish to begin playback (the cue point will be set at the point immediately after the sound heard during audible pause).
-
When you have found the desired cue point using the frame number or audible pause, press the CUE button.
-
The CUE button's rim indicator will light to indicate that the new cue point has been recorded in memory.
- During DVD playback, a thumbnail of the cue point appears on the preview monitor screen.
- During CD playback, the cue point's track number and time is displayed on the preview monitor screen.
- When a new cue point is recorded in memory, the previously memorized cue point will be erased.
[Modifying a cue point]
- During playback, press the CUE button.
- Playback will return to the set cue point and enter cue standby.
- Use the search buttons (REV←, FWD▶) to enter audible pause mode.
- Find the new cue point by performing steps 2 and 3 of the above section "■ Setting a cue point with VINYL mode OFF".
Setting a cue point with VINYL mode ON
- As playback nears the desired cue point, either press the top surface of the jog dial or press the PLAY/PAUSE (▶/II) button to set the unit in pause mode.
- While pressing the surface of the jog dial, listen to the playback sound as you rotate the dial, and return playback to the point just before the spot you wish to use as the cue point.
-
When the sound is at the desired cue point, continue holding the surface of the jog dial depressed, and press the CUE button.
-
The CUE button's rim indicator will light to indicate that the new cue point has been recorded in memory.
- When a new cue point is recorded in memory, the previously memorized cue point will be erased.
[Modifying a cue point]
- During playback, press the CUE button.
- Playback will return to the set cue point and enter cue standby.
- Perform steps 2 and 3 of the previous section "■ Setting a cue point with VINYL mode ON".
- In the same way as for VINYL mode OFF, The search buttons (REV←, FWD→) can also be used to modify a cue point.
Real time cue
During forward playback, press the LOOP IN/REALTIME CUE button at the place you wish to set as cue point.
- This point will be recorded as the new cue point.
■ Confirm cue point (cue point sampler)
After setting a cue point, depress the CUE button while the unit is in the cue standby mode.
- The audio and video from the cue point will be played back while the CUE button is held depressed, allowing you to confirm the point.
To return to a cue point (back cue)
During playback, press the CUE button.
- Playback will return to the previously set cue point, sound will be muted, and the monitor screen will display black background as the unit enters the cue standby mode.
- Press the PLAY/PAUSE (▶/II) button to resume playback instantly from the cue point.
- When playing a DVD that prohibits title or other searches, playback will continue, and the prohibited mark will appear in the display; the similar mark will appear on the preview monitor screen.
Changing playback speed D
This function is not supported when the rear panel mode select switch (MODE NORMAL/DJ) is set to the NORMAL position.
Slide the TEMPO control slider forward or back.
When the slider is moved forward (+) , playback speed will increase, and when moved back (-) , playback speed will decrease.
The rate of tempo change is displayed.
- It is also possible to change playback speed without affecting the pitch ( P35 , "Setting master tempo").
Selecting a tempo control range
Press the TEMPO button.
Each time the button is pressed, the TEMPO control slider's variable control range alternates between the values ± 6% , ± 10% , ± 16% , and WIDE. The range can be adjusted in increments of 0.02% (for ± 6% ), 0.05% (for ± 10% ), 0.05% (for ± 16% ), and 0.5% (for WIDE).
- The variable control range setting value is shown by the tempo control range indicator, as well as in the onscreen display.
The variability in the WIDE range is:
$$ \begin{array}{l} \pm 100 \% (\mathrm{CD}) \ + 70 \% \text {to} - 100 \% (\text {DVD}) \ \end{array} $$
■ Tempo Reset
Press the TEMPO RESET button.
The TEMPO RESET indicator lights and the tempo change rate is reset to "0" (normal tempo), regardless of the position of the TEMPO control slider.
- If the TEMPO RESET button is pressed once again, tempo reset is canceled, and the tempo returns to the value set with the TEMPO control slider.
Setting master tempo D
This function is not supported when the rear panel mode select switch (MODE NORMAL/DJ) is set to the NORMAL position.
During playback, press the MASTER TEMPO button.
The master tempo indicator lights and the "MT" indicator appears on the display. In this way, the music pitch will not vary even if the TEMPO control slider is used to change the tempo (speed).
- Note that sound quality will deteriorate, however, due to digital processing of the audio signals.
Jog dial functions D
This function is not supported when the rear panel mode select switch (MODE NORMAL/DJ) is set to the NORMAL position.
- Rotate during playback (pitch bend).
When the jog dial is set to VINYL mode ON, take care to operate the jog dial by rotating its outer periphery (the inclined surface); touching the top panel will cause operation of a separate function.
- Playback is accelerated (FWD+) or decelerated (REV^-) in an amount corresponding to the degree of jog dial rotation. In the reverse play mode, the operating directions are reversed (accelerated when rotated in the REV- direction, and decelerated when rotated in the FWD+ direction).
-
When the jog dial rotation is stopped, playback returns to its previous speed.
-
Rotate during playback (scratch play).
See the section "Scratch Play" in Advanced Operations (P. 36).
- Rotate during pause (frame search).
[When jog mode is in VINYL mode OFF]
The player will enter the audible pause mode (the paused image is displayed).
- When the jog dial is rotated, the audible pause position changes in individual frame units, in the direction corresponding to the direction of jog dial rotation.
- One full revolution of the jog dial is equivalent to 1.8 seconds (135 frames) of disc advance (or reversal).
[When jog mode is in VINYL mode ON]
The player will enter the silent pause mode (the paused image is displayed).
- When the jog dial is rotated, the disc is played back in the direction and at a speed proportional to the direction and speed of jog dial rotation, and the pause position changes in individual frame units.
- When the hand is removed from the surface of the jog dial and rotation stops, the unit enters the silent pause mode again with paused image displayed.
-
One full revolution of the jog dial is equivalent to 1.8 seconds (135 frames) of disc advance (or reversal).
-
Rotate during playback or in pause mode (spin).
See the section "Spin play" in Advanced Operations (P. 36).
- Rotate during playback, while depressing the manual search button (super-fast search).
While holding one of the manual search buttons (REV←, FWD→) depressed, rotate the jog dial in the direction corresponding to the direction of desired search; the search will be performed at faster-than-normal speed.
- Rotate while depressing track search button (super-fast track search).
While holding one of the track search buttons (PREVIOUS) depressed, rotate the jog dial in the direction corresponding to the direction of desired search (track search or chapter search); the search will be performed at a faster-than-normal speed, proportionate to the direction and speed of jog dial rotation.
- Rotate while depressing title search button (super-fast title search) (DVD only).
While depressing one of the title search buttons (TITLE+/-), rotate the jog dial in the direction corresponding to the direction of desired search. The title search will be performed at a faster-than-normal speed, proportionate to the direction and speed of jog dial rotation.
Note:
The top surface of the jog dial is equipped with a pressure-sensitive switch. Do not rest objects on the dial, or subject it to severe impact or pressure. Also, do not rest drinks or other liquids near the dial; if the liquid spills, it can enter the parts of the dial, causing damage.
[Hyper jog mode]
With jog mode set to VINYL ON, if the HYPERJOG MODE button is pressed so that the indicator lights, the rate of change of picture and sound produced in response to rotation of the jog dial increases to 2x the rate of change produced when the hyper jog mode is OFF.
Mixing different tracks (splicing) D
This function is not supported when the rear panel mode select switch (MODE NORMAL/DJ) is set to the NORMAL position.
(Example) To splice the next track (B) to the currently playing track (A).
- Connect the first player A to DJ mixer CH-1, and second player B to CH-2.
-
Raise trim, channel fader, and master volume to appropriate levels, and set player A for playback.
-
Set the DJ mixer's CROSS FADER lever to the left (CH-1) side.
-
Track A plays.
-
Load the desired disc on player B.
- Press the track search button (PREVIOUS) on the player B to select the desired track B.
- Monitor CH-2 on the DJ mixer.
- Rotate the DJ mixer's MONITOR LEVEL dial and listen to track B on headphones.
The main speakers produce the sound of track A only.
- Select the cue point for track B while listening on the headphones.
① With the player B in playback mode, press the PLAY/PAUSE (▶/II) button near the desired track B cue point.
- If the jog mode is set to VINYL mode OFF, the audible pause mode will be enabled; if the jog mode is VINYL mode ON, the silent pause mode will be enabled.
② Rotate the player B jog dial to find the exact cue point (first beat) of track B.
③ Once track B's cue point has been set, press the CUE button on player B.
Sound will be muted and the cue point will be set.
-
In beat with the sound of track A from the speakers, press the player B's PLAY/PAUSE (▶/II) button.
-
The speakers will produce the sound of track A.
-
The headphones will produce the sound of track B.
-
Move the second player B's TEMPO control slider so that the tempo (BPM) of track A and B are aligned.
Move the player B's TEMPO control slider so that the displayed BPM of track B matches the BPM value for track A.
- When the BPM numbers match, tempo adjustment is completed.
-
Press the player B's CUE button.
-
The player B will return to the previously set track B cue point.
-
While listening to the closing sounds of player A's track A from the speakers, press the player B's PLAY/PAUSE (▶/II) button.
-
The player B begins playing track B.
-
While confirming the sound on the headphone, steadily move the DJ mixer's cross fader lever toward the right side.
-
The sounds of track B will gradually mix with and replace the sounds of track A heard from the speaker.
- When the DJ mixer's cross fader lever has moved completely to the right side, the splicing has been completed.
■ Long mix play
As long as the BPM rates match, track A and track B will mix well, even if the cross fader lever is in the middle position.
Fader start play
Using the cross fader start function on the DJM-600, DJM-500, DJM-300, DJM-3000, DJM-909, or DJM-707, the mixing operation can be simplified by eliminating step 10 (above).
Also, when the cross fader lever is returned, the players return to the status of step 9 (above), so sound can be produced repeatedly.
Advanced Operations
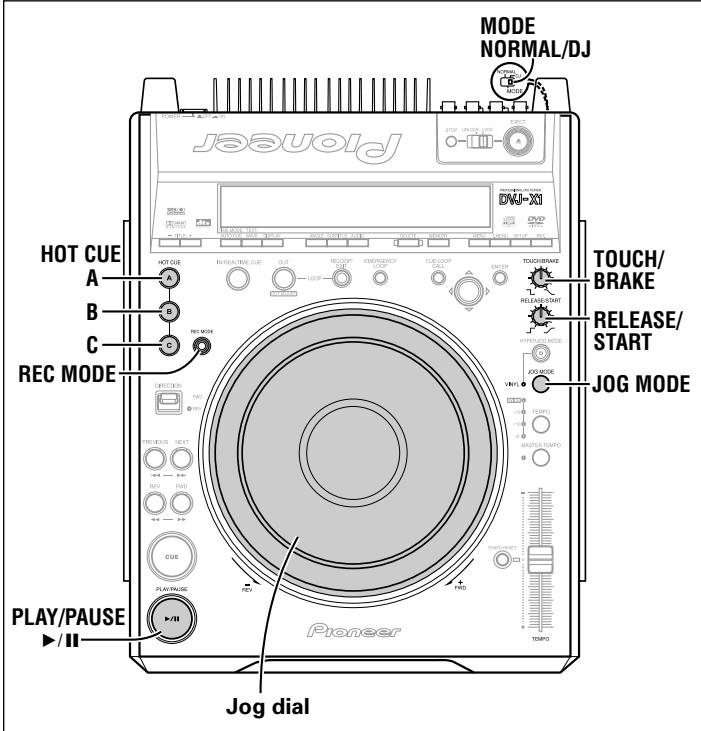
Scratch play
This function is not supported when the rear panel mode select switch (MODE NORMAL/DJ) is set to the NORMAL position.
When the jog mode is set to VINYL mode ON, pressing the jog dial's top panel while rotating the dial will cause audio and video to be output in proportion to the direction and speed of jog dial rotation.
-
Press the JOG MODE select button so that the VINYL mode indicator lights.
-
During playback, press the top of the jog dial.
-
Playback will slow and come to a stop (the time required to complete stop can be set independently).
-
If the jog dial is rotated as playback slows but before it has completely stopped, sound will be interrupted suddenly, and will then start again, but in the direction corresponding to the direction the jog dial is rotated in step 3.
-
Rotate the jog dial in the desired direction of playback.
-
Playback will occur in proportion to the direction and speed of jog dial rotation.
- Release hand from surface of jog dial.
- Playback will return to its original status (the time required until full acceleration can be set independently).
To set the deceleration time (time until playback fully stops when jog dial surface is pressed)
Rotate the TOUCH/BRAKE response dial.
The time till playback stops changes.
To set the acceleration time (time until playback fully regains original speed when hand is released from jog dial surface)
Rotate the RELEASE/START response dial.
The time till playback returns to normal speed changes.
Spin play D1
This function is not supported when the rear panel mode select switch (MODE NORMAL/DJ) is set to the NORMAL position.
With VINYL mode ON, press the surface of the jog dial, or press the PLAY/PAUSE (▶/II) button to set the unit to pause, then rotate the jog dial quickly; even if you remove your hand from the jog dial, playback will occur in proportion to the direction and speed of the jog dial rotation.
Buttons and controls with the D) mark are disabled when the mode select switch is set to NORMAL.
Hot cue DJ
This function is not supported when the rear panel mode select switch (MODE NORMAL/DJ) is set to the NORMAL position.
This function allows playback to be started quickly from one of three points (A, B, C), by previous setting of cue point and loop information.
- Storing to memory may not be possible while the jog dial's audio/video memory status display is flashing.
Setting hot cue point
- Press the HOT CUE REC MODE button so that the HOT CUE A, B, and C button indicators light red.
-
During playback, pause mode or cue standby mode, find the point you wish to use as the hot cue, and at that point press the button (A, B, or C) in which you wish to store the cue information.
-
The button memory will be recorded with the time position data and playback method.
- The pressed button will flash red for about 2 seconds, then light steadily.
- During DVD playback, a thumbnail of the hot cue point will be displayed on the preview monitor screen.
- If the HOT CUE button is pressed during the loop setting mode (while LOOP OUT/OUT ADJUST button and LOOP IN/REALTIME CUE buttons are flashing), the currently playing loop information will be stored in memory.
- If a memory card is loaded, the data recorded to the HOT CUE button will be stored on the memory card; in this way, the previously set information can be called up quickly when playing the same disc at a later date (P.40).
Starting a hot cue
-
Press the HOT CUE REC MODE button so that the HOT CUE A, B, and C button indicators light green or orange.
-
Buttons containing stored hot cue points will light green.
- Buttons containing stored loop information will light orange.
-
Buttons without any stored information will not light.
-
During playback, pause, or cue standby mode, press one of the buttons with stored information (A, B, or C).
-
During playback, pause mode or cue standby mode, if a green or orange lighted button is pressed, playback will begin instantly based on the information recorded in the button. In this case, cue point information stored in the normal CUE button, or loop information stored in the RELOOP/EXIT button will not be overwritten, but remain valid.
- Pressing a HOT CUE button with stored loop information causes loop playback to begin instantly based on the stored information. In this case, the RELOOP/EXIT button can be used to cancel the loop playback just as with normal loop play, and the LOOP OUT/OUT ADJUST button can likewise be used to modify the loop-out point. If loop information is modified, the loop information stored in the button will simultaneously be modified.
-
If a memory card is loaded, inserting a disc will allow previously recorded hot cue and loop information for that disc to be restored (P.41).
-
When playing a DVD that prohibits title or other searches, it may be impossible to begin playback from the hot cue point.
In this case, the prohibited mark will appear in the display and the similar mark 串 will appear on the preview monitor screen.
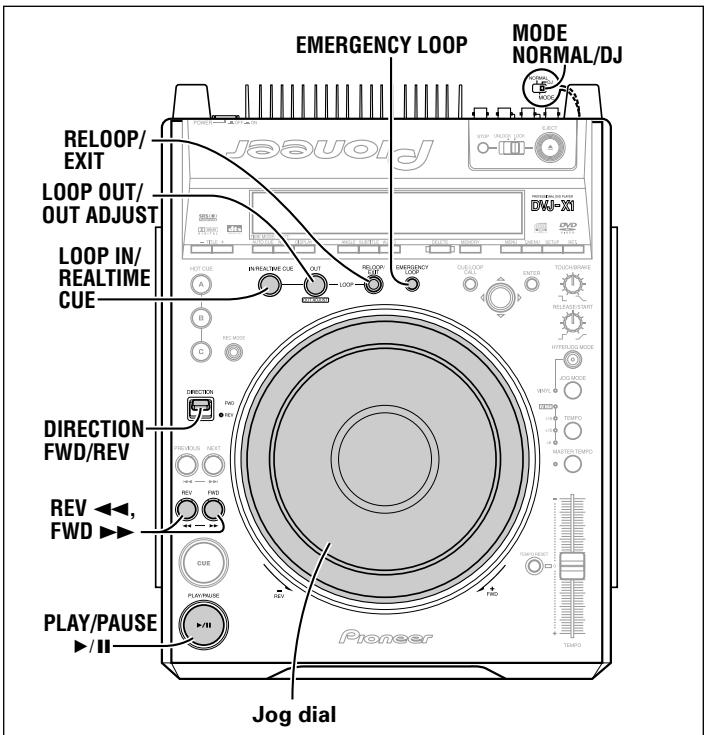
Loop playback
This function is not supported when the rear panel mode select switch (MODE NORMAL/DJ) is set to the NORMAL position.
To create a loop
-
Press the PLAY/PAUSE ()/() button to begin playback.
-
During playback, press the LOOP IN/REALTIME CUE button.
-
This step is unnecessary if you wish to use a previously recorded cue point as the loop-in point.
-
During the time required for writing the loop-in point, the LOOP IN/REALTIME CUE button will flash for about 2 seconds.
-
During playback, press the LOOP OUT/OUT ADJUST button at the point you wish to use as the loop-out point.
-
Repeat play (loop play) will begin without break between the selected loop-in and loop-out points.
- The frame search function can be used to set more accurate out points.
- If an alternate viewing angle or audio channel is selected before setting a loop-out point, it may not possible to designate a loop-out point.
- Loop-out points cannot be set during reverse play.
■ To cancel loop play
During loop playback, press the RELOOP/EXIT button.
- The loop will be canceled and playback will continue normally past the loop-out point.
To change a loop-out point
-
During loop playback, press the LOOP OUT/OUT ADJUST button.
-
The display will show the loop-out point time, and the LOOP OUT/OUT ADJUST button will flash rapidly, while the LOOP IN/REALTIME CUE button indicator turns off.
-
Press the manual search buttons (REV←, FWD→) or rotate the jog dial.
-
The loop-out point will change in one-frame units.
- The loop-out point cannot be moved to a location before the loop-in point.
- To cancel the adjust mode and return to loop play, press the LOOP OUT/OUT ADJUST button or wait 30 seconds.
The loop-out point cannot be adjusted during reverse play.
To return to a loop (reloop)
After cancellation of a loop, press the RELOOP/EXIT button during normal playback.
- Playback will return to the loop-in point of the previously set loop, and loop play will resume.
Automatic loop-out setting (emergency loop)
During playback, press the EMERGENCY LOOP button.
-
The normal loop playback indicators will appear (flashing LOOP OUT/OUT ADJUST button and LOOP IN/REALTIME CUE button), and the EMERGENCY LOOP indicator will flash.
-
The point at which the button is pressed will become the loop-in point, and a loop-out point will be set automatically as described below; loop playback will then continue between the two points.
-
If the immediately preceding BPM value is known, a point four beats afterwards will become the loop-out point.
- If the immediately preceding BPM value is not known, the loop-out point will be set four seconds after the loop-in point.
-
If either of the above two conditions come after the track end, the track end will be made the loop-out point.
-
When the EXIT/RELOOP button is pressed, the loop play will end and normal playback will resume.
- Emergency loop is not supported during reverse play.
- The loop-out point cannot be changed during the period of time from the pressing of the EMERGENCY LOOP button till the beginning of loop playback. Further, if the unit is switched to reverse play before beginning of loop playback, loop playback will be canceled.
Reverse play D
This function is not supported when the rear panel mode select switch (MODE NORMAL/DJ) is set to the NORMAL position.
Set the DIRECTION FWD/REV select switch to the REV position (forward).
The REV indicator lights and playback occurs in reverse.
- The jog dial's operation to accelerate/decelerate playback is reversed.
- During reverse playback, loop points cannot be set nor loop-out points modified.
- When track search or loop play are performed, the jog dial's audio/video memory status display will flash for 1-2 seconds and scratch/ reverse operations may not respond.
About fader start play D
This function is not supported when the rear panel mode select switch (MODE NORMAL/DJ) is set to the NORMAL position.
When the supplied accessory control cord is used to connect the CONTROL connector of this player to the CONTROL connector of a DJ mixer DJM-300, DJM-500, DJM-600, DJM-3000, DJM-909, or DJM-707, raising the DJ mixer's channel fader lever simultaneously releases the player from cue standby, automatically starting instant playback. Fader start can also be started by using the cross fader operation; when the fader lever is returned to its original position, the player also returns to its cue point (back cue) and enters cue standby. (For connection instructions consult page 12).

Relay play with two players DLI
This function is not supported when the rear panel mode select switch (MODE NORMAL/DJ) is set to the NORMAL position.
Relay play can be performed by using the supplied accessory control cord to connect the CONTROL connectors of this player and another CDJ series CD player (P.12).
- Set the auto cue functions of the two players to ON (auto cue (A.CUE) indicator lights in the display).
-
If connected to a DJ mixer, set the mixer's fader control to its center position.
-
Begin playback on the first player.
- When the currently playing track ends, the other player (in standby mode) will automatically begin playback.
-
Set the first player to cue standby at the beginning of the next desired track.
-
By repeating these steps, you can perform continuous automatic relay play between the two players.
- By replacing the disc on the waiting player and cueing it to a desired track, an unending variety of tracks can be played.
- By setting a cue point on the waiting player, playback can be set to begin automatically from any point in any desired track (P.34, "Setting cue points").
Notes:
- Relay play may not occur smoothly if the two players' audio output terminals are not connected to the same DJ mixer.
- If power is interrupted to the currently playing player, the other player will automatically begin playback.
- Since fader start and relay play require that the same control connectors be connected in different ways, they cannot be performed simultaneously.
WAVE display
This function is not supported when the rear panel mode select switch (MODE NORMAL/DJ) is set to the NORMAL position (replaced by CD TEXT display).
The WAVE display portrays a graphic indication of the changes in a track's deep beat sounds (e.g., bass drum), thus giving the user a better idea of breaks and end points in the track. Each track or chapter is expanded or compressed to fill the entire display range (in 50 steps).
Use the TEXT/WAVE select button to select WAVE display.
- The WAVE display will appear together with the start of the track playback.
- By storing a WAVE display on a memory card, the WAVE display will appear instantly the next time the same track is played (P.40).
- While the wave data is being read, attempts to use the search, pause, jog dial and certain other functions may result in faulty operation.
- If a track has little change in its low-frequency beat level, or if a track has been recorded at a low recording level, the break points may not display correctly.
CD TEXT display
When playing a CD that supports CD TEXT, disc and track titles will be displayed. Disc titles of up to 72 characters and track titles of up to 48 characters can be displayed (alpha-numerics and certain symbols only). Titles exceeding 8 characters will cause the display to scroll.
- During display of a disc title, the ±b mark will appear.
Press the TEXT/WAVE select button to select CD TEXT display (disc and track titles).
- If no CD TEXT is recorded, the "NO TEXT" message will be displayed for about 2 seconds.
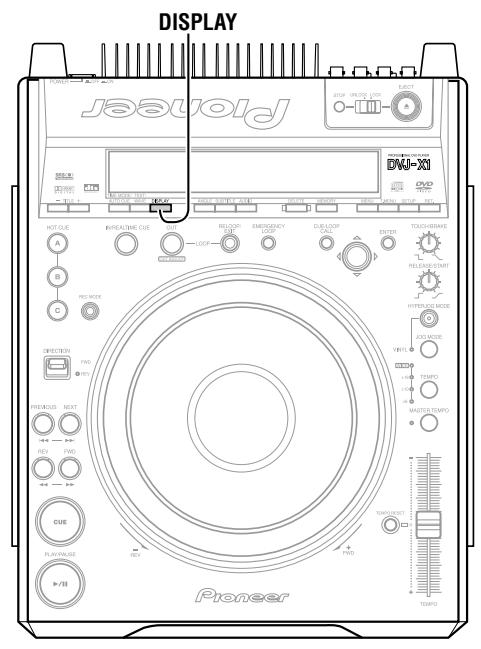
To view guide displays
Press the DISPLAY button to turn the guide displays ON/OFF.
In the DJ mode, onscreen guide displays are not output to the main video output (VIDEO OUT) connectors; in this case, the button operates to enable and disable the guide displays (hot cue, cue point, playing time, etc.) output to the preview video (PREVIEW OUT) connectors.
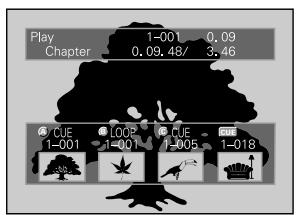
Guide display ON


Guide display OFF
In the NORMAL mode, pressing the DISPLAY button turns the guide display ON/OFF on both the main video and preview video outputs. Pressing the DISPLAY button changes the display contents in the following way:
Current title number - Chapter number Current title elapsed time
Play 2-2 0.30
Title -121. 13/121.43
Remaining title time
Total title time

Current title number - Chapter number Current title elapsed time
Play 2-2 0.30
Chapter 0.10/5.43
Elapsed chapter time
Total chapter time

Current title number - Chapter number Current title elapsed time
Play 2-2 0.30
Chapter -5.33/ 5.43
Remaining chapter time
Total chapter time

Current title number - Chapter number Current title elapsed time
*2
Play # 2-2 0.30
Tr.Rate: 8.6
8.6
Transmission rate level

Display OFF
- Chapter and time may not be displayed with some titles.
1 Transmission rate is a value indicating the data volume recorded on the DVD. While higher transmission rates indicate larger amounts of data, they do not necessarily translate to higher picture quality.
2 Displayed during progressive video signal is recorded.
Operations Using Memory Cards D
Using memory cards
This player supports the use of SD memory cards or MultiMedia Cards for the recording of disc identification data, cue point data, loop point data, and hot cue data. Data regarding cue points and loop points include each point's position, as well as audio channel, angle, and thumbnail image.-Thumbsail images cannot be recorded, however, in the case of copy-protected discs (included those using Macrovision technologies).
Memory cards must be formatted in accordance with "SD Memory Card Specifications Part2 FILE SYSTEM SPECIFICATION Version 1.0" (commercially purchased SD memory cards are factory formatted to the above standards). Unformatted cards cannot be used (the "UNFORMAT" message will be displayed).
* When a MultiMedia card has been formatted or recorded on the CDJ-1000 or CDJ-1000MK2, it can be used only for data reading (new point information cannot be recorded to or erased from the card). Copying of the card is also not supported. If an attempt is made to record to the card, the "CALL ONLY" message will be displayed.
Memory cards formatted on computers or in digital cameras may not be usable with this player.
Loading a memory card
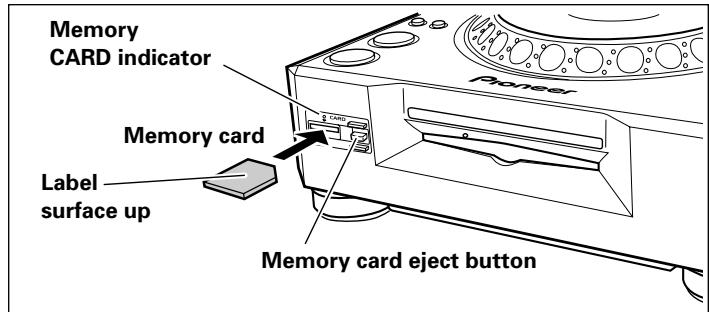
Insert memory cards with label-side up, and the cut-away corner pointed away from you (toward the player). Insert the card until it is pulled fully into the player.
- Removing a memory card
Confirm that the CARD indicator is not lighted, then press the memory card eject button. Pull out the card gently in a straight line.
Notes:
- When the CARD indicator is lighted, the player is currently accessing the card. Do not attempt to remove the card, and do not turn off power to the unit during card access, since the recorded data may be destroyed.
- Memory cards are precision electronic devices. Do not bend or drop them, or subject them to strong forces or impacts. Also, avoid using or storing memory cards in environments subject to static electricity or electrical noise.
- Memory cards can be broken when subjected to impacts or static electricity. Be very careful when handling them, and make regular backups of important recorded data (P. 43).
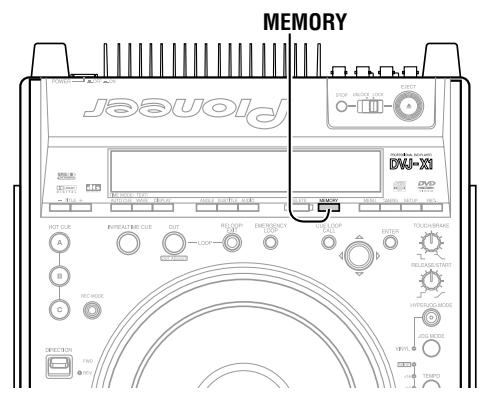
Recording to memory cards
■ Recording a cue point
- Use the auto cue function or CUE button to input a cue point.
-
When the player is in cue standby mode (if currently playing, perform back cue), press the MEMORY button.
-
The "MEMORY" indicator will light in the display, showing that the cue point has been stored in the memory card.
- If no memory card is loaded, the "NO CARD" message will appear.
■ Recording a loop point
- Set a loop-in point and loop-out point and begin loop playback.
-
During loop playback, press the MEMORY button.
-
The "MEMORY" indicator will light in the display, showing that the loop data has been stored in the memory card.
-
If no memory card is loaded, the "NO CARD" message will appear.
-
Up to 100 points (total of both cue and loop points) can be stored for each disc. When 100 points have been stored, attempts to record further points will result in the display of the "POINT FULL" message, and no further points can be recorded.
- If insufficient memory space exists on the card to record the current points, the "CARD FULL" message will appear.
- If the card has been set to write-protect, the "PROTECTED" message will be displayed.
■ Recording hot cue points A, B, C
Hot cue points A, B, and C are automatically recorded on the memory card.
WAVE display
WAVE displays are automatically recorded on the memory card.
- As one example of the use of a 32 MB SD memory card, up to 75 discs' worth of cue and loop points can be recorded per card (assuming use of DVD discs with 20 points per disc, and recording of thumb-nail images for each point).
To protect important data
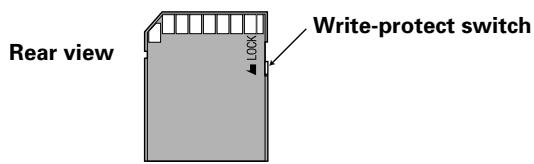
- Set the write-protect switch to the LOCK position to prevent further writing to the card. Return the switch to its original position if you wish to record further data on the card.
- The CARD indicator lights while the recorder is writing data to the disc. During this period, do not attempt to remove the card, or disconnect power to the unit, since card data may be destroyed. Pioneer disclaims any responsibility for damage to or loss of memory card data, or other incidental damages arising from such loss.
■ Message displays during recording of cue and loop points
| Player display | Contents |
| "MEMORY" | Data stored correctly. |
| "MEMORY", followed by "NO PICTURE" | Displayed when recording point information from a copy-protected disc. Thumbnail images cannot be recorded on the memory card. |
| "MEMORY", followed by "CALL ONLY" | Displayed when attempting to record to a card formatted on the CDJ-1000 or CDJ-1000MK2. Point data cannot be written to the memory card. |
| "MEMORY", followed by "CARD FULL" | Insufficient recording capacity. No new point data can be recorded. |
| "MEMORY", followed by "PROTECTED" | Displayed when the card's write-protection switch is set to LOCK. Point data cannot be written to the memory card. |
| "MEMORY", followed by "NO CARD" | Displayed when no card is loaded. |
| "POINT FULL" | Displayed when total number of cue point and loop point data items has reached 100; new points data cannot be recorded. |
Insert a memory card when cue point, loop point, hot cue point or WAVE data is recorded.
Note that the data is lost if the disc is removed or power is turned off when a memory card is not present.
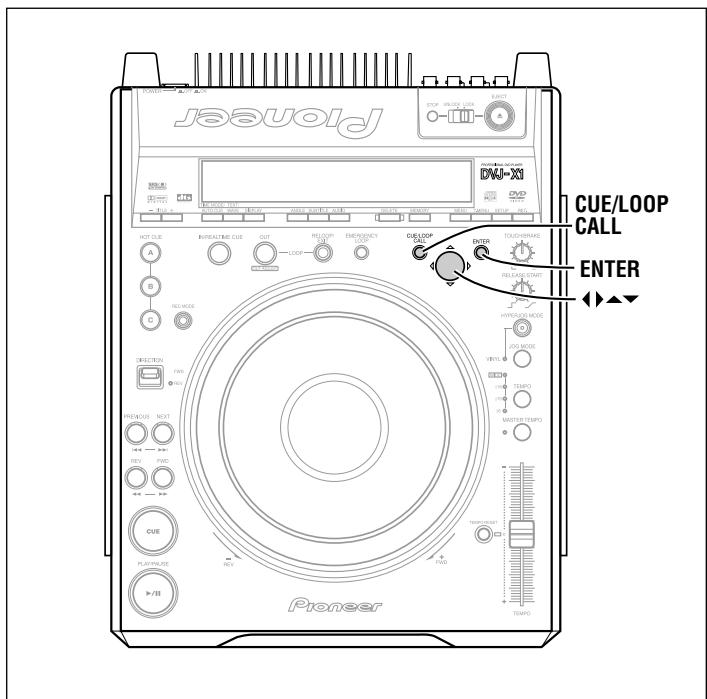
To recall data recorded on memory cards
To recall a recorded cue or loop point
1. Press the Cue/LOOP CALL button.
- The preview monitor screen will display the cue point navigation menu.
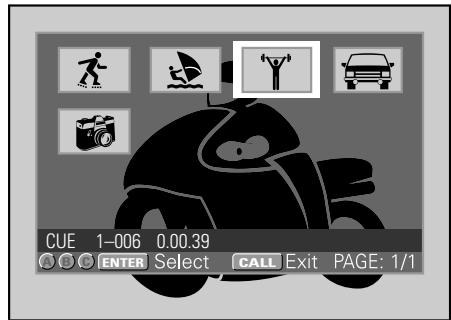
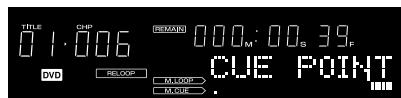
While the call screen is displayed, point information is also shown on the player's display.
- Use the cursor button to select the desired thumbnail image, and press the ENTER button.

While reading data from a memory card, the main unit's display will show the "CUE readin" or "LOOP readin" message.
- The cue point or loop point will be read into the player, and the memory point time will be displayed; the player will search for the cue point and enter cue standby there.
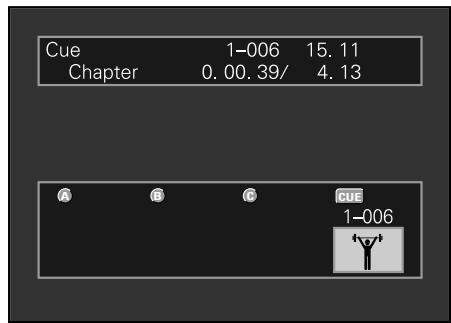
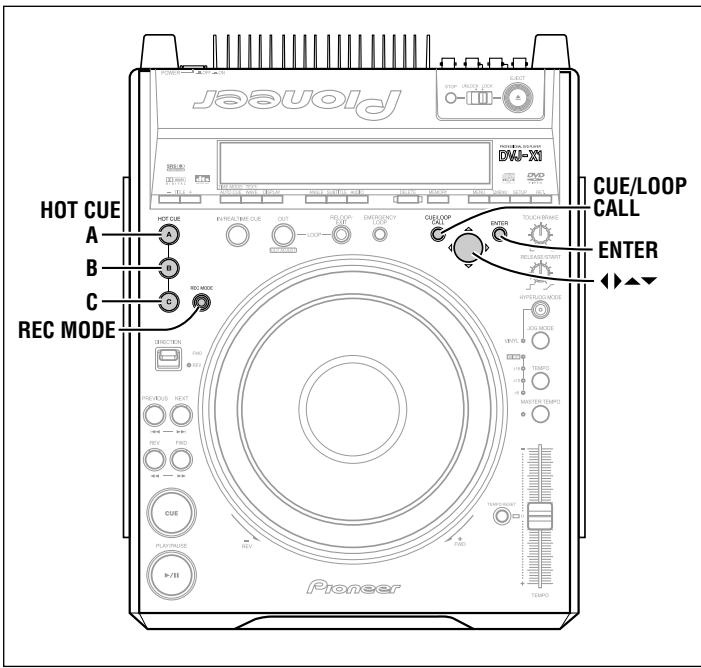
To read a cue/loop point into a hot cue
1. Press the CUE/LOOP CALL button.
- The preview monitor screen will display the cue point navigation menu.
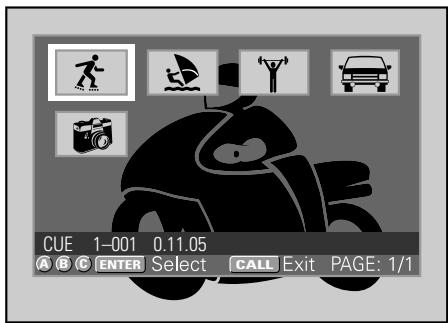
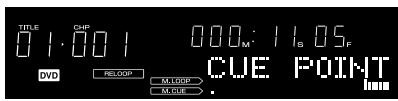
While the call screen is displayed, point information is also shown on the player's display.
- Use the cursor button to select the desired thumbnail image, and press the HOT CUE REC MODE button so that the HOT CUE A, B, and C button indicators light red. Then press the button (A, B, or C) into which you wish to store the hot cue point.

While reading data from the memory card, the main unit's display will show the "HOT*readin" message.
- Playback will begin when data reading is completed.
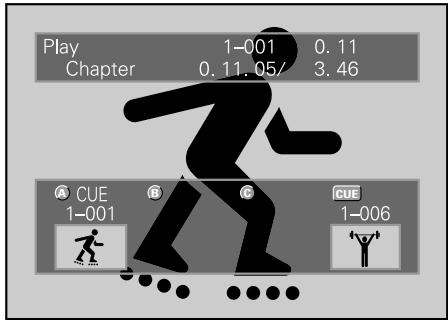
- When a copy-protected disc is loaded, the recorded points on the sub-screen cannot be stored in the memory card.
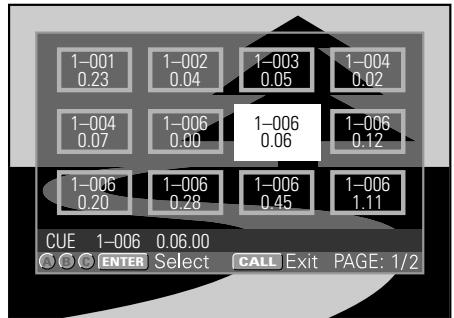
If no thumbnail image is displayed, cue point or loop point memory point time data will be displayed.
- Cue point navigation screen when CD is loaded.
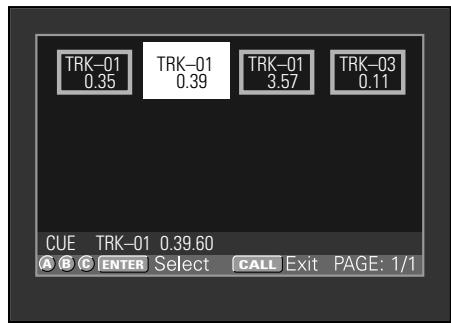
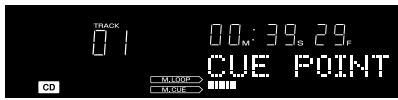
Point information is also shown on the main unit's display, allowing you to select points even without a preview monitor.
To recall a memorized hot cue point
Hot cue points A, B, and C are recorded automatically on the memory card. If hot cue points are recorded at the time a disc is inserted, the HOT CUE buttons A, B, C, will flash green. To call up one of the recorded hot cue points, press the corresponding button A, B, or C. The flashing green indicator will light steadily (when calling, sound will not begin instantly). If you have no need of calling one of the hot cue points, press the HOT CUE REC MODE button. The indicators will change to red, and the hot cue setting mode will be enabled. (To subsequently call up one of the hot cue points previously recorded on the memory card, remove the disc or memory card and reinsert it so that the A, B, and C buttons flash once again. Then press the desired flashing button).
WAVE display
When playing a track with which you have previously used the WAVE display function, the recorded WAVE pattern will automatically be recalled and displayed.
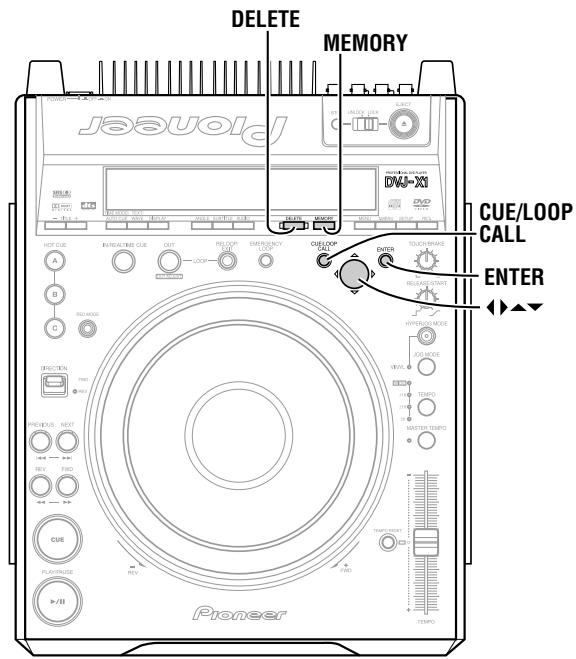
To delete information recorded on memory cards
To delete individual cue/loop points
-
Press the Cue/LOOP CALL button.
-
The preview monitor screen will display the cue point navigation menu.
-
Use the cursor button to select the thumbnail of the cue point you wish to erase, then press the DELETE button.
-
The display will show the "DELETE" message, and the selected cue point or loop point data will be erased from the memory card.
Data on MultiMedia cards formatted and recorded with the CDJ-1000 or CDJ-1000MK2 cannot be deleted in this way; the "CALL ONLY" message will appear and the delete operation will not respond.
To delete all cue/loop point information for an entire disc
- Load the disc whose cue/loop point information you wish to erase.
- Hold the DELETE button depressed for 5 or more seconds.
- The display will scroll the "DISC DELETE? PUSH MEMORY" confirmation message.
- Press the MEMORY button.
- All cue and loop data for the loaded disc will be deleted from the memory card.
- If any button other than the MEMORY button is pressed, the delete mode will be canceled.
Data on MultiMedia cards formatted and recorded with the CDJ-1000 or CDJ-1000MK2 cannot be deleted in this way; the "CALL ONLY" message will appear and the delete operation will not respond.
To delete all memory card data
-
With no disc loaded, hold the DELETE button depressed for 5 seconds or more.
-
The display will scroll the "ALL DELETE? PUSH MEMORY" confirmation message.
-
Press the MEMORY button.
-
All data will be deleted from the memory card.
- If any button other than the MEMORY button is pressed, the delete mode will be canceled.
Data on MultiMedia cards formatted and recorded with the CDJ-1000 or CDJ-1000MK2 cannot be deleted in this way; the "CALL ONLY" message will appear and the delete operation will not respond.
To copy memory card data
-
With no disc or memory card loaded: Hold the MEMORY button pressed for 5 seconds or more.
-
The display will scroll the "COPY MODE" "CARD A IN" messages.
-
Insert the original source memory card into the memory card slot.
-
The display will show the "READING" message; after several minutes, the "CARD B IN" message will appear.
-
Remove the source card and insert the target memory card.
-
Be sure to delete earlier contents of the target card to provide sufficient recording capacity.
-
The display will show the "WRITING" message, and after several minutes, the "CARD A IN" message will appear.
-
Remove the target card, and once more insert the original source card.
-
The display will show the "READING" message; after several minutes, the "CARD B IN" message will appear.
-
Repeat steps 3 and 4 as required.
-
The copying process is completed when the display shows the "COMPLETE" message.
- Copying of a full 32 MB memory card will require a maximum of 3 cycles of recording steps 3-4.
-
If the target card has insufficient memory capacity to complete the copying process, the "Capa Err" message will appear.
-
If you possess a computer with memory card reader, the reader can be used to copy your memory cards (P.40, precautions regarding memory card formatting).
Data on MultiMedia cards formatted and recorded with the CDJ-1000 or CDJ-1000MK2 cannot be copied to in this way; the "CDJ CARD" message will appear and the copy operation will not respond.
Troubleshooting
Incorrect operations can be mistaken as malfunctions. If you believe the unit is not operating correctly, consult the chart below. Sometimes incorrect operation may be due to a malfunction in another component. If the problem is not fixed, check the other components used with the player. If the problem still persists, contact your nearest Pioneer authorized service center or dealer for service.
| Symptom | Probable Diagnosis | Remedy |
| No power. | ●Power cord isn't connected. | ●Connect power cord properly. |
| Discs don't eject when the EJECT (▲) button is pressed. | ●The eject/stop mode select switch is set to LOCK. | ●Set the player to pause mode or cue standby mode then press EJECT (▲) button.●Set the eject/stop mode selector switch to UNLOCK then press EJECT (▲) button. |
| Playback doesn't start when a disc is inserted. | ●Auto cue function is set to ON. | ●Hold the TIME MODE/AUTO CUE button depressed for 1 second or more to turn the auto cue function off. |
| Playback stops immediately after starting. | ●Disc is loaded with label side down.●Disc is fogged or dirty.●The disc has a different region number. | ●Reload the disc with label side up.●Clean the disc.●Check the disc for correct region number If it is not correct, it cannot be played on this unit. |
| DVD-R, DVD-RW discs cannot be played.“NOTVIDEO FORMAT” is displayed. | ●Disc isn't recorded in video format. | ●Record disc in video format. |
| Can't play DVD. | ●Mode select switch is set to “DJ”. Some DVDs are constructed to prohibit playing in DJ mode. | ●Set mode select switch to “NORMAL”. |
| The ! marks appear. | ●Operation is prohibited by disc or player. | ●Perform correct operation. |
| Images don't appear on screen. | ●Output cables are loose or not connected correctly.●Improper operation of television or video mixer, etc.●Television connected to component video output connector does not support progressive scan. | ●Connect correctly.●Confirm settings of television or video mixer, etc.●Set component video output connector setting to [Interface]. |
| No sound. | ●Output cables are loose or not connected correctly.●Improper operation of audio mixer.●Connectors or plugs are dirty.●Player is set to pause mode. | ●Connect cables correctly.●Check audio mixer's switches and volume settings.●Clean connectors and plugs.●Press PLAY/PAUSE (▶II) button to begin playback. |
| Sound is distorted or has noise. | ●Output cables are not connected correctly.●Connectors or plugs are dirty.●Electromagnetic influence from television. | ●Connect cables correctly to audio mixer line input connectors. Do not connect to MIC connector.●Clean connectors and plugs.●Turn off television or move farther away. |
| Certain discs produce much noise. | ●Disc has large scratches.●Disc is very dirty. | ●Replace disc.●Clean disc. |
| Playback is interrupted. | ||
| DVDs and CDs produce different sound volumes. | ●Due to difference in recording formats. | ●Not a malfunction. |
| When auto cue function is ON, track search does not end. | ●If intervals between tracks is very long, track search takes longer.●If a non-recorded intervals continue for more than 10 seconds, play will not begin unless auto cue function is turned OFF. | ●Hold the TIME MODE/AUTO CUE button depressed for 1 second or more to turn auto cue function OFF. |
| During playback, back cue doesn't occur when CUE button is pressed. | ●No cue point is set.●Mode select switch is set to “NORMAL”.●With DVD, some discs do not support DJ operations during playback. | ●Set a cue point. (▶P34)●Set mode select switch to “DJ”.●Play back a part supporting DJ operations. |
| Loop play doesn't start when LOOP OUT/OUT ADJUST button is pressed. | ●Cue point (loop-in point) isn't set.●Mode select switch is set to “NORMAL”.●Cue points and angle, audio settings are different.●With DVD, some discs do not support point DJ operations during playback. | ●Set a cue point. (▶P34)●Set mode select switch to “DJ”.●Set angle and audio conditions the same.●Play a part supporting DJ operations. |
| Auto cue setting is not retained. All settings cannot be returned to their factory defaults. | ●The power was turned off right after settings were made or changed. | ●Wait 10 seconds before turning off the unit after changing settings. |
| Jog dial doesn't respond.Jog dial performs different operation from that intended. | ● Mode select switch is set to "NORMAL".● Jog mode is incorrect.Hyper-jog mode is incorrect.With DVD, some discs do not support point DJ operations during playback. | ● Set mode select switch to "DJ".● Press the JOG MODE button to select desired jog mode (VINYL ON/OFF).● Press the HYPERJOG MODE button to select desired mode.● Play a part supporting DJ operations. |
| DJ operations don't respond. | ● Mode select switch is set to "NORMAL".● With DVD, some discs or players do not support point DJ operations during playback." DISABLE DJ MODE" is displayed.With DVD, DJ operations not be possible when playback is performed from the Setup Menu. | ● Set mode select switch to "DJ".● Play a part supporting DJ operations.DJ operations are not supported here. Play a part of the disc supporting DJ operations. |
| With power ON, disc stops. | ● If left in pause mode without command input for 80 minutes or more, player automatically stops disc rotation.Disc rotation stops with disc playback completes last track. | ● Press PLAY/PAUSE (▶II) button to resume playback. Or press EJECT (▲) button to remove disc. |
| Screen images stops and commands don't respond. | ● Operations prohibited on some discs. | ● Press the STOP button, then begin playback again. |
| Setting items don't appear on Setup Menu. | ● Setup Menu is set for [Basic] mode. | ● Set Setup Menu to [Expert] mode. |
| Digital sound isn't reproduced. | ● [Dolby Digital Out] option is set to [Off].● Mode select switch is set to "DJ".During DVD play, digital sound is not output in DJ mode. | ● Set [Dolby Digital Out] option to [On].● Set mode select switch to "NORMAL". |
| 96 kHz audio is not output in digital. | ● [96kHz PCM Out] option is set to [96kHz ▷ 48kHz].Some discs prohibit 96 kHz output. | ● Set [96kHz PCM Out] option to [96kHz]. |
| DTS audio is not reproduced. | ● Amplifier or decoder does not support DTS audio. | ● Press audio button to select audio format other than DTS. |
| Image appears stretched horizontally or vertically. | ● [TV Screen] option settings are incorrect.S-terminal video output connection is incorrect. | ● Set [TV Screen] options properly.Due to television signal processing, images may appear lengthened horizontally or vertically. In this case, set [S-Video Out] option to [S1]. |
| During DVD playback, image is distorted or dark. | ● Disc is equipped with analog copy protect technology. | ● Not a malfunction. |
| Subtitles don't appear. | ● Mode select switch is set to "DJ". (Subtitles aren't displayed in DJ mode) | ● Set mode select switch to "NORMAL". |
| Can't open Setup Menu. | ● Setup cannot be performed during playback in DJ mode. | ● Stop playback before performing settings.Perform settings in NORMAL mode. |
| When angle is changed, playback is momentarily interrupted. | ● In DJ mode, a special playback mode is used so changing the angle causes temporary playback interruption. | ● Not a malfunction. |
| When audio format is changed, playback is momentarily interrupted. | ● In DJ mode, a special playback mode is used so changing the audio causes temporary playback interruption. | ● Not a malfunction. |
| Title or chapter search command doesn't respond. | ● With DVD, some discs do not support certain operations. | ● Not a malfunction. |
| Can't begin playback from title or chapter designated before loading disc. | ● With DVD, some discs require playback from a specified place. | ● Not a malfunction. |
| Cue point navigation menu doesn't display thumbnail images. | ● Disc is copy protected.No memory card is loaded.Disc loaded is CD. | ● Thumbnail images cannot be recorded in memory card when disc is copy protected.Insert memory card formatted in compliance with SD memory card standards.Thumbsail images are not displayed with CDs. |
| Can't record cue point memory. | ● Memory card was recorded on CDJ-1000, CDJ-1000MK2.No memory card is loaded.SD memory card has been set for write-protect. | ● This player supports read only with these cards.Insert memory card formatted in compliance with SD memory card standards.Set write-protect switch to allow writing to card. |
| Can't use SD memory cards. | ● SD memory card not loaded.SD memory card has been set for write-protect.SD memory card not formatted properly. | ● Insert SD memory card.Set write-protect switch to allow writing to card.Insert memory card formatted in compliance with SD memory card standards. |
- This component may fail to operate properly due to influence of static electricity or other external influences. In this case, try turning off the POWER switch, and turn on the power again only when the disc has fully stopped rotating.
This unit cannot play DVD-R or DVD-RW discs recorded in video format unless they have been finalized. - This unit cannot play DVD-RW discs recorded in VR format.
- This unit cannot play partially recorded CD-R or CD-RW discs that have not been finalized.
This unit plays only standard 12 cm discs and 8 cm discs mounted in proper disc adapters; it cannot play irregularly shaped discs (damage or malfunctions may occur). - When playing 8cm discs mounted on adapters, some speed loss may be experienced when using scratch and reverse operations. This unit for high performance when rotating discs at high speed, but when 8cm discs are mounted in adapters, the rotation speed is reduced for safety. This is not a malfunction.
- BPM values measured with this unit may differ from published values found on DVD or CD labels, or those measured on Pioneer DJ mixers. This is a result of differences in BPM measuring methods, and is not a malfunction.
- When playing DVD-R/RW or CD-R/RW discs, some degradation in performance may be experienced depending on the recording quality of the individual disc.
This unit supports analog copy-protection technology. Some discs include copy-protection signals and when such discs are played, some images may display horizontal stripes or other distortions, this is not a malfunction. Also, when viewing or recording images through a VTR, the copy guard device may prevent proper playback. - In DJ mode, the following option values change, regardless of the setting of the Setup Menu.
Setup Menu item
Setting value
[4:3(letterbox)] (The 4:3(Pan&Scan) format is not supported in DJ mode.)
[Auto]
[Off]
- When playing DVDs, the same disc may display different playback patterns when played in DJ mode and NORMAL mode.
- SD memory cards formatted using ordinary computer OS formatting software are not generally compatible with SD memory card standards.
Error message display
When the unit is unable to operate properly, an error code is displayed on the display panel. Check the error code displayed against the following table and take the recommended action to correct the error. If an error code other than any of the error codes listed in the table below is displayed or if the same error code is displayed even after corrective action has been taken, contact your nearest Pioneer Service Station or contact the store from which you purchased your player for assistance.
| Error code | Error type | Error content | Cause and remedy |
| E-72 01 | TOC READ ERROR | Can’t read TOC data. | Disc is cracked. → Replace disc. |
| E-83 01 E-83 02 E-83 03 | PLAYER ERROR | Can’t play this disc properly. | Disc is dirty. → Clean disc. If other discs operate normally, problem is with this disc. |
| E-91 01 | MECHANICAL TIME OUT | Mechanical operation did not end within specified time. | Foreign object in disc loading slot. → Remove foreign object. Turn the power to the DVJ-X1 OFF then ON again. |
| E-72 02 | WRONG REGION NO. | Does not match supported region number. | Confirm the region number for the disc. Discs cannot be played if their region number is not supported. |
Dot Matrix Guide Display Messages
| Message | Event/Display Timing |
| LOAD IN | During disc loading |
| END | When disc completes playback |
| EJECT | When EJECT (▲) button is pressed |
| NO DISC | When eject is completed |
| STOP | When STOP button is pressed |
| STILL | DVD NORMAL mode: Displayed during still mode of disc data |
| RESUME | DVD NORMAL mode: Displayed during resume mode |
| PLAY | DVD NORMAL mode: Displayed during playback |
| PAUSE | DVD NORMAL mode: Displayed during pause |
| SEARCH | DVD NORMAL mode: Displayed during chapter or title search |
| ▶▶1,▶▶2,▶▶3 | DVD NORMAL mode: Displayed during forward-direction search |
| ←1,←2,←3 | DVD NORMAL mode: Displayed during reverse-direction search |
| DISABLE DJ MODE | DVD DJ mode: Displayed during those parts of playback when DJ operations are not supported |
| NOT VIDEO FORMAT | This DVD is not recorded in video format (VR format, DVD-audio, etc.) |
| SETUP | When calling Setup Menu |
| MENU | During display of menu, top menu |
| NO TEXT | When beginning playback of disc that contains no text display |
| NORMAL | During NORMAL mode or when attempting to perform operation not supported in NORMAL mode. |
| DJ MODE | When switching to DJ mode |
| SD CARD | When loading an SD formatted memory card |
| CDJ CARD | When loading a memory card formatted on CDJ-1000 or CDJ-1000MK2 |
| ****DISCS | When inserting memory card: displayed after above message, indicating number of discs recorded |
| READ ERROR | Inserted card has damaged data |
| CARD ERROR | When inserted card is damaged; also displayed during abnormal event when reading or writing data to card |
| UNFORMAT | When card format not compatible with SD memory standards |
| MEMORY | When recording cue/loop point |
| NO PICTURE | When attempting to record point on copy-protected disc |
| CALL ONLY | When attempting to record to card formatted on CDJ-1000 or CDJ-1000MK2 |
| CARD FULL | Insufficient card space for further recording |
| PROTECTED | Card's write-protect switch is set to LOCK |
| NO CARD | No card loaded |
| Message | Event/Display Timing |
| POINT FULL | 100 cue/loop points have been recorded |
| CUE POINT | During cue point navigation: cue point data selected |
| LOOP POINT | During cue point navigation: loop point data selected |
| NO POINT | During cue point navigation: no cue data recorded |
| CUE readin | During cue point navigation: reading cue point data |
| LOOP readin | During cue point navigation: reading loop point data |
| HOT A readin | During cue point navigation and after inserting disc: reading hot cue point data |
| HOT B readin | During cue point navigation and after inserting disc: reading hot cue point data |
| HOT C readin | During cue point navigation and after inserting disc: reading hot cue point data |
| COPY-MODE | External memory card copying mode |
| CARD A IN | During copy mode: request for insertion of source card |
| READING | During copy mode: reading source card |
| CARD B IN | During copy mode: request for insertion of target card |
| WRITING | During copy mode: writing to target card |
| COMPLETE | During copy mode: copying complete |
| Capa Err | Insufficient space on target card |
| PROTECTED | Target card's write-protect switch is set to LOCK |
| CARD ERROR | Malfunction during attempted write |
| UNFORMAT | Attempt to write to unformatted card |
| READ ERROR | Loaded card has damaged data, or data malfunction discovered during attempt to read |
| NO DATA | No data recorded on source card. |
| DISC DELETE ? PUSH MEMORY | Confirmation request when deleting disc point data |
| ALL DELETE ? PUSH MEMORY | Confirmation request when deleting all card data |
| DELETE | When deleting card contents |
| A.CUE -36dB | Auto cue level setting -36 dB |
| A.CUE -42dB | Auto cue level setting -42 dB |
| A.CUE -48dB | Auto cue level setting -48 dB |
| A.CUE -54dB | Auto cue level setting -54 dB |
| A.CUE -60dB | Auto cue level setting -60 dB |
| A.CUE -66dB | Auto cue level setting -66 dB |
| A.CUE -72dB | Auto cue level setting -72 dB |
| A.CUE -78dB | Auto cue level setting -78 dB |
Specifications
1. General
System DVD-Video, CD
Power requirements AC 220 - 240 V, 50/60 Hz
Power consumption 47 W
Operating temperature. +5^ to +35^
Operating humidity. 5% to 85%
(There should be no condensation of moisture.)
Weight 7.3 kg
Dimensions 348 (W) × 451 (D) × 128 (H) mm
2. Video Output
Composite output (2)
Output level 1 V p-p (75 Ω)
Jack RCA jack(1), BNC jack(1)
S-Video output
CB/PB,CR/PR 0.7Vp-p(75Ω)
Jack BNC jack
3. Preview Video Output
Composite output
Output level 1 V p-p (75 Ω)
Jack .RCA jack
S-Video output
Output level 2 V rms (1 kHz, 0 dB)
Jack RCA jack
Digital audio output
Frequency response (CD) 4 Hz - 20 kHz
Frequency response (DVD, 96 kHz) 4 Hz - 44 kHz
Signal-to-noise ratio 115 dB or more (JEITA)
Distortion 0.006% (JEITA)
Jack RCA jack
5. Other jacks
CONTROL jack............ Mini phone jack (3.5 0)
SYNC IN jack BNC jack
6. Accessories
- SD memory card. 1
Audio cable 1
Video cable 1
Control cord 1
Power cord 1 - Forced eject pin 1
(housed in a groove in the bottom panel)
- Operating instructions 1
Note:
Specifications and design are subject to possible modification without notice.
Published by Pioneer Corporation.
Copyright © 2004 Pioneer Corporation.
All rights reserved.
| Audio1 | A2 | Video1 | V2 | Language | General |
| OSD Language | ■English français Deutsch Italiano Espanol | P.25 | |||
| Audio Language | ■English French German Italian Spanish Other | P.25 | |||
| Subtitle Language | ■English French German Italian Spanish Other | P.26 | |||
| Auto Language | ■On Off | P.26 | |||
| DVD Language | ■w / Subtitle Language English French German Italian Spanish Other | P.26 | |||
| Subtitle Display | ■On Off Assist Subtitle | P.27 | |||
| Subtitle Off | ■Selected Subtitle | P.27 | |||
| Audio1 | A2 | Video1 | V2 | Language | General |
| Setup Menu Mode | Expert | ||||
| ■Basic | |||||
| Setup Navigator | Start | ||||
| Parental Lock | Password (Change) | ||||
| Level | |||||
| Country Code | |||||
Publication de Pioneer Corporation.
2004 Pioneer Corporation.
Language (OSD Language) TV Connection (TV Type) Amp Connection
| Audio1 | A2 | Video1 | V2 | Language | General |
| OSD Language | ■ English frangs | S.25 | |||
| ■ français | |||||
| Deutsch | |||||
| Italiano | |||||
| Espanol | |||||
| Audio Language | ■ English French | S.25 | |||
| ■ German | |||||
| Italian | |||||
| Spanish | |||||
| Other | |||||
| Subtitle Language | ■ English French | S.26 | |||
| ■ German | |||||
| Italian | |||||
| Spanish | |||||
| Other | |||||
| Auto Language | ■ On Off | S.26 | |||
| DVD Language | ■ w / Subtitle Language | S.26 | |||
| English | |||||
| French | |||||
| German | |||||
| Italian | |||||
| Spanish | |||||
| Other | |||||
| Subtitle Display | ■ On Off | S.27 | |||
| Assist Subtitle | |||||
| Subtitle Off | With Audio | S.27 | |||
| ■ Selected Subtitle | |||||
| Audio1 | A2 | Video1 | V2 | Language | General |
| Setup Menu Mode | Expert | ||||
| ■Basic | |||||
| Setup Navigator | Start | ||||
| Parental Lock | Password (Change) | ||||
| Level | |||||
| Country Code | |||||
w/Subtitle Language:
| Audio1 | A2 | Video1 | V2 | Language | General |
| OSD Language | ■English français Deutsch Italiano Espanol | ||||
| Audio Language | ■English French German Italian Spanish Other | ||||
| Subtitle Language | ■English French German Italian Spanish Other | ||||
| Auto Language | ■On Off | ||||
| DVD Language | ■w / Subtitle Language English French German Italian Spanish Other | ||||
| Subtitle Display | ■On Off Assist Subtitle | ||||
| Subtitle Off | ■Selected Subtitle | ||||
| Audio1 | A2 | Video1 | V2 | Language | General |
| Setup Menu Mode | Expert | ||||
| ■Basic | |||||
| Setup Navigator | Start | ||||
| Parental Lock | Password (Change) | ||||
| Level | |||||
| Country Code | |||||
Apparil menu Picture Quality Controls.

3. Scegliere [Video Memory Select] e premere ENTER.
![PIONEER DVJ-X1 - Scegliere [Video Memory Select] e premere ENTER. - 1](/content/2025/01/76095/images/ad6a42dbf97967c7c710d1a299fef34fd8b826e881e9b1f77b7b497eed305e23.jpg)
Apparil menu Picture Quality Controls.
![PIONEER DVJ-X1 - Scegliere [Video Memory Select] e premere ENTER. - 2](/content/2025/01/76095/images/dbe01aab8a5e09e48f11da04fb39058e026cb3ee561408864ddc080032ecf976.jpg)
w/Subtitle Language:
Copyright © 2004 Pioneer Corporation.
TOONHOOGTE-VERBUIGING
ACHTERWAARTSE WEERGAVE
REAL-TIME CONTINUE LOOPS
WAARSCHUWING NETSNOER
- Auto-cue indicator (A.CUE)
- Loop-geheugenindicator (M.LOOP)
| Audio1 | A2 | Video1 | V2 | Language | General |
| OSD Language | ■English français Deutsch Italiano Espanol | ||||
| Audio Language | ■English French German Italian Spanish Other | ||||
| Subtitle Language | ■English French German Italian Spanish Other | ||||
| Auto Language | ■On Off | ||||
| DVD Language | ■w / Subtitle Language English French German Italian Spanish Other | ||||
| Subtitle Display | ■On Off Assist Subtitle | ||||
| Subtitle Off | With Audio ■Selected Subtitle | ||||
| Audio1 | A2 | Video1 | V2 | Language | General |
| Setup Menu Mode | Expert | ||||
| ■Basic | |||||
| Setup Navigator | Start | ||||
| Parental Lock | Password (Change) | ||||
| Level | |||||
| Country Code | |||||
Alle installingen terugzetten op de fabrieksinstallingen
w/Subtitle Language:
2. Selecteer [List of Language] of [Code].
4. Selecteer [List of Codes] of [Code].
Copyright © 2004 Pioneer Corporation.
BUCLE CONTINUO EN TIEMPO REAL
Delete Changes (Borrar candidos):
| Audio1 | A2 | Video1 | V2 | Language | General |
| OSD Language | ■English français Deutsch italiano Espanol | P.25 | |||
| Audio Language | ■English French German Italian Spanish Other | P.25 | |||
| Subtitle Language | ■English French German Italian Spanish Other | P.26 | |||
| Auto Language | ■On Off | P.26 | |||
| DVD Language | ■w / Subtitle Language English French German Italian Spanish Other | P.26 | |||
| Subtitle Display | ■On Off Assist Subtitle | P.27 | |||
| Subtitle Off | With Audio ■Selected Subtitle | P.27 | |||
| Audio1 | A2 | Video1 | V2 | Language | General |
| Setup Menu Mode | Expert | ||||
| ■Basic | |||||
| Setup Navigator | Start | ||||
| Parental Lock | Password (Change) | ||||
| Level | |||||
| Country Code | |||||